
Old Testament KJV BIble Crafts
Click on the links below to print a PDF of the craft you wish to use. You can also find our crafts on Pinterest and you can follow us on Facebook.
PLEASE NOTE YOU MAY HAVE TO CHANGE PRINTING PREFERENCES IN ORDER TO PRINT THE PDF'S, FOR EXAMPLE TO PRINT IN COLOUR, TO PRINT AS LANDSCAPE, TO THE CORRECT SCALE ETC.
A range of Old Testament crafts are provided free of charge to print, these include a series on Daniel and a series on the life of David. There are other crafts relating to Joseph, Josiah, Rahab, Jonah, and others.
Daniel Chapter 1 - A Purposed Heart
This craft is based on Daniel chapter 1.
Daniel and his three friends found themselves in a foreign land against their will, presented with foods that they believed would not be pleasing to God. They bravely ask to eat just pulses, generally thought to be food grown from seeds, and to drink water. There is also a colouring sheet available to print based on this same passage.
The free PDF printable template is found here.
Light card (160gM2) works well in most printers without sticking.
Carefully cut out the shapes on the above PDF printable template.
Use the carrot body and carrot tops templates as a pattern to cut out an orange carrot body and green carrot tops from some coloured card. Light card is ideal, heavy card will not fold well and crease badly.
Using the template as a guide, cut some lines into the green carrot top shape, as shown in the picture to the right.
Stick the green carrot top onto the inside of the orange carrot body, roughly as shown by the dotted lines on the printed template.
Fold the cone as shown in the picture and secure with double sided tape, staples or glue.
Colour the corn on the cob yellow and colour the verse text box.
Using the templates for corn leaves, cut out two leaves from a sheet of green card or paper. As before, heavy card will not work well.
Stick the two green leaves onto the corn as shown in the picture, only stick down at the bottom of the leaves as shown, leaving the tops loose.
Using a pencil, wrap the top of the leaves round it one at a time, to create a curly effect as shown in the picture.
Now stick each item onto a paper plate or page as shown in the picture.
I also used a hole punch to create holes for a pipe cleaner handle to hang the craft up with.

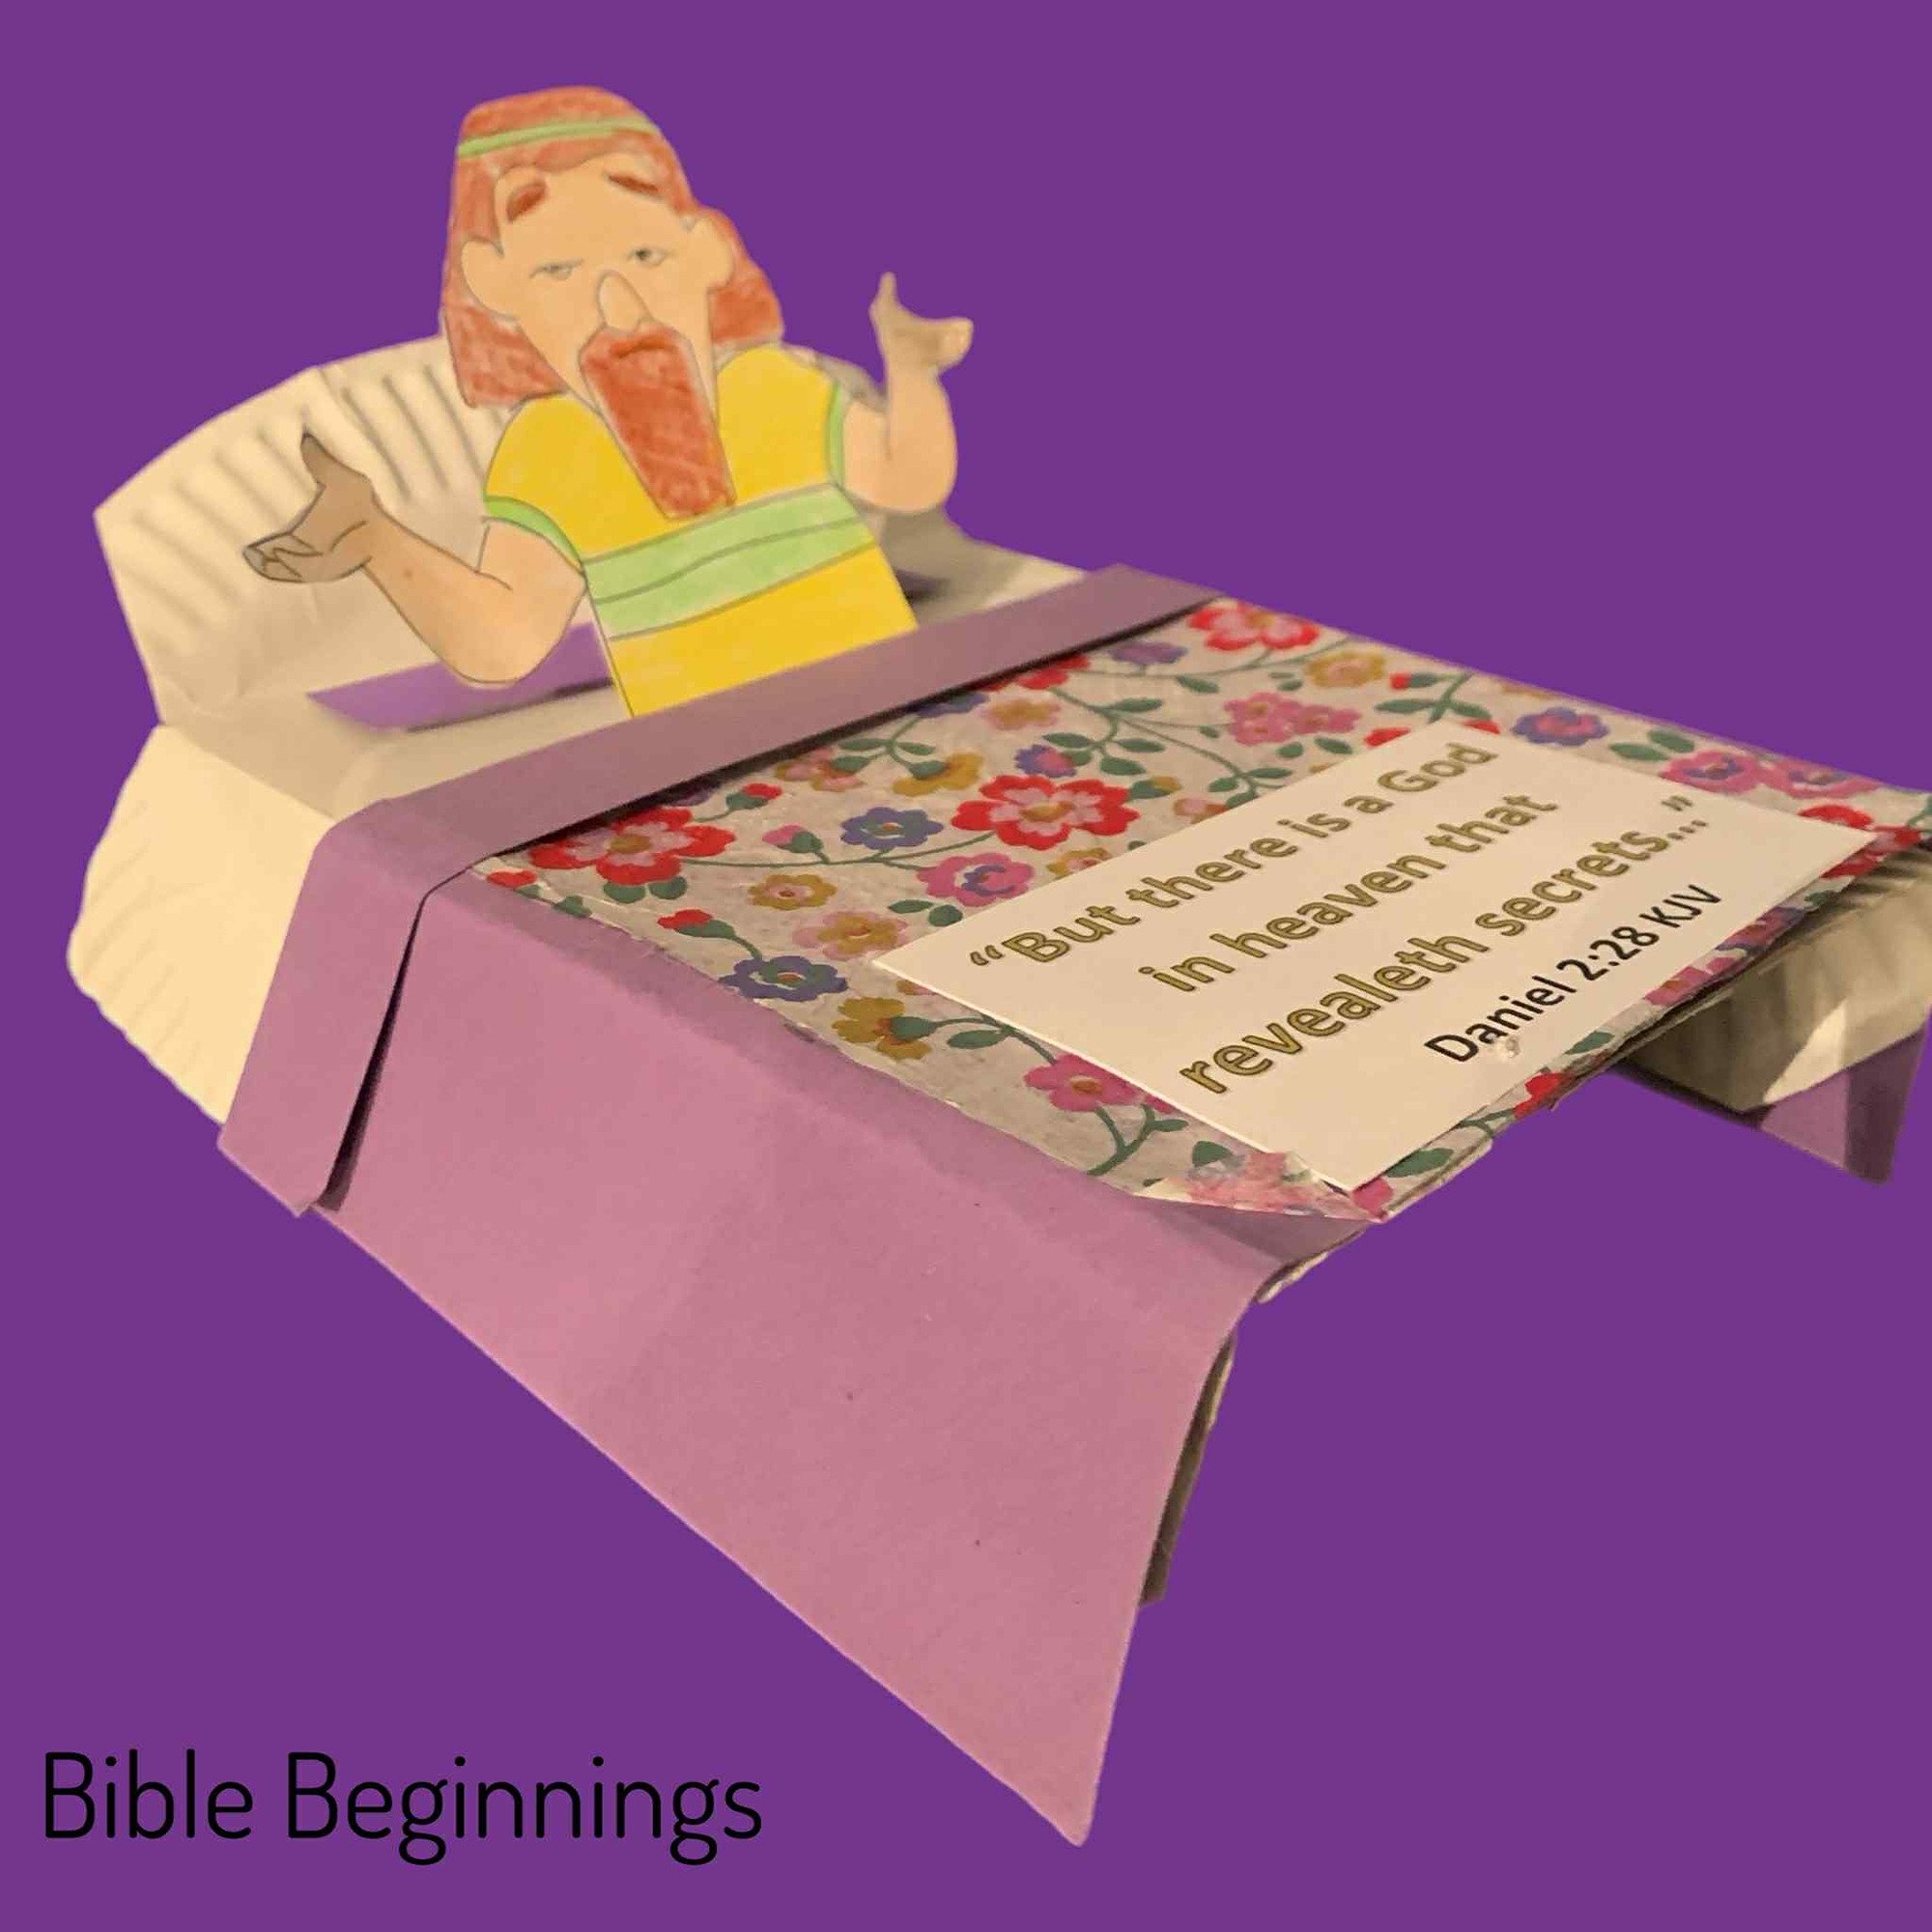
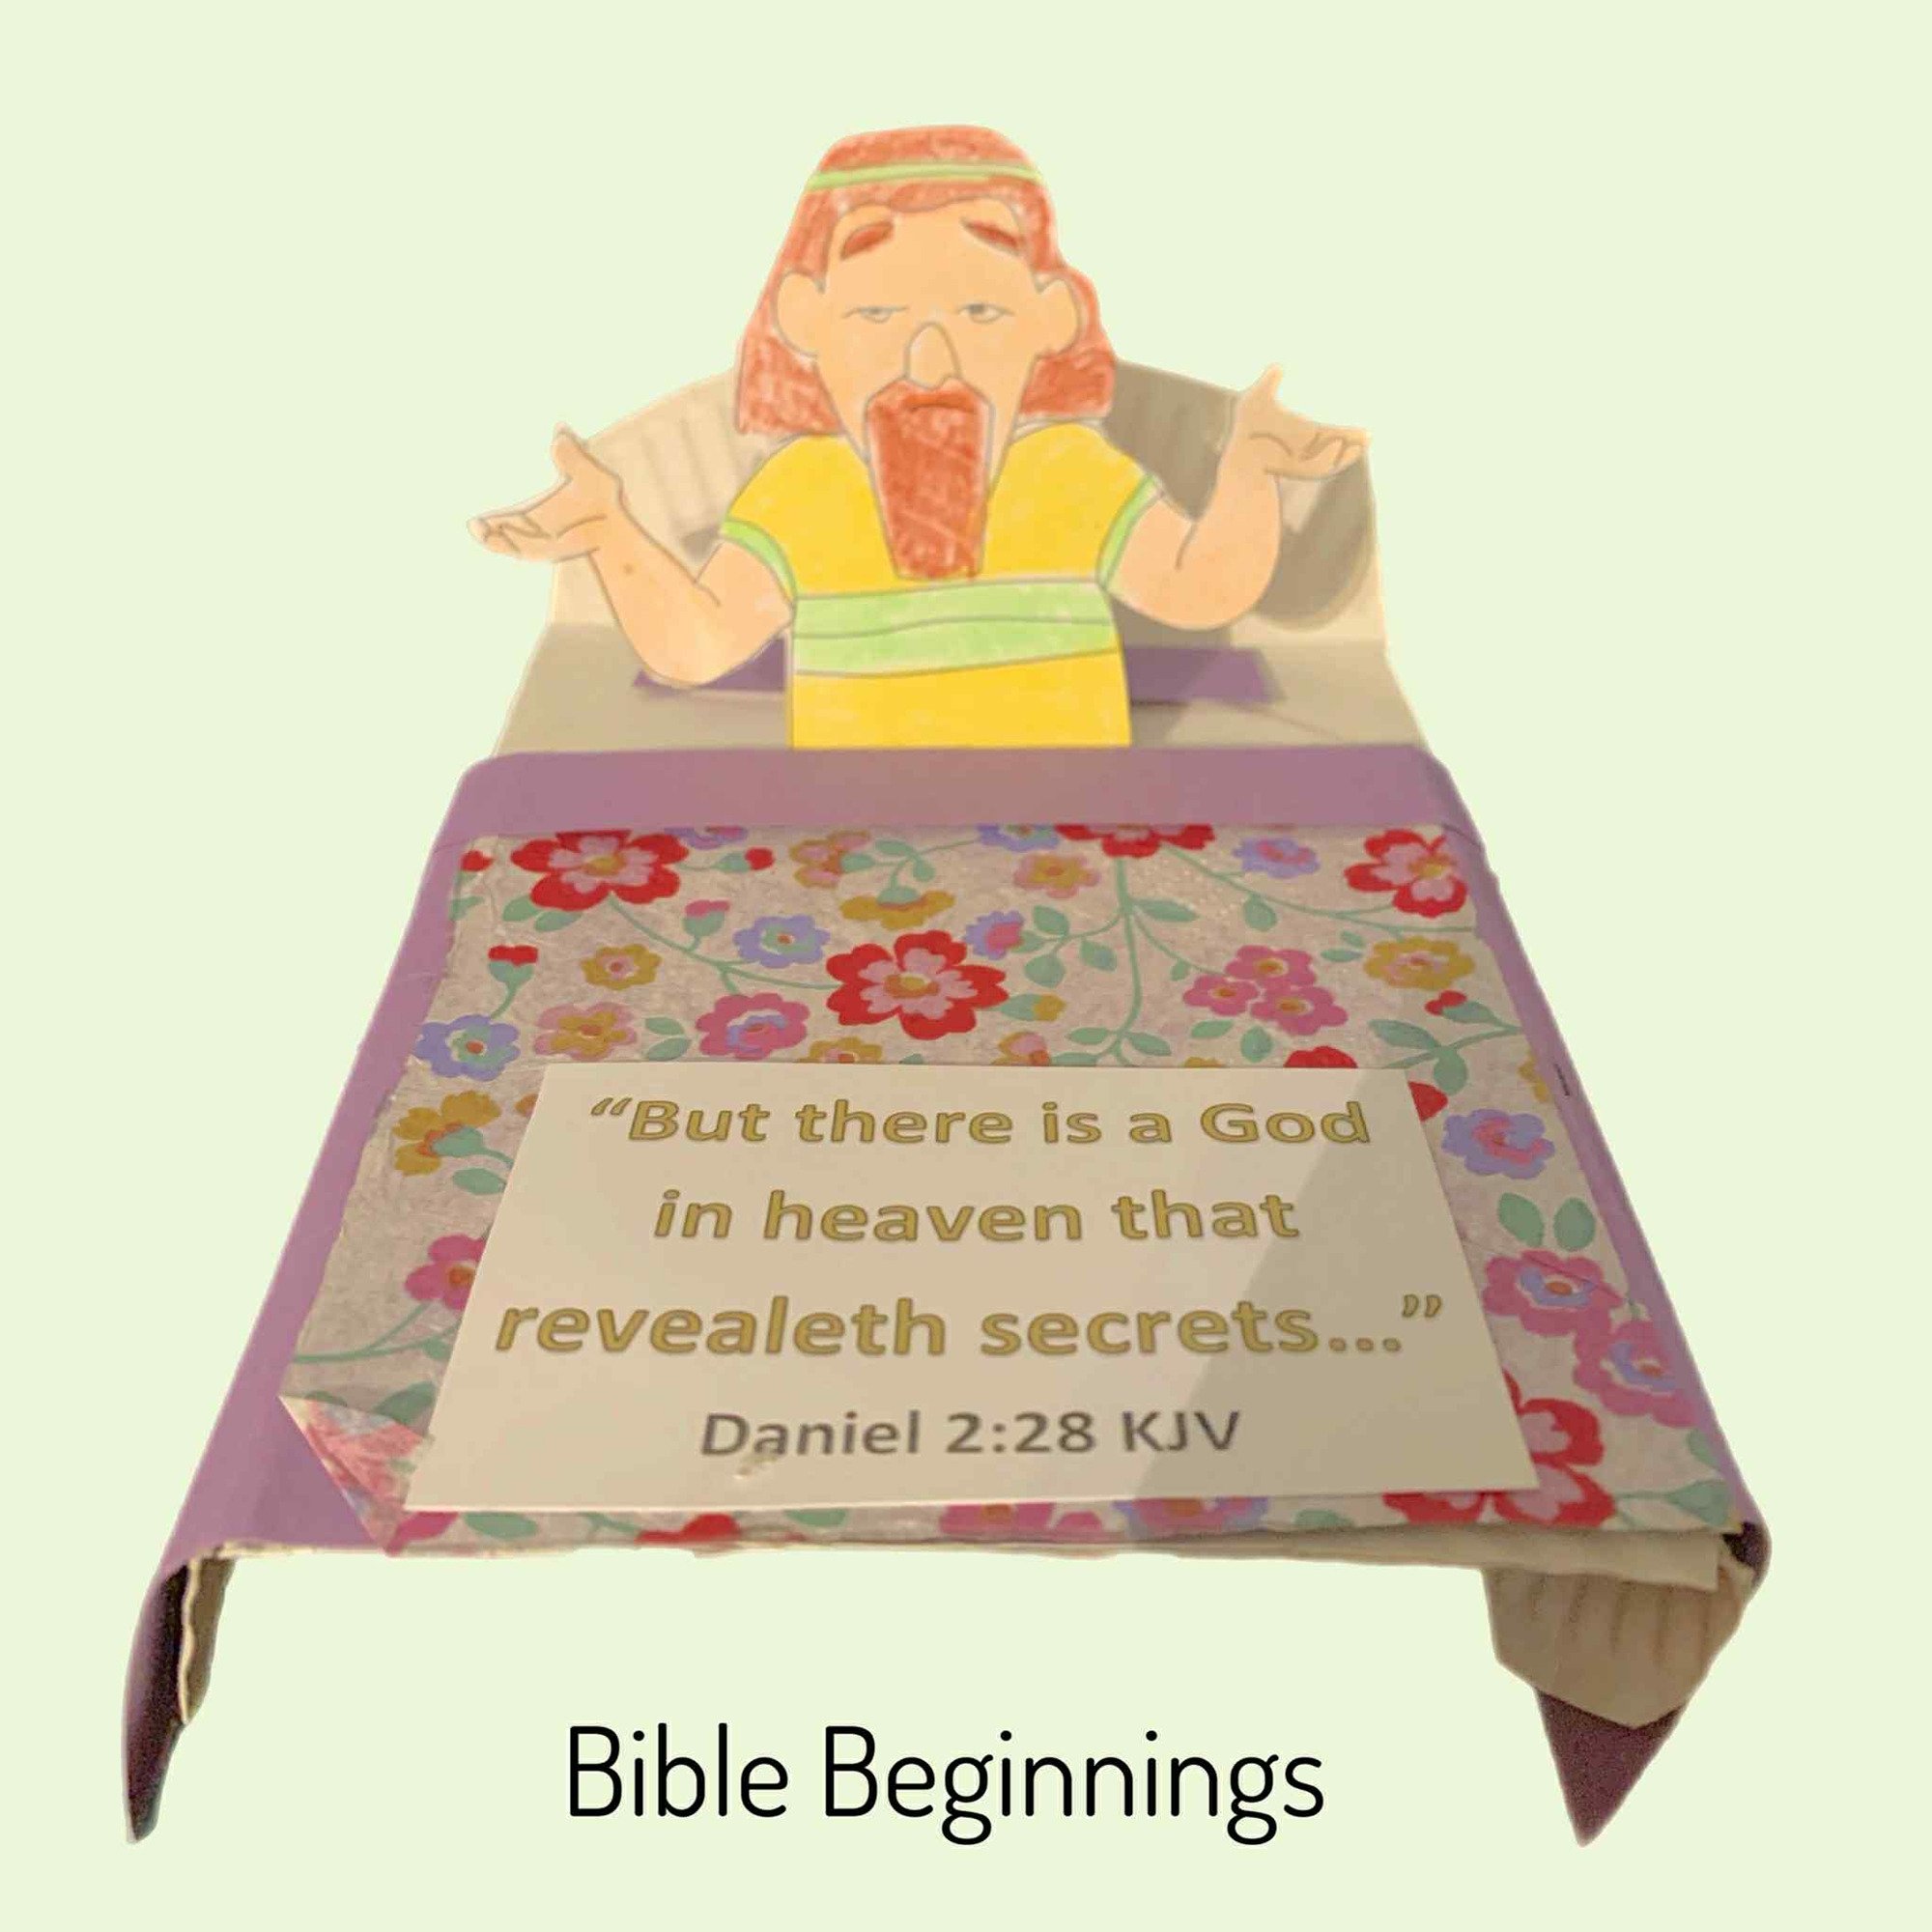
Daniel Chapter 2 Dream's and Secrets!
This craft is based on Daniel chapter 2.
King Nebuchadnezzar had dreams that were troubling him and keeping him awake at night. None of the "wise" men could tell him the meaning of his dreams, he was very angry, and threatened to kill all the wise men of Babylon. Daniel went to the King and bravely offered to help, God answered prayer and Daniel was able to tell the King that there is a God in Heaven that revealeth secrets!
The FREE printable template for this craft is found HERE.
Light card (160gM2) works well in most printers without sticking.
You will need the printable PDF availbale above, a paper plate (23cm/9inch approx), coloured card OR decorative napkin OR fabric, glue stick, sticky pads and scissors.
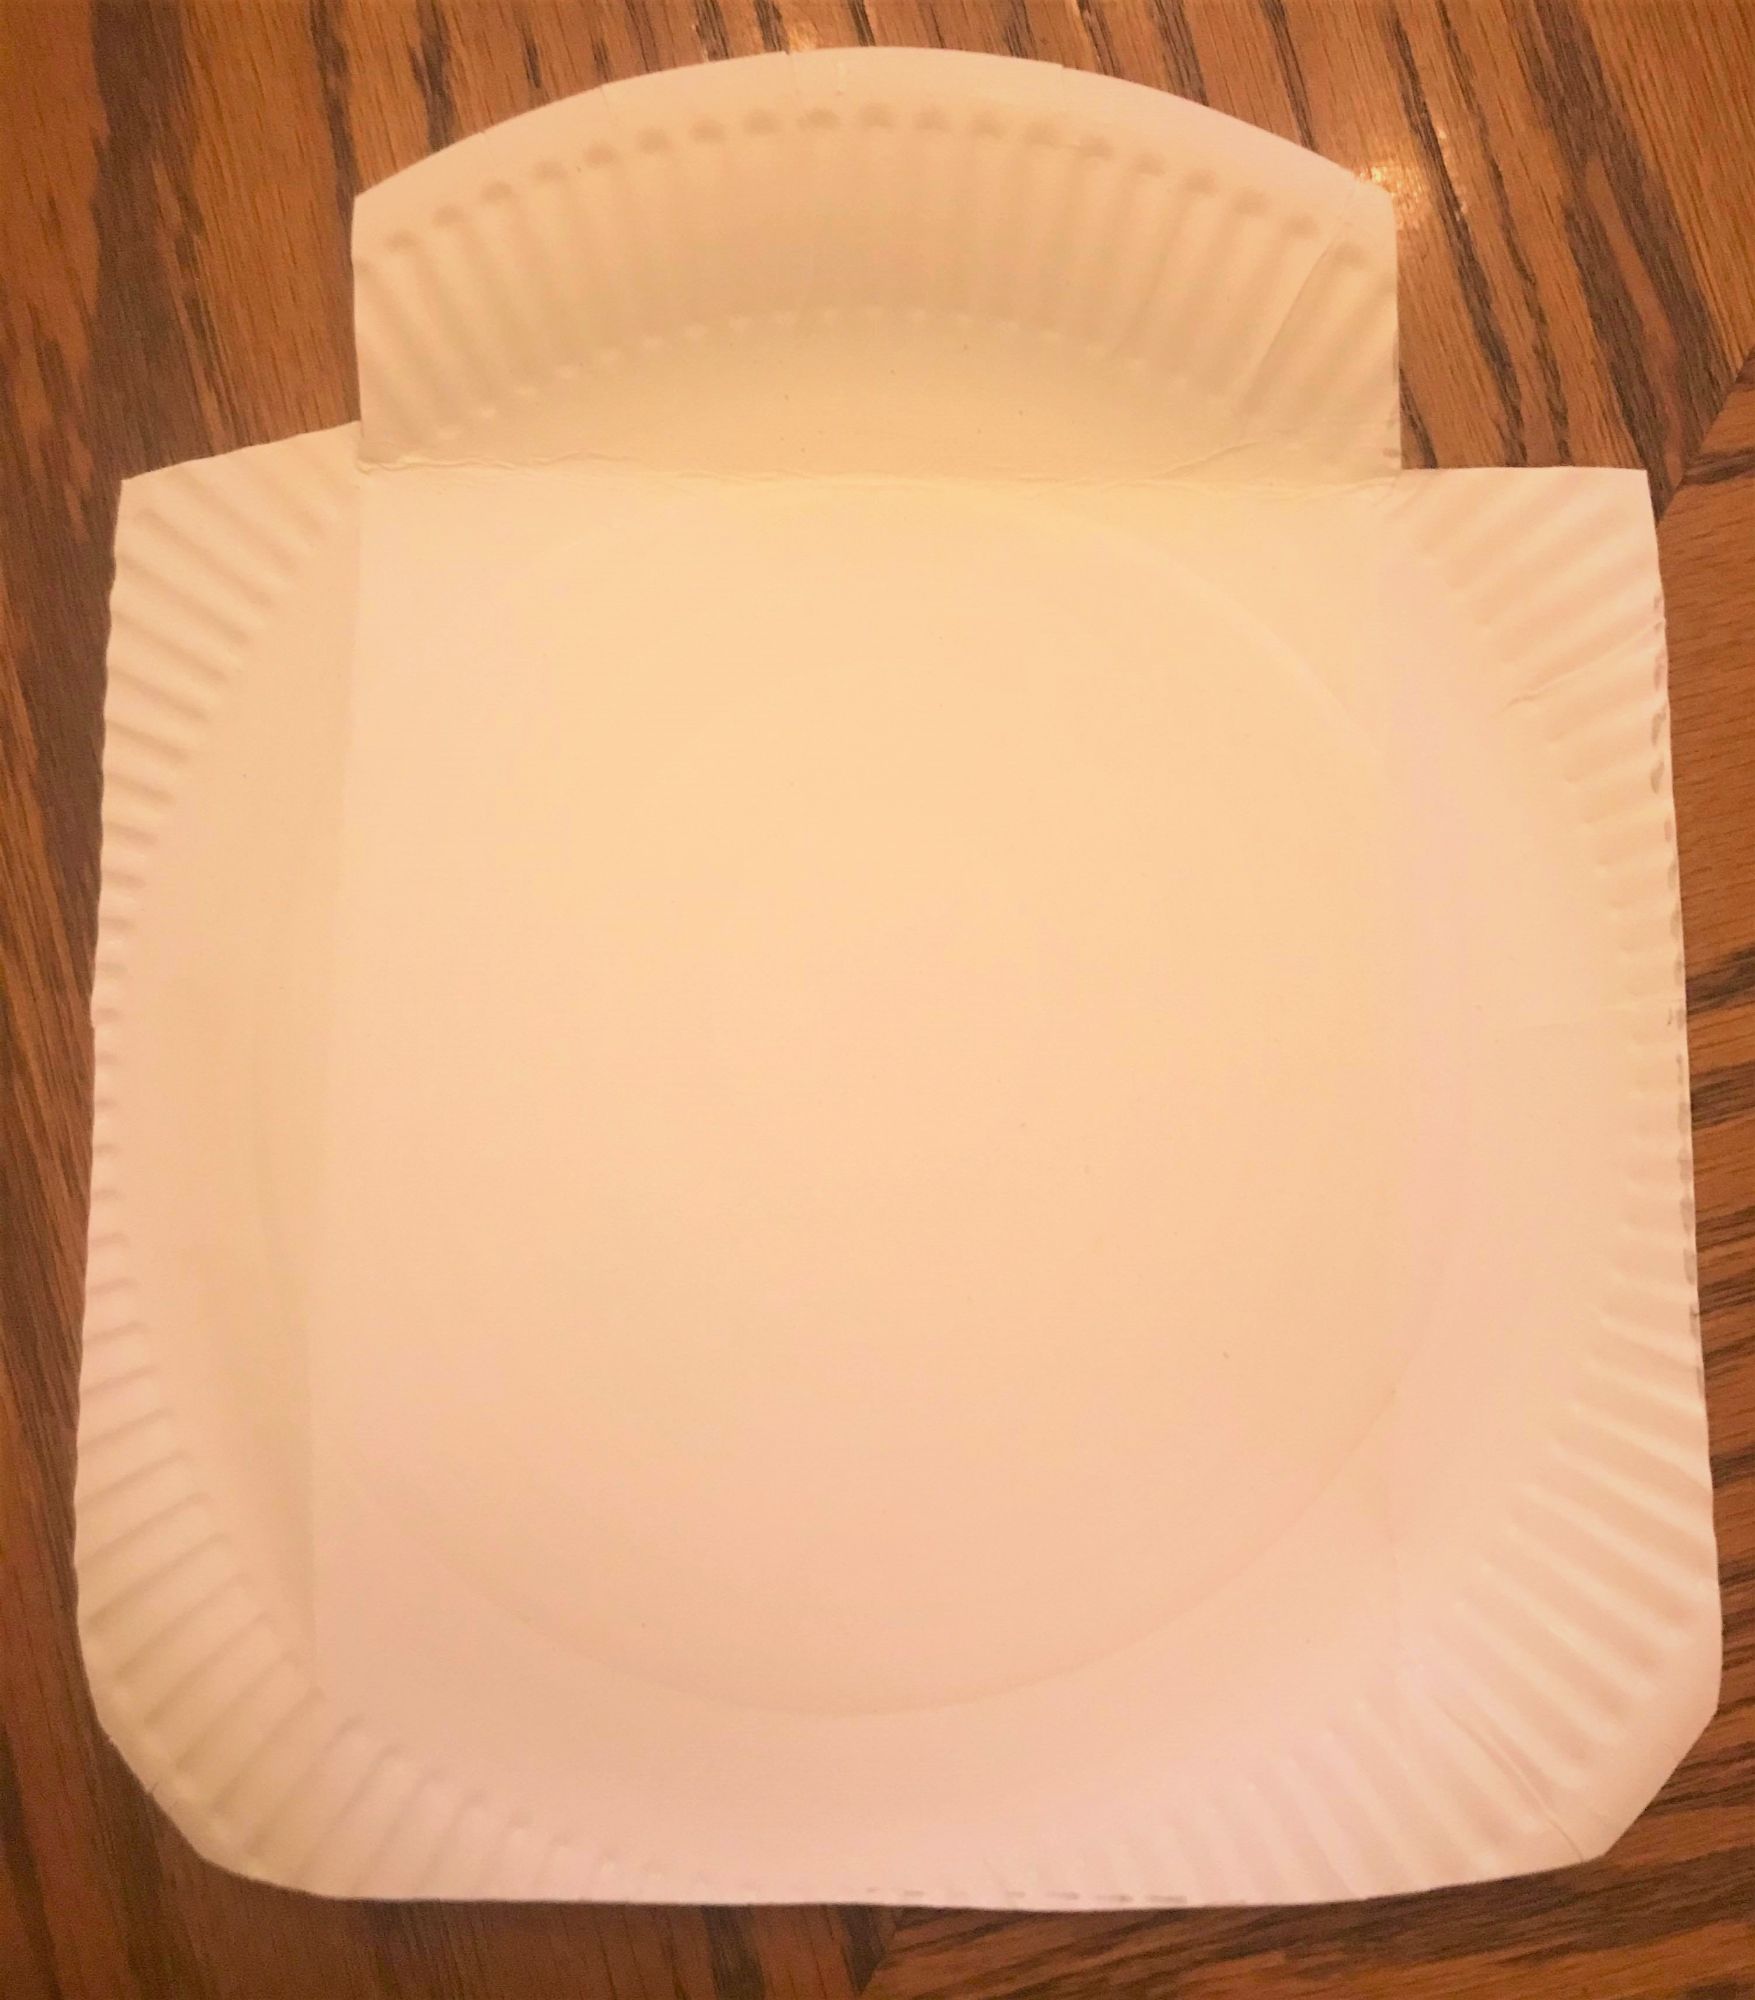
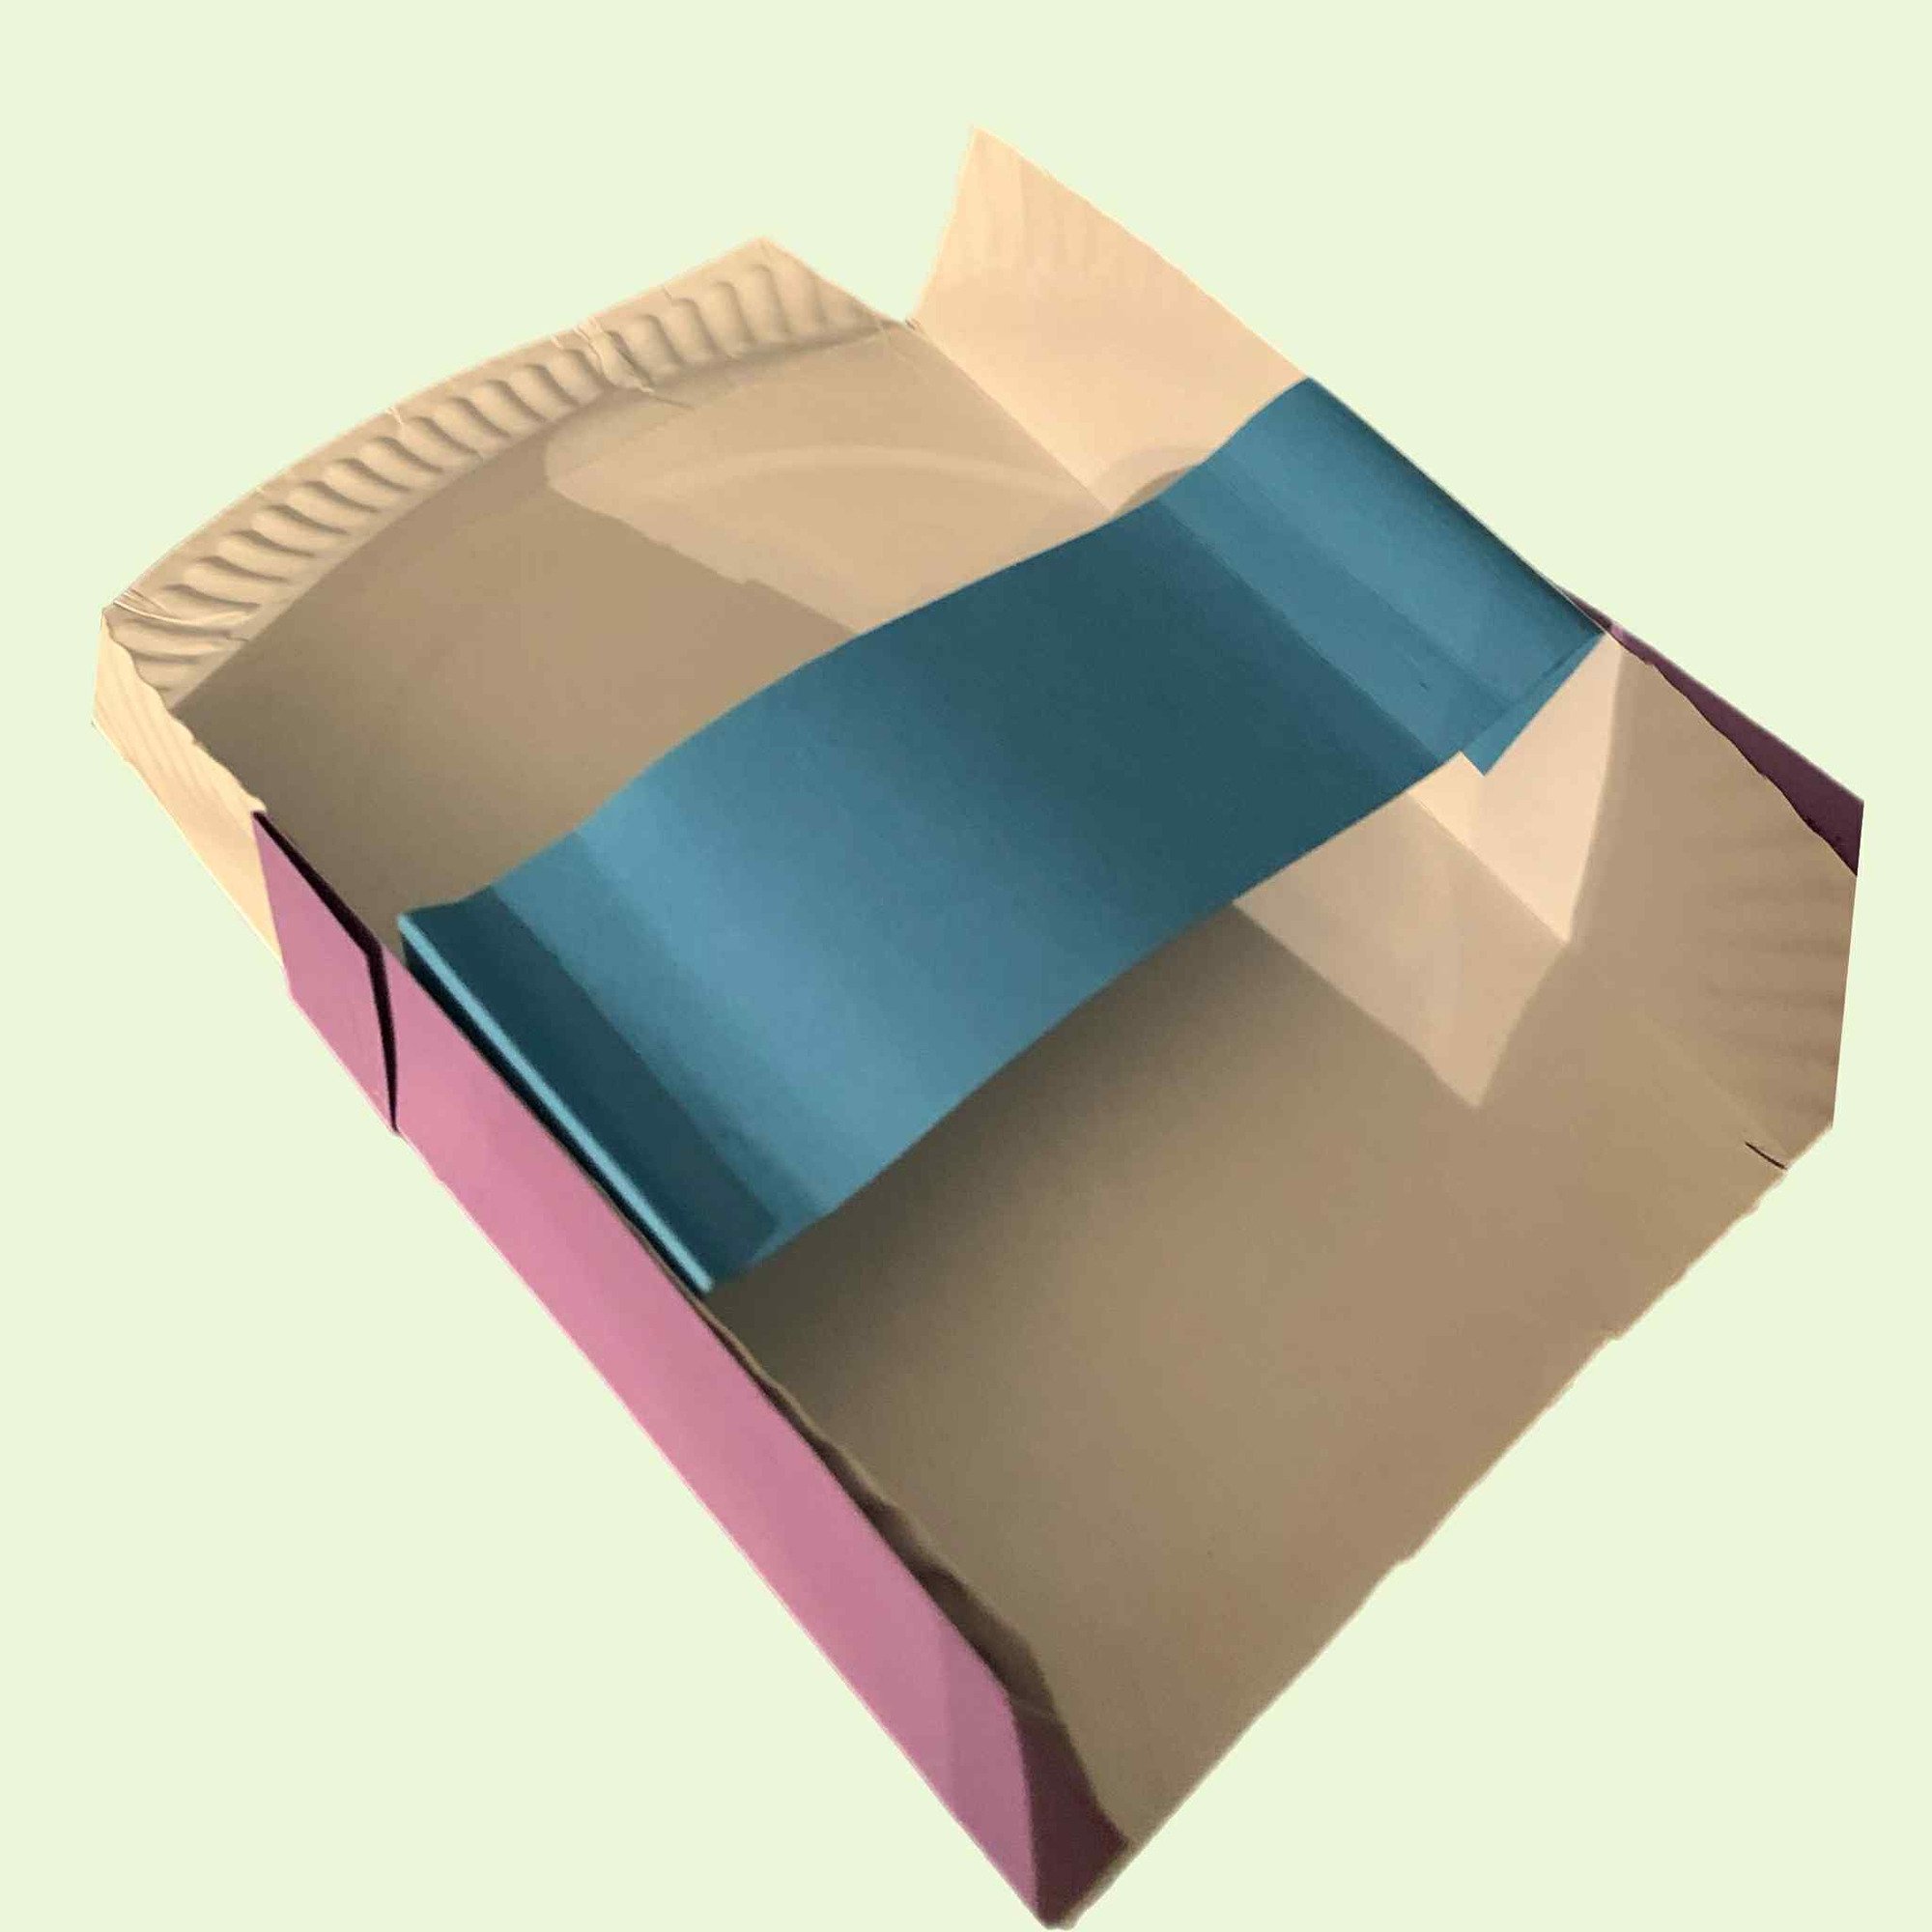
Trim three edges of the paper plate to make three straight sides. You can snip with the scissors 2cm inwards at the bottom of the plate, draw a line across to the sides from this slit, and then cut that section off, repeat on the two sides. See picture.
Then, as shown in the picture, cut out two triangles at the top two sides of the plate. Fold the top flap upwards to create the headboard of the bed.
Fold the two side flaps downwards to create the sides of the bed.
Cut out a piece of card approx. 8cm X 3cm and create a pillow, you could cover it to match the rest of the bed (see steps below for bed linen). Use sticky pads to stick the pillow in place.
Cut out the King figure from the PDF printable sheet and the verse of Scripture. Colour in the King.
Fold forwards a 2cm flap at the bottom of the King's body and use this flap to stick the King to the bed, sitting upright. You could use double sided tape. Bend his arms at the elbows.
Measure the width and breadth of the bed (exclude headboard section) and cut out a piece of either decorative card, plain card to colour, pretty napkin or fabric to create a bed linen. Stick at the sides leaving the covers loose on the top of the bed.
Stick down the Scripture text from the printable PDF.
You may wish to measure and cut a piece of paper/light card to fit across the bottom of the bed underside, see pictures. This can be stapled in place to stop the bed flopping flat.
Daniel Chapter 3 - Faith In The Fiery Furnace! Craft Number 1
This craft is based on Daniel chapter 3.
The King made a huge golden image of himself and invited a large crowd of important leaders and rulers to come together when it was finished. Daniel's three friends, Shadrach, Meshach and Abednego are invited. The King had an announcement made that when music was played, all people must bow down and worship the golden image. The three friends did not bow down, they only worshipped the one true God. The King was furious, the faithful friends were cast into the furnace, but they were not alone, God was with them and they were unharmed.
The free printable PDF template is found by clicking here.
LIGHT CARD 160GM2 WORKS IN MOST PRINTERS
- You will need the PDF from above printed on white card, some yellow, orange and red light card or heavy paper, glue stick, stapler, scissors, crayons and stickers if desired.
- Colour the printed PDF template of the furnace, red/brown bricks look good as in the picture.
- Draw around the child's hand on some yellow, orange and red card. You need four or five hands cut out, a mix of colours looks best.
- Staple or glue the hand cut outs along the back of the A4 furnace template so that they look like flames coming up out of it.
- Fold the furnace A4 sheet into a circle as shown in the picture and secure with glue and staples if needed for extra hold.
- Decorate with stickers if desired.

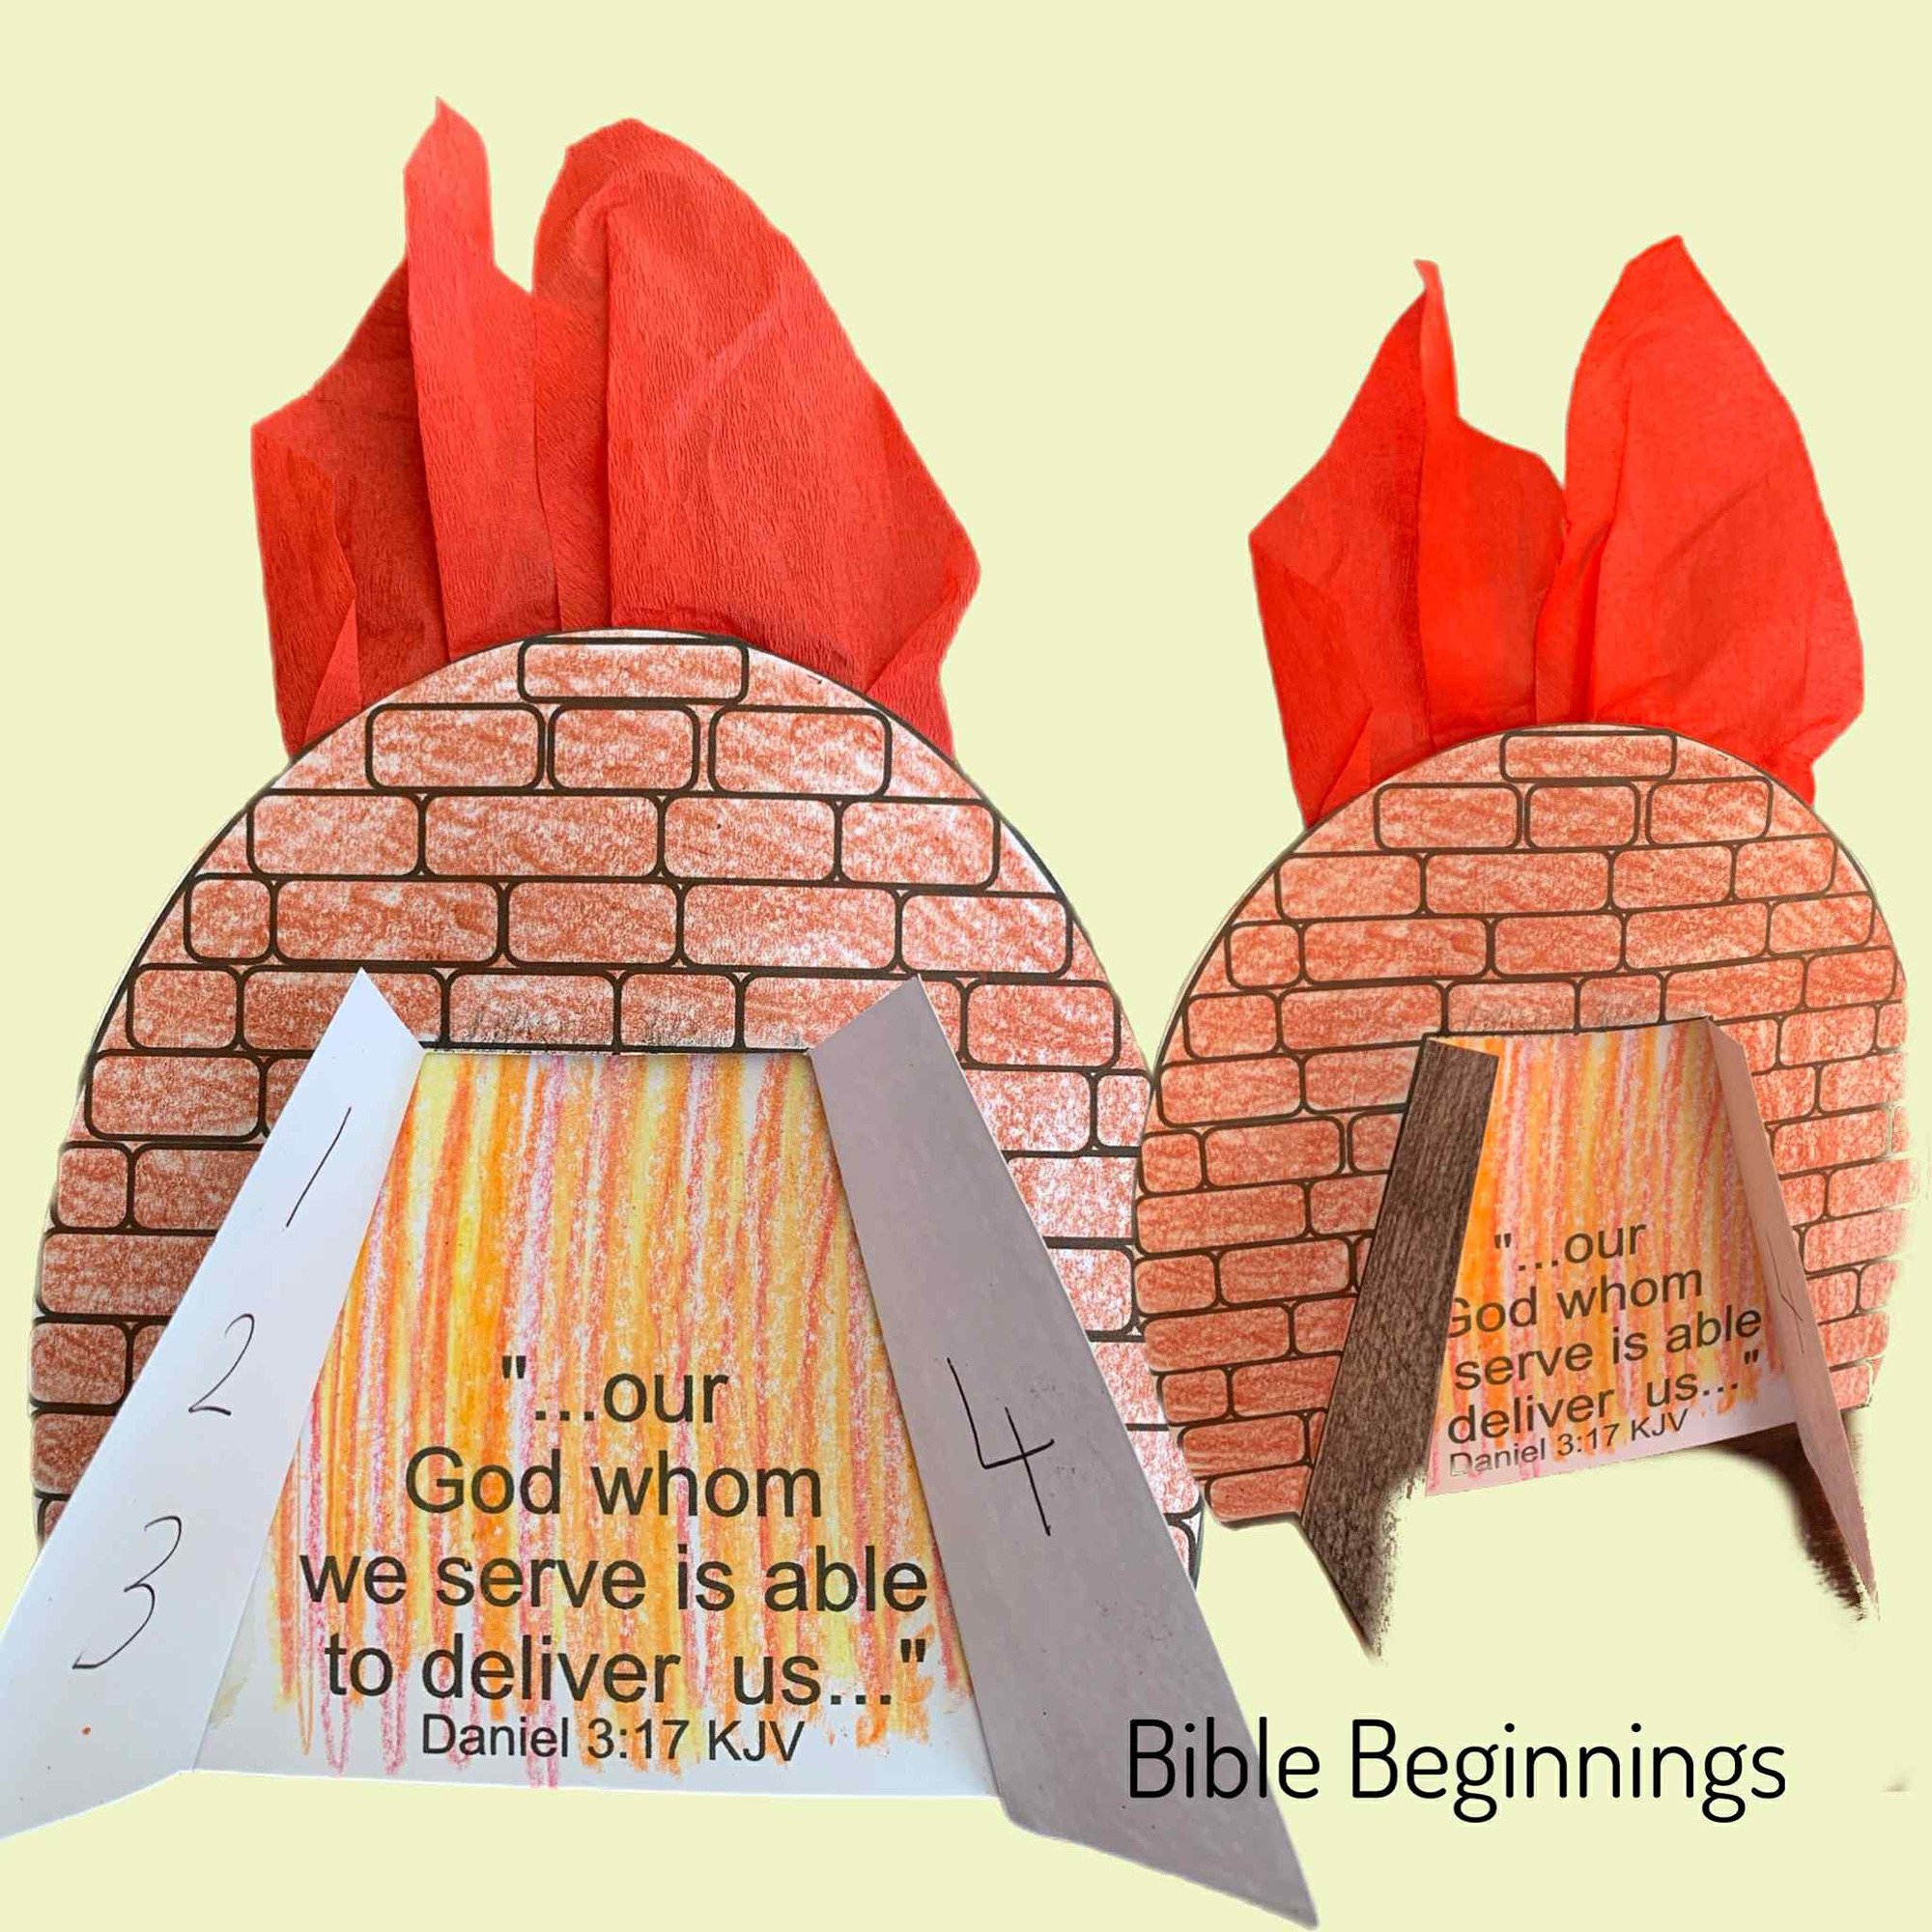
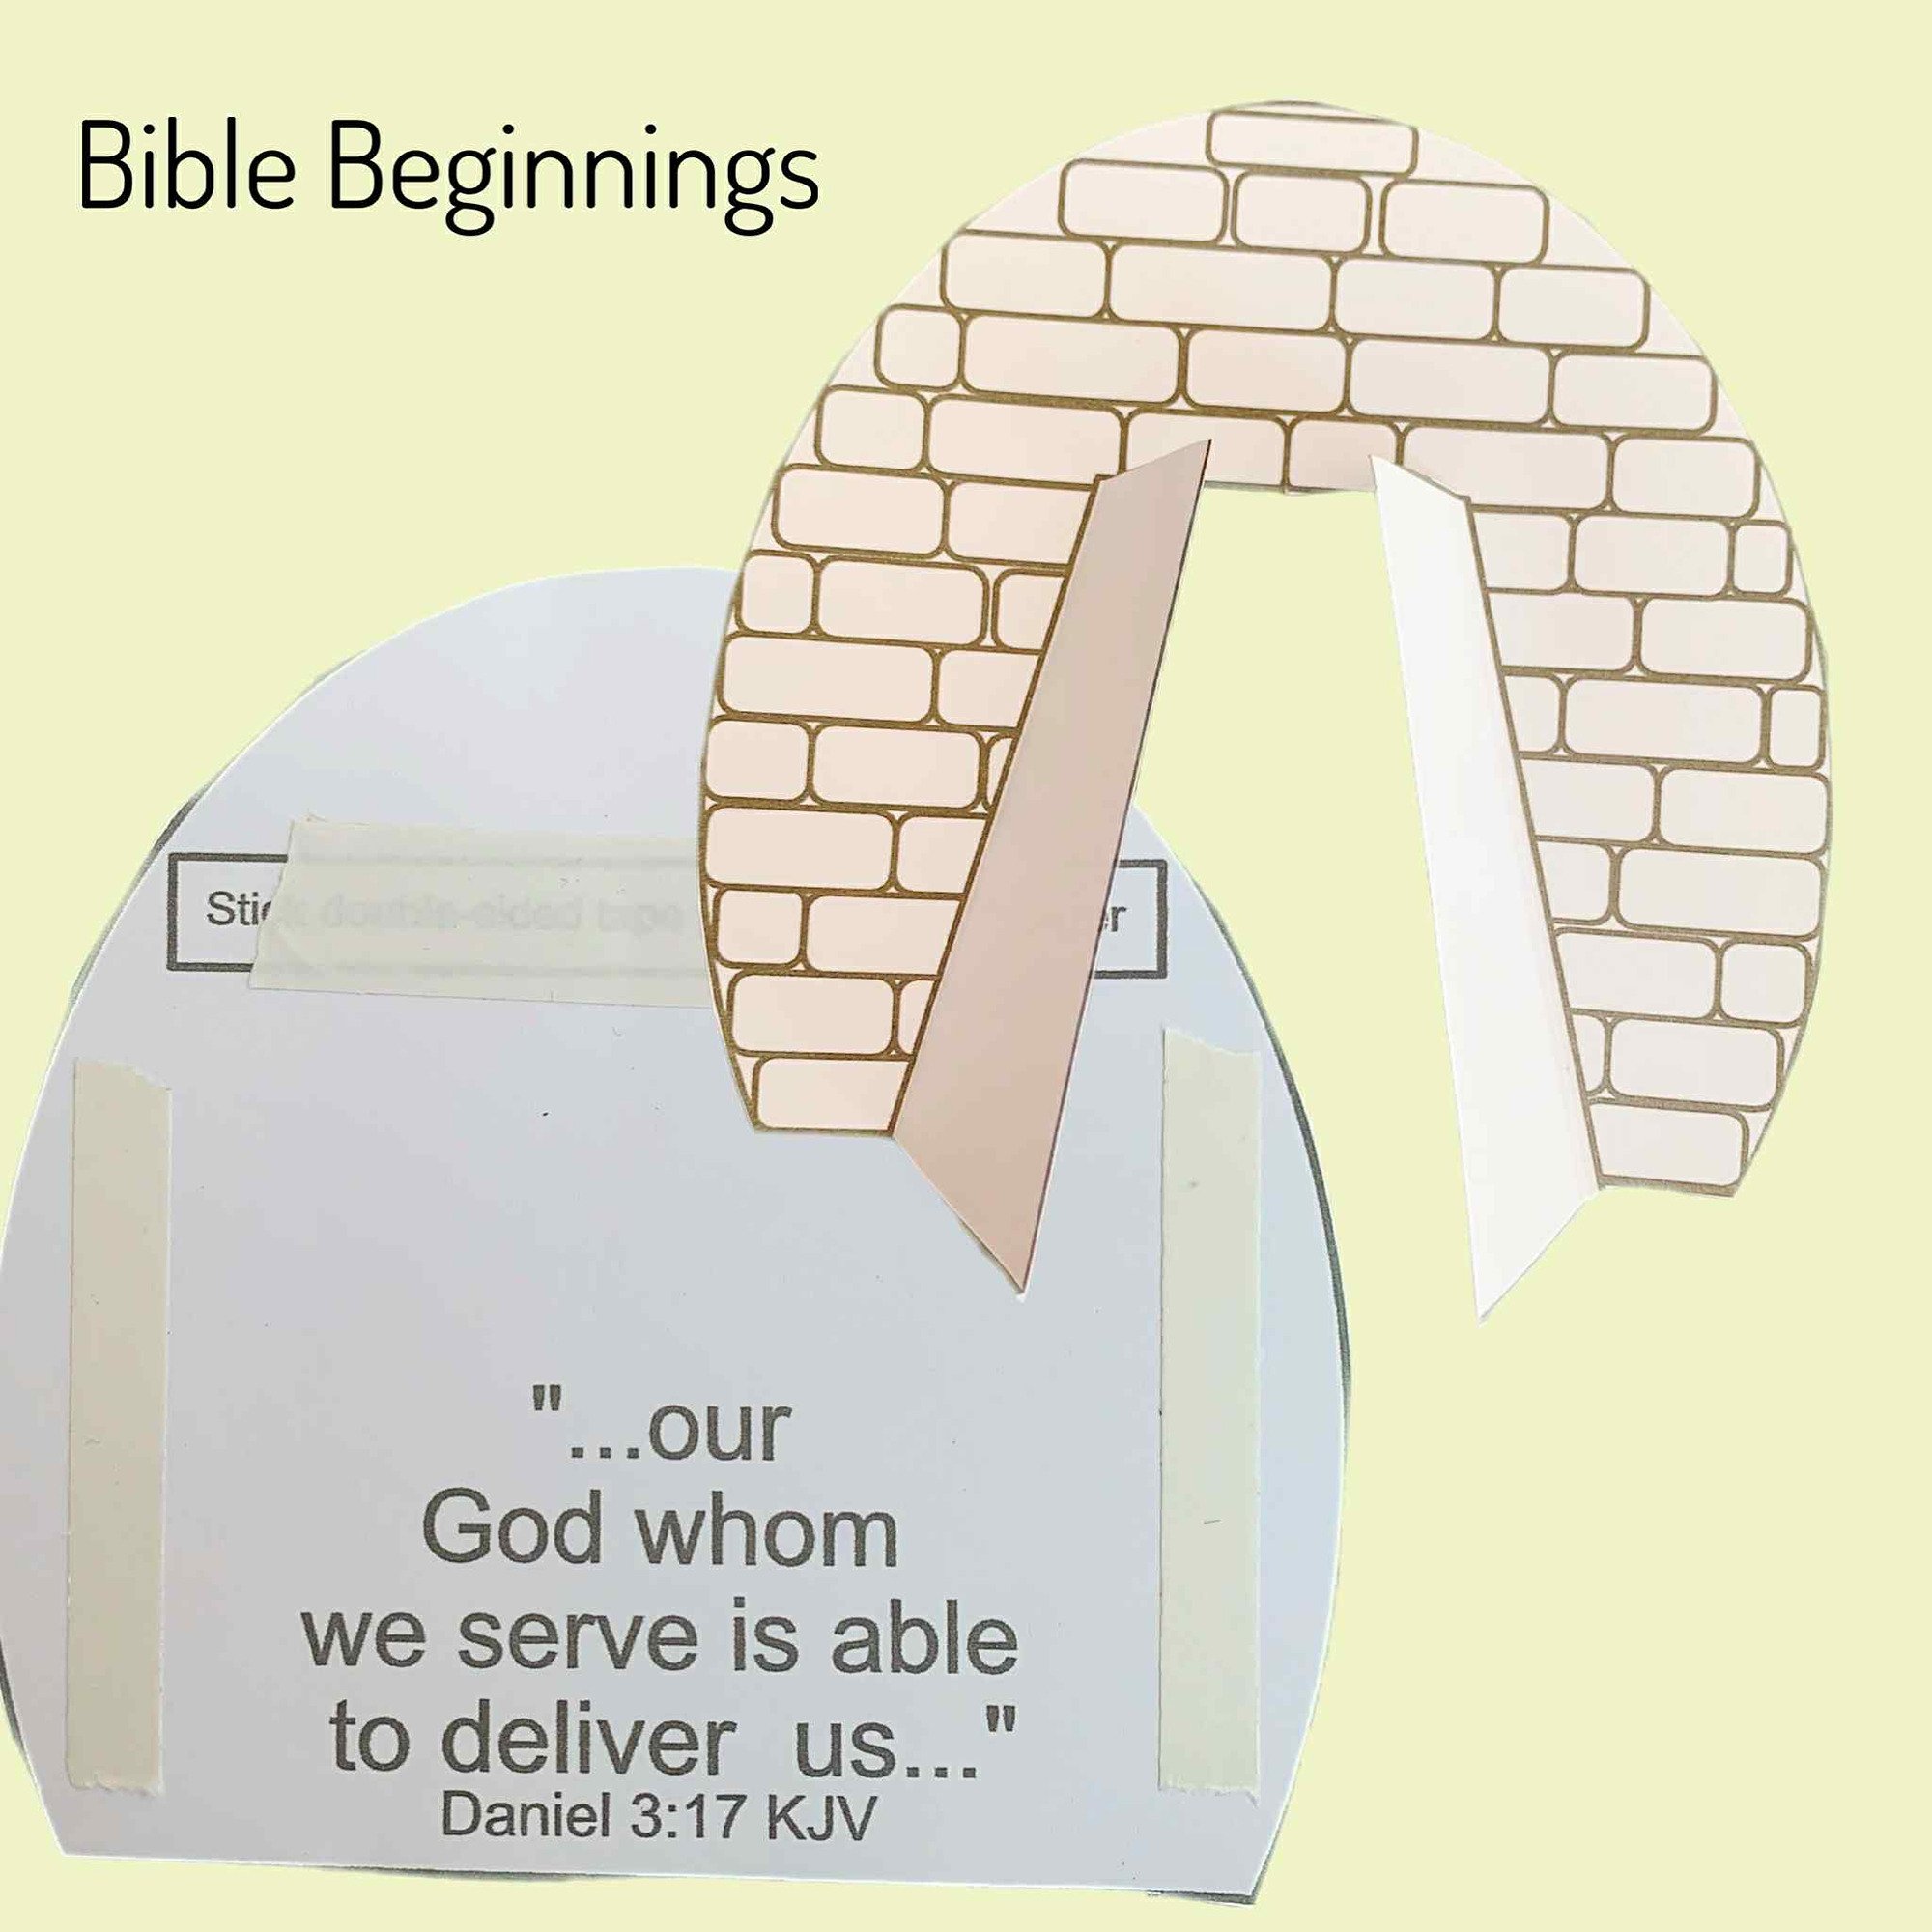
Chapter 3 - Faith In The Fiery Furnace - Craft Number 2
Alternative craft for Daniel chapter 3 as discussed above.
Click here to print the FREE printable template. Light card works best, 160gsm fits through most inkjet printers without sticking.
Carefully cut out the two sections of the template and then cut up the middle of the two doors and the two door tops as shown in the pictures, enabling the doors to be opened. The open doors are angled to allow the craft to stand up on a table/flat surface.
The bottom side of the craft needs to be coloured in. Double sided tape can be prepped in advance as shown. I also used two strips of double sided tape down the two sides (see picture), so there could be no mistakes with putting the glue in the wrong place.
Once the two sections are coloured, stick down some strips of red tissue paper as shown, and then stick the two halves together. I used red for flames, you could use grey tissue to mimic smoke.
Ask the children to write the numbers 1, 2,3, down the left hand door, and the number 4 on the right hand door (see colour picture). This will help them remember the lesson of the three friends and the fourth figure that appeared in the furnace.
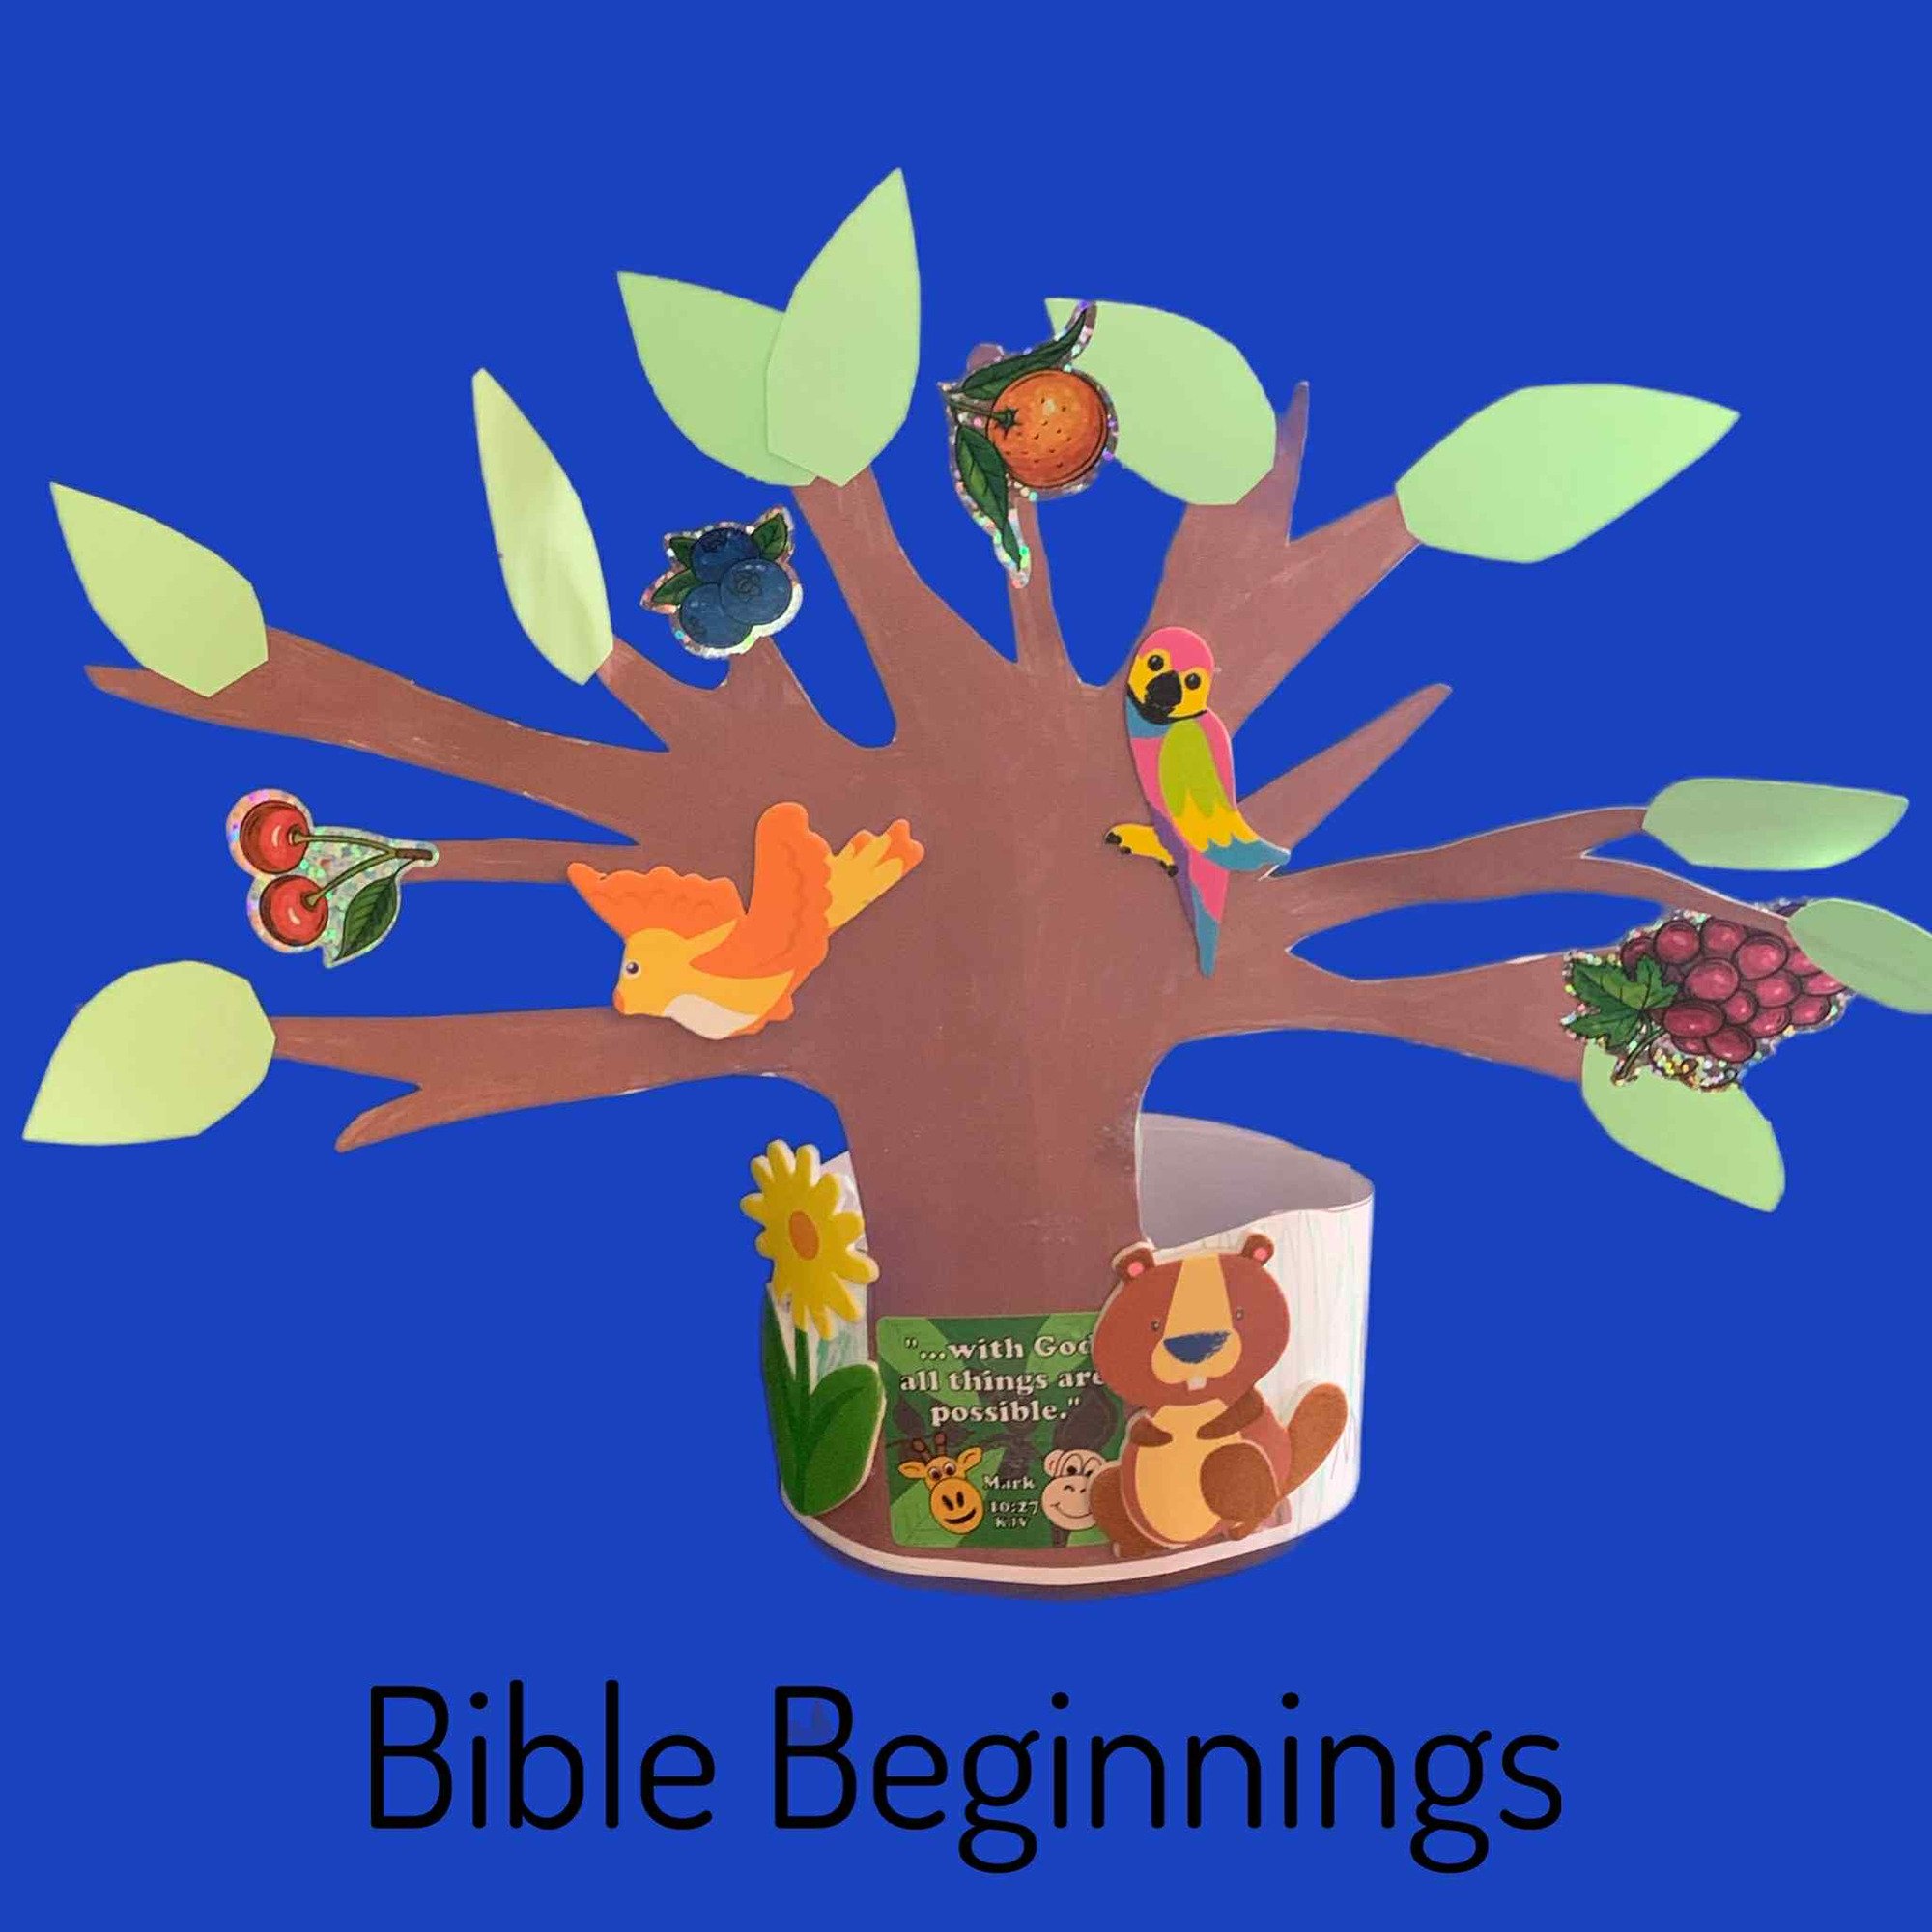
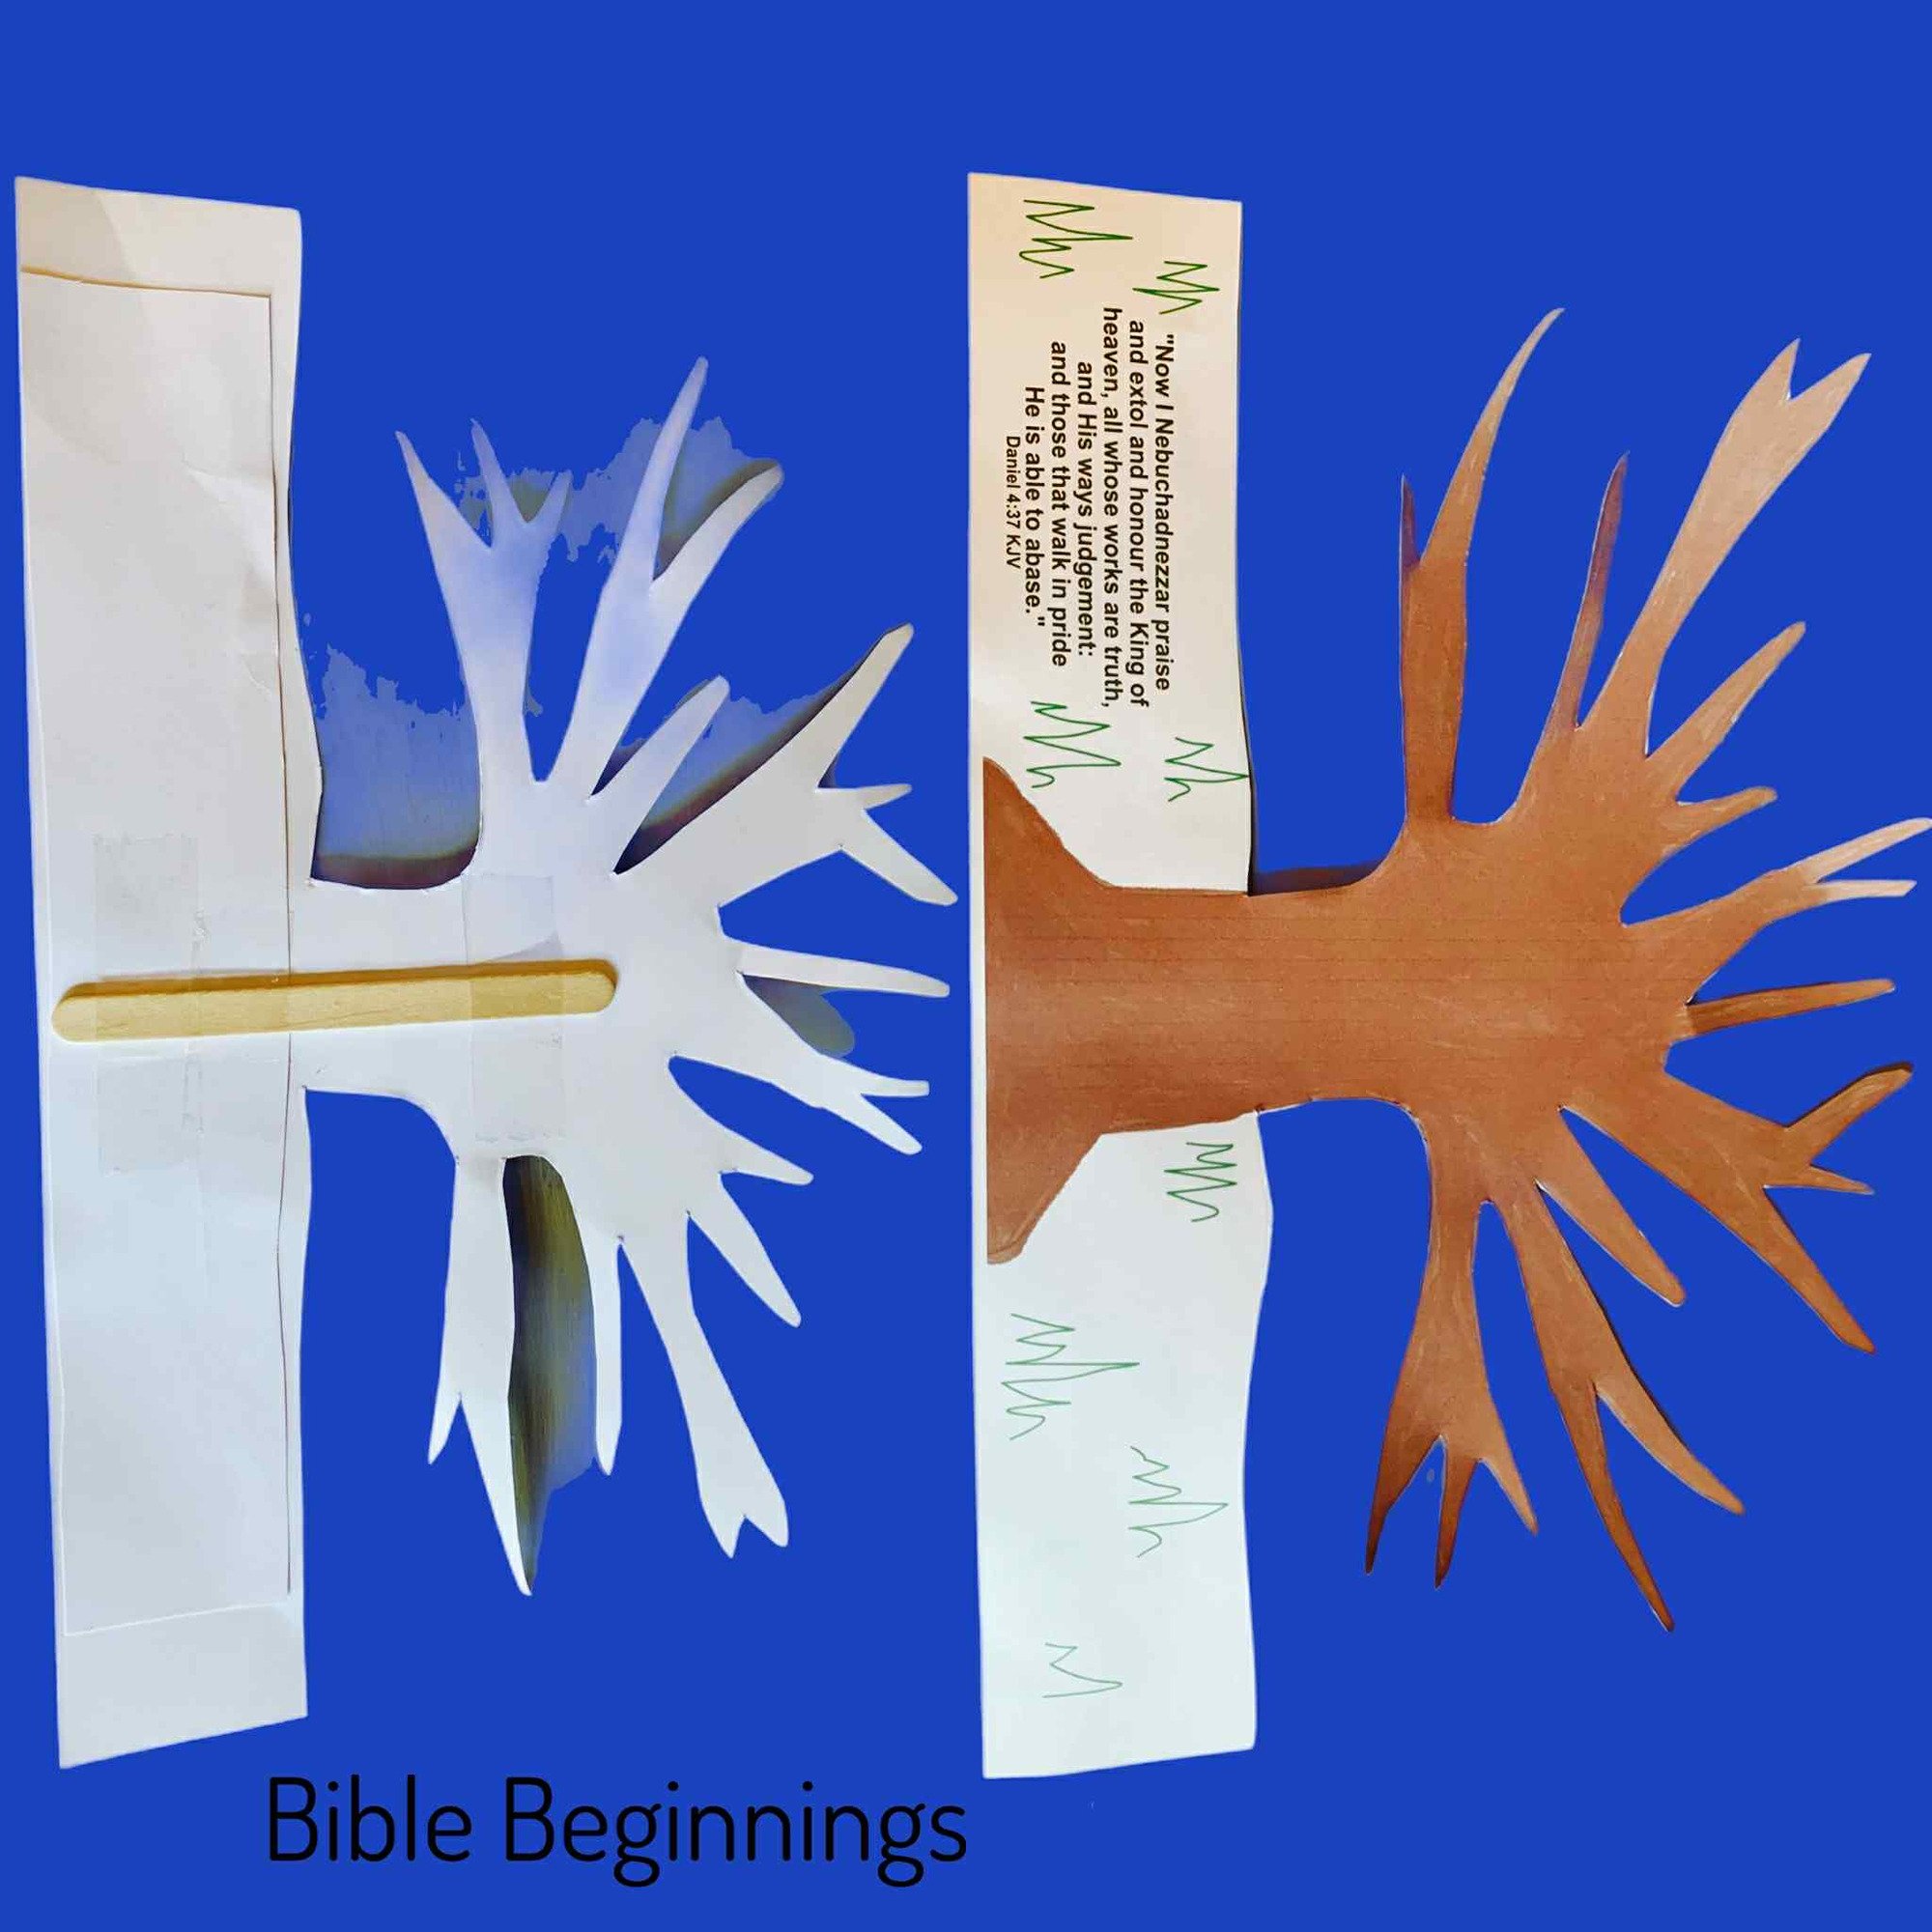
Daniel Chapter 4 - A Royal Message
This craft is based on Daniel chapter 4, God has been showing King Nebuchadnezzar, in different ways, that He is the one true God. The King has another dream, this time it is about a giant tree. Again he makes the same mistake of first consulting the "wise men" who used magic and other sinful practices. Once again Daniel was able to step in with answers from God. Daniel warned the King of the need to repent and change his ways, but he did not listen. The dream was fulfilled and only after seven years of great suffering, King Nebuchadnezzar looked to God for help. This chapter is an amazing turnaround as we read of the same King who cast God's children into the fiery furnace, now writing a public announcement about the greatness and majesty of God, and of HIs eternal kingdom. What a message!
The free PDF template with the scripture text can be downloaded by clicking here.
Light card (160gM2) works well in most printers.
Carefully cut out the template.
Cut out a strip of paper 25cm X 5cm and stick to the back of the template, along the grassy bottom strip. This will strengthen the craft for standing upright.
Sellotape/secure a small craft stick to the back of the tree trunk to create support.
Decorate the branches with leaves. You can cut some out of green paper as shown or use stickers or plastic leaves.
Adorn the branches with fruits and birds as is described in the Bible passage.
Decorate around the base of the tree trunk with the land animals.
Staple the bottom ends together as shown in the picture so the tree can be stood upright.
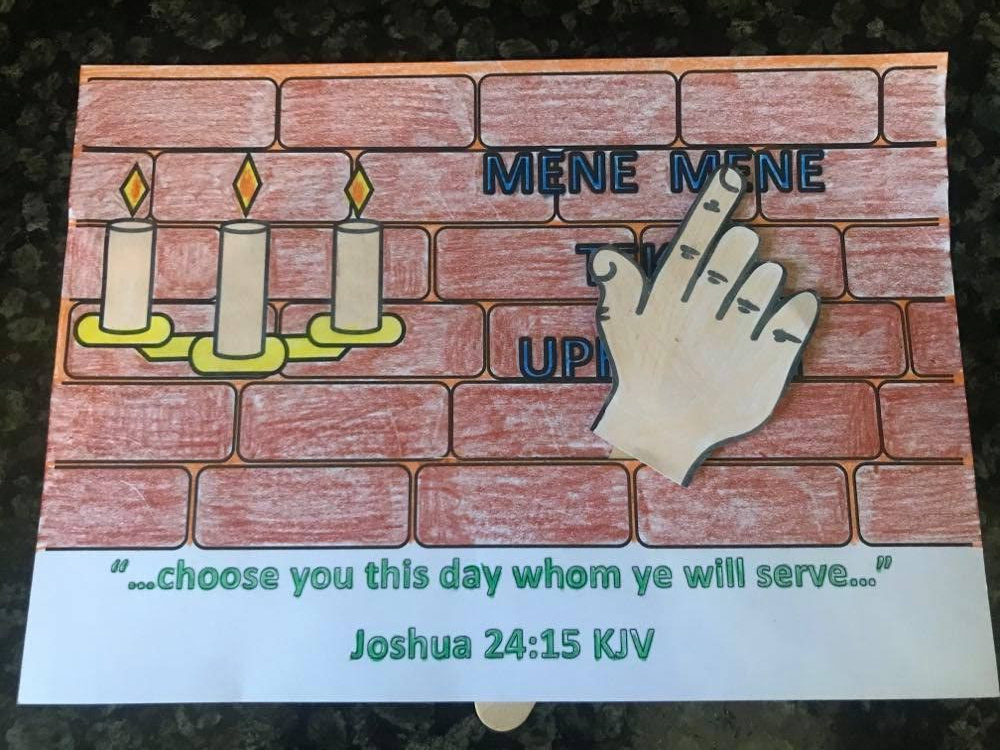
Daniel Chapter 5 - The Writing On The Wall
This craft is based on Daniel chapter 5. King Belshazzar now rules in Babylon. The Bible tells us that King Belshazzar held a great feast, and invited many important men. He made a very foolish decision, he asked for the very precious gold and silver cups that had been stolen from God's temple many years before, to be used for the feast. These people praised false gods. The very same hour something very strange happened, as they witnessed the fingers of a man's hand writing on the wall. Once again we read of a Babylonian king needing the help of Daniel, he was needed this time to explain what this writing meant. Sadly, the king did not listen to Daniel's message from God, and was killed that very night. Another remarkable Bible passage that has many valuable lessons for children.
The free PDF template of the colouring sheet is available to print
The free PDF template of the fingers/hand is available by clicking here.
You will need the PDF A4 colouring sheet from the above link. Light card is best, 160gM2 fits through most inkjet printers with no trouble.
There is also another PDF of the fingers, again print on light card and carefully cut out. Colour the hand with crayons or whatever you decide to use.
You will need a large craft/lolly stick and some double sided sticky tape, the thick padded tape holds better.
Stick the wrist area of the hand to the top of the lolly stick.
Colour in the A4 sheet with the writing on the wall, then then you need to make a slit in the A4 sheet to allow the hand to be inserted from the back. I used an A4 paper trimmer. I slit a hole roughly the width of the writing, along the top edge of the bottom row of brick. This allows the hand to be moved along the section of writing.
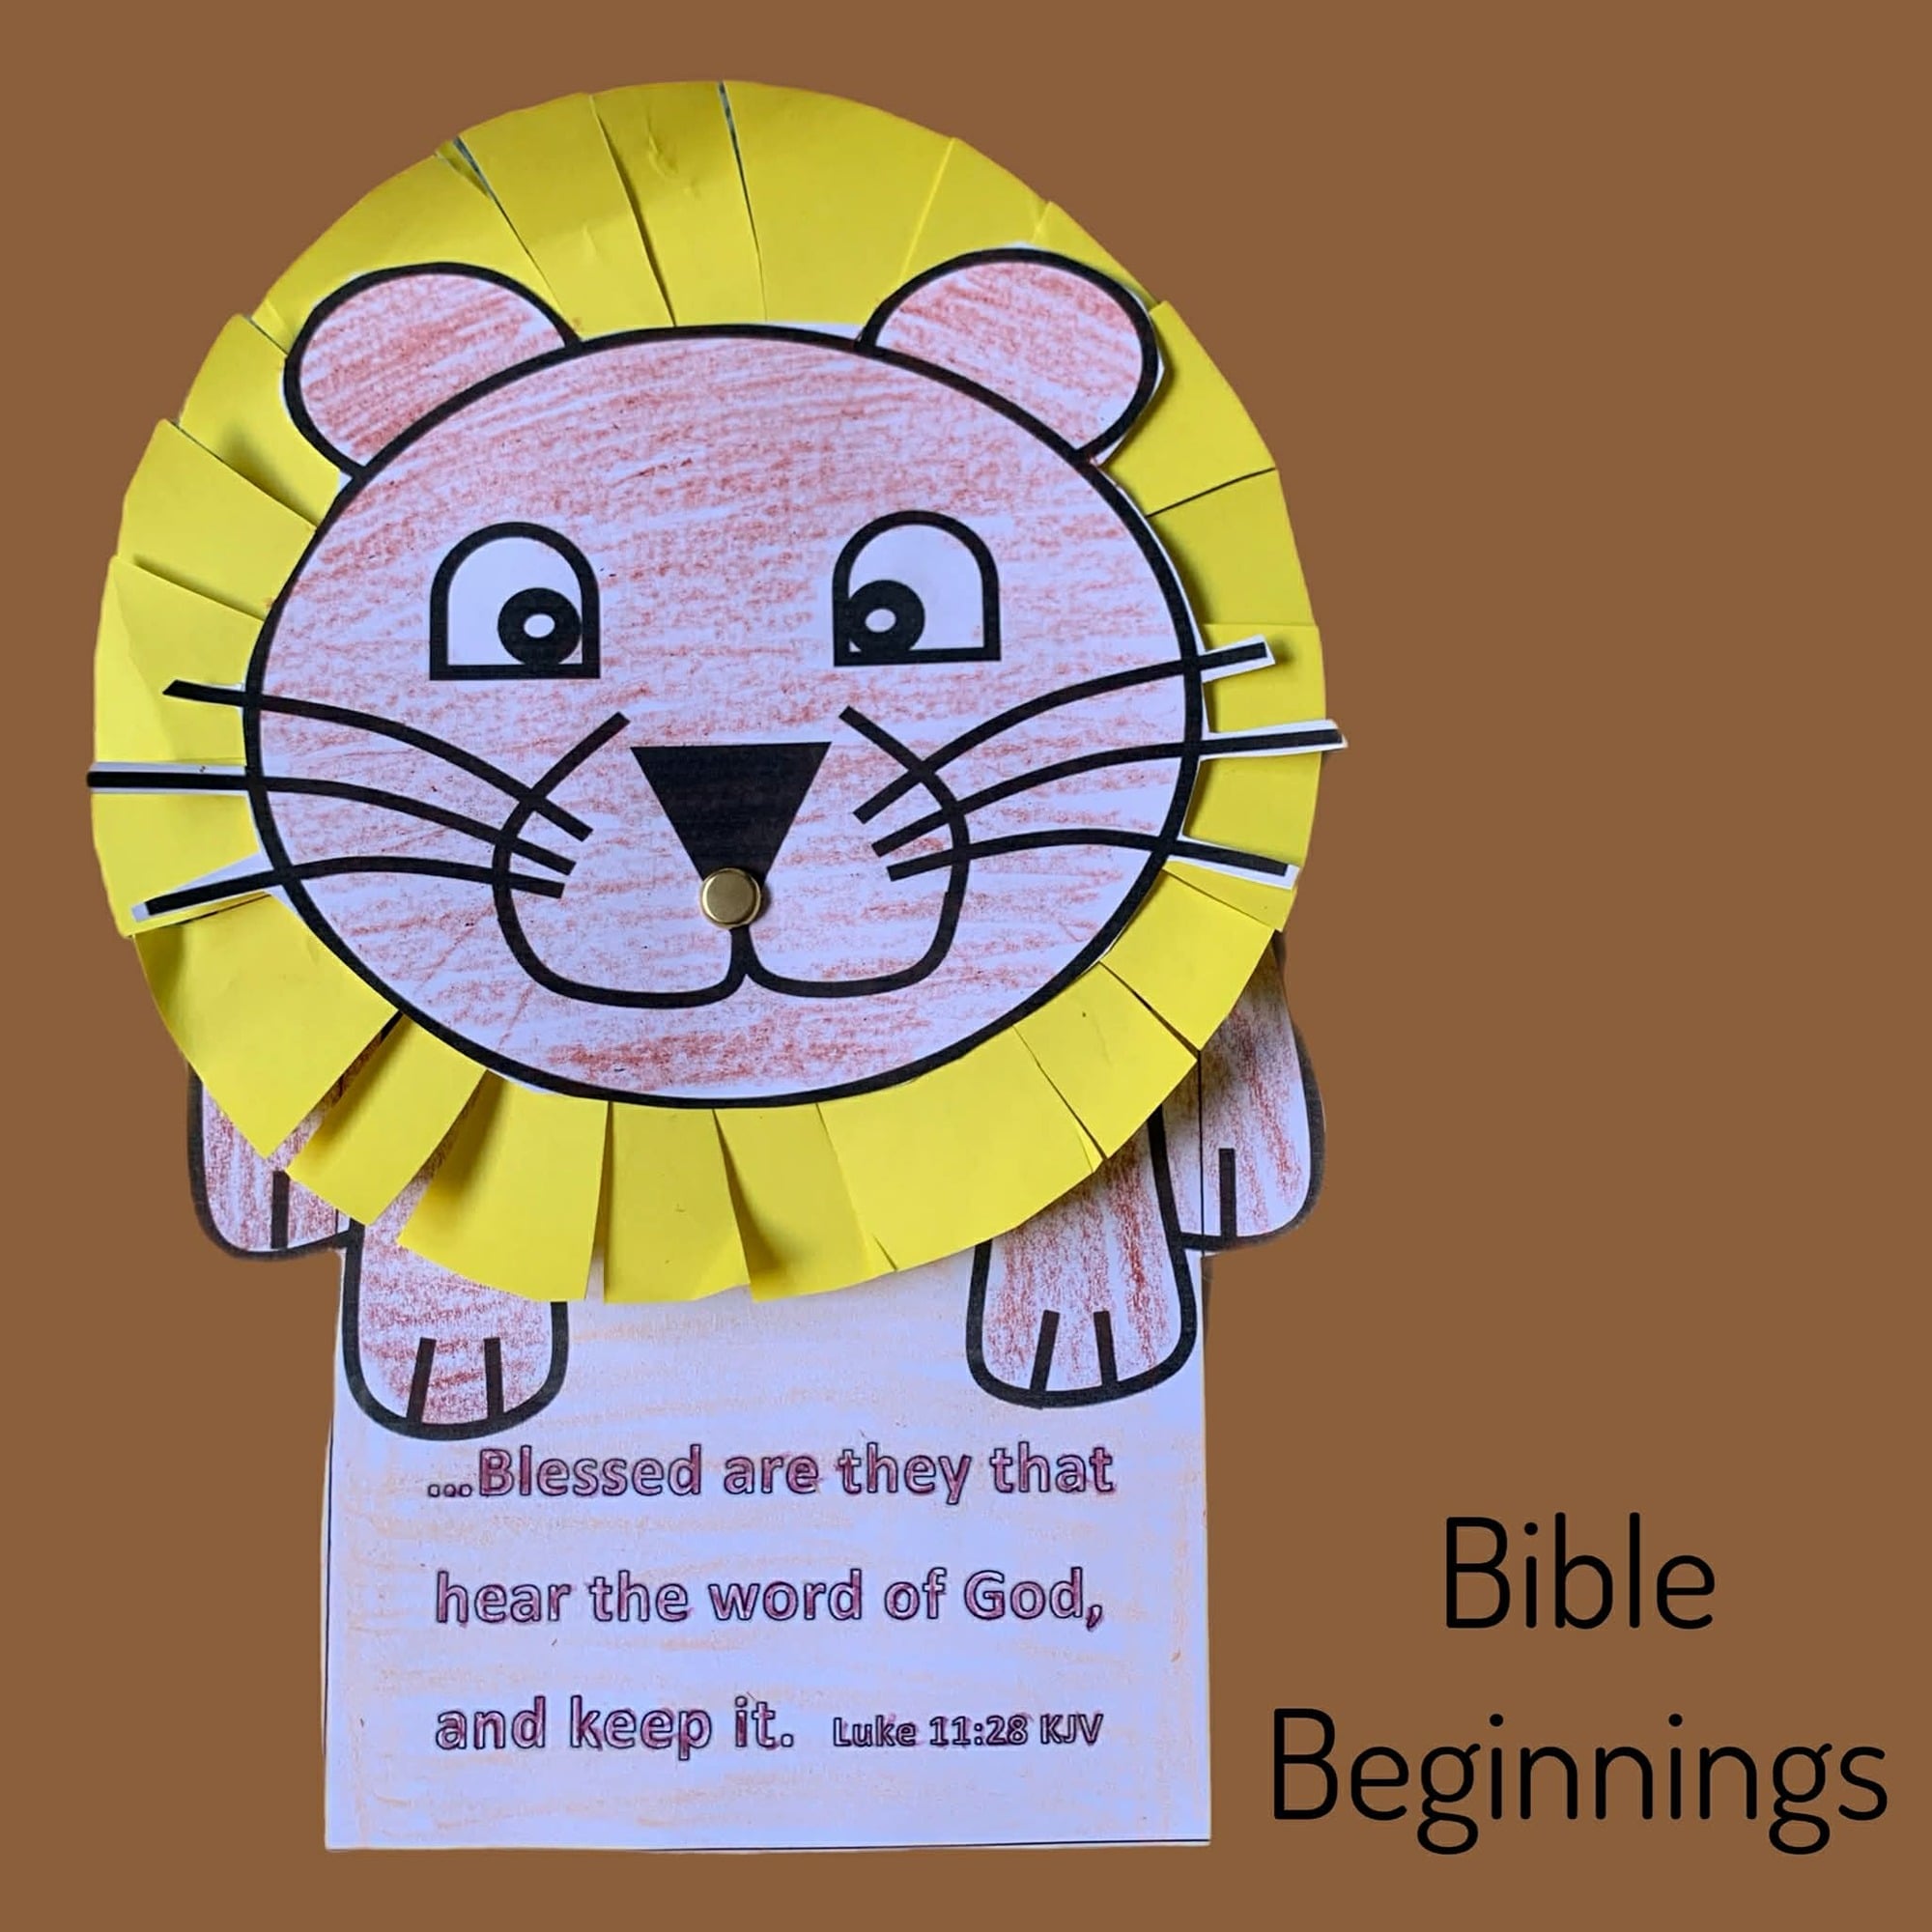
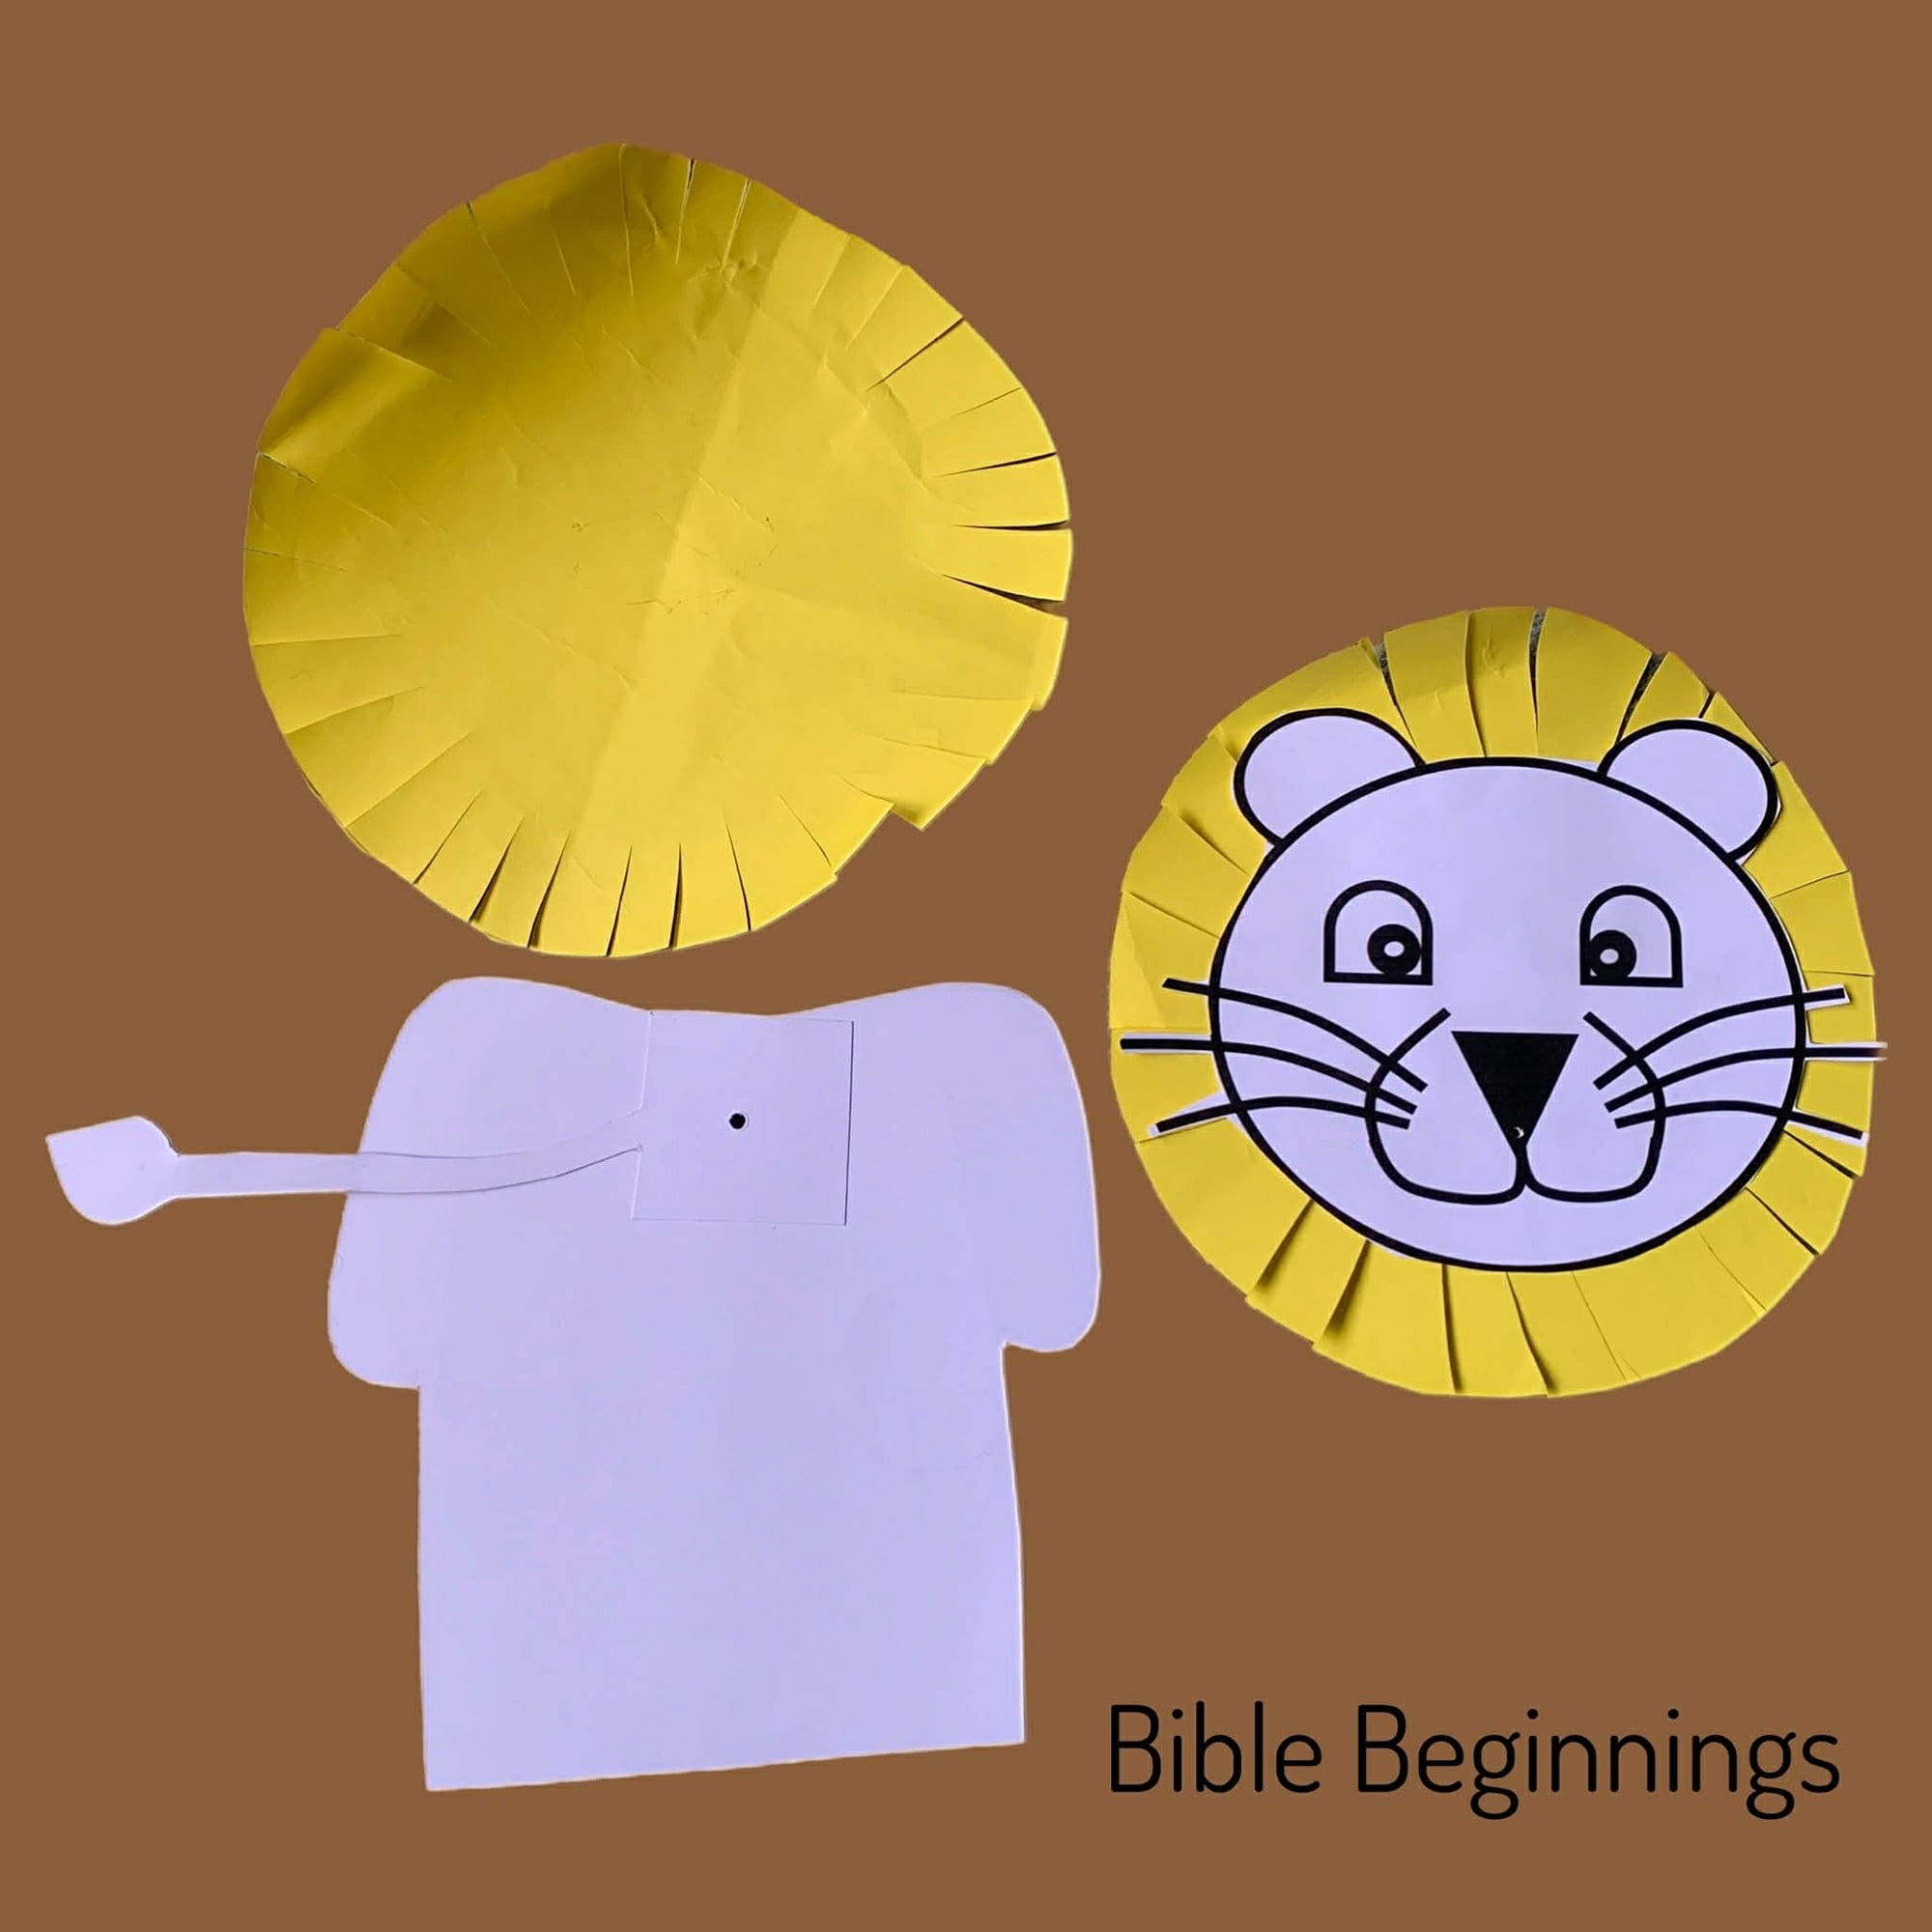
Daniel Chapter 6 - Daniel In The Lion's Den
This craft is based on Daniel chapter 6, and is one of the best known and loved Bible passages. Another new King reigns in Babylon, King Darius. Daniel is now over eighty years of age. Daniel was favoured by the King and this created jealousy in the other rulers, they plotted to get Daniel in bad favour with the King. Convincing the King to make a new law forbidding anyone to pray to any god or man for thirty days, they knew Daniel would be faithful to his God, the one true God. The King is left with no other choice than to cast Daniel into the den of lions. Yet again, God rescues and protects in a miraculous way! Daniel listened to God, not men.
The free printable PDF is available to print by clicking here. Light card (160gM2) works in most printers without sticking.
NOT SUITABLE FOR CHILDREN UNDER THREE YEARS DUE TO CHOKING HAZZARD
Carefully cut out the pieces from the above template.
Colour in the lion's body, tail and head, and the text.
Cut out a circle of yellow/gold/brown card to make a lion's mane., roughly 15.5 cm wide. Then cut in 2-3cm from the edge as shown at intervals, to make a fringed edge as shown. Attach the lion head to the centre of the fringed circle.
Pierce a hole as shown, in the middle of the lions body. You also need to pierce a hole through the centre of the box at the base of the tail piece.
Attach the head and mane piece to the body and tail pieces with a metal paper fastener.
The head and tail should be moveable, and you can bend the ears forward to add a little more interest.


Jonah Sign Post Craft
Based on Jonah Chapters 1 and 2.
A sign post that reminds us that God's Way Is Best.
Print the free printable PDF template by clicking here.
Light card is recommended, 160gsm fits well through most inkjet printers.
Cut out the shapes from the above template.
You will require a cardboard tube, kitchen roll tubes are a bit too thick, I used cardboard tubes from finished cling film and tinfoil rolls. You could also use an extra long craft stick. If you have only a regular craft stick you could use only the "God's Way Is Best" sign. Both will not allow room to hold the craft.
Attach the two sign templates as shown in the picture.
Attach the whales as shown, tape a quarter of a pipe cleaner to the inside of each whale and curl, to make pretend water spouts.
Add a little Jonah picture to each side, see pictures.
Jonah Craft - God Spoke A Second Time
Based on chapters 3 and 4 of the book of Jonah.
Reminding us of the mercy of God, the need to listen carefully to God's Word, and to be obedient.
Print the FREE PDF template by clicking here.
Light card is recommended, 160gsm fits easily through most inkjet printers.
Cut out the shapes from the second page, the main page needs to be coloured, the shapes/characters stuck on and then folded to make a stand up desk display as shown in the images. There are faint lines to help you fold in the correct places. Secure with sellotape at top and bottom to stabilise.


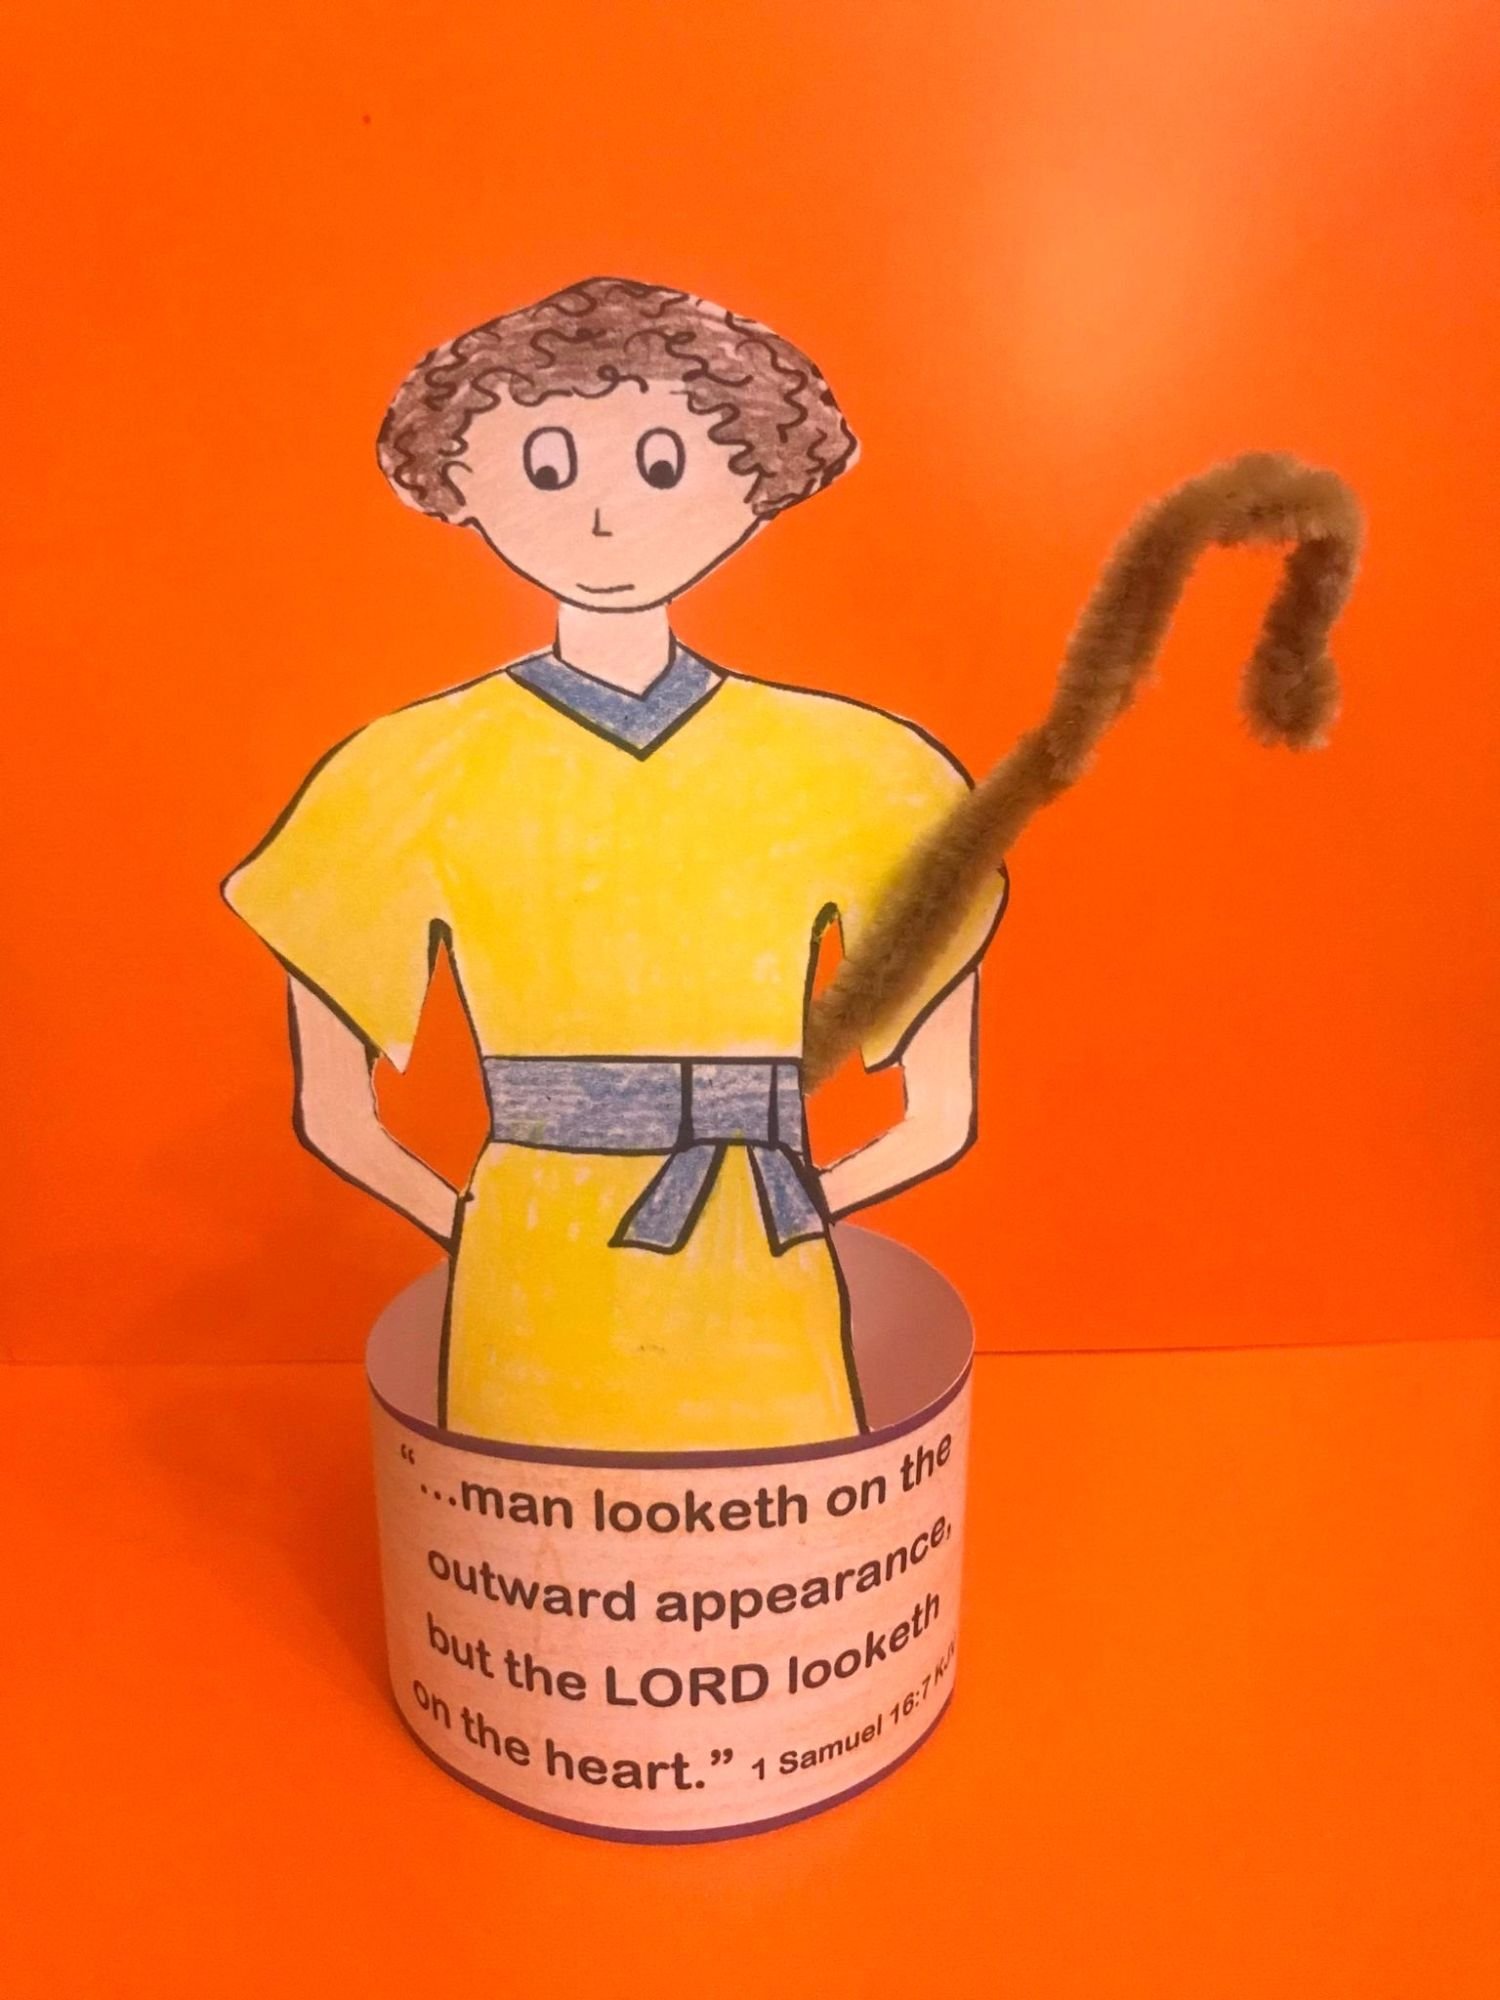
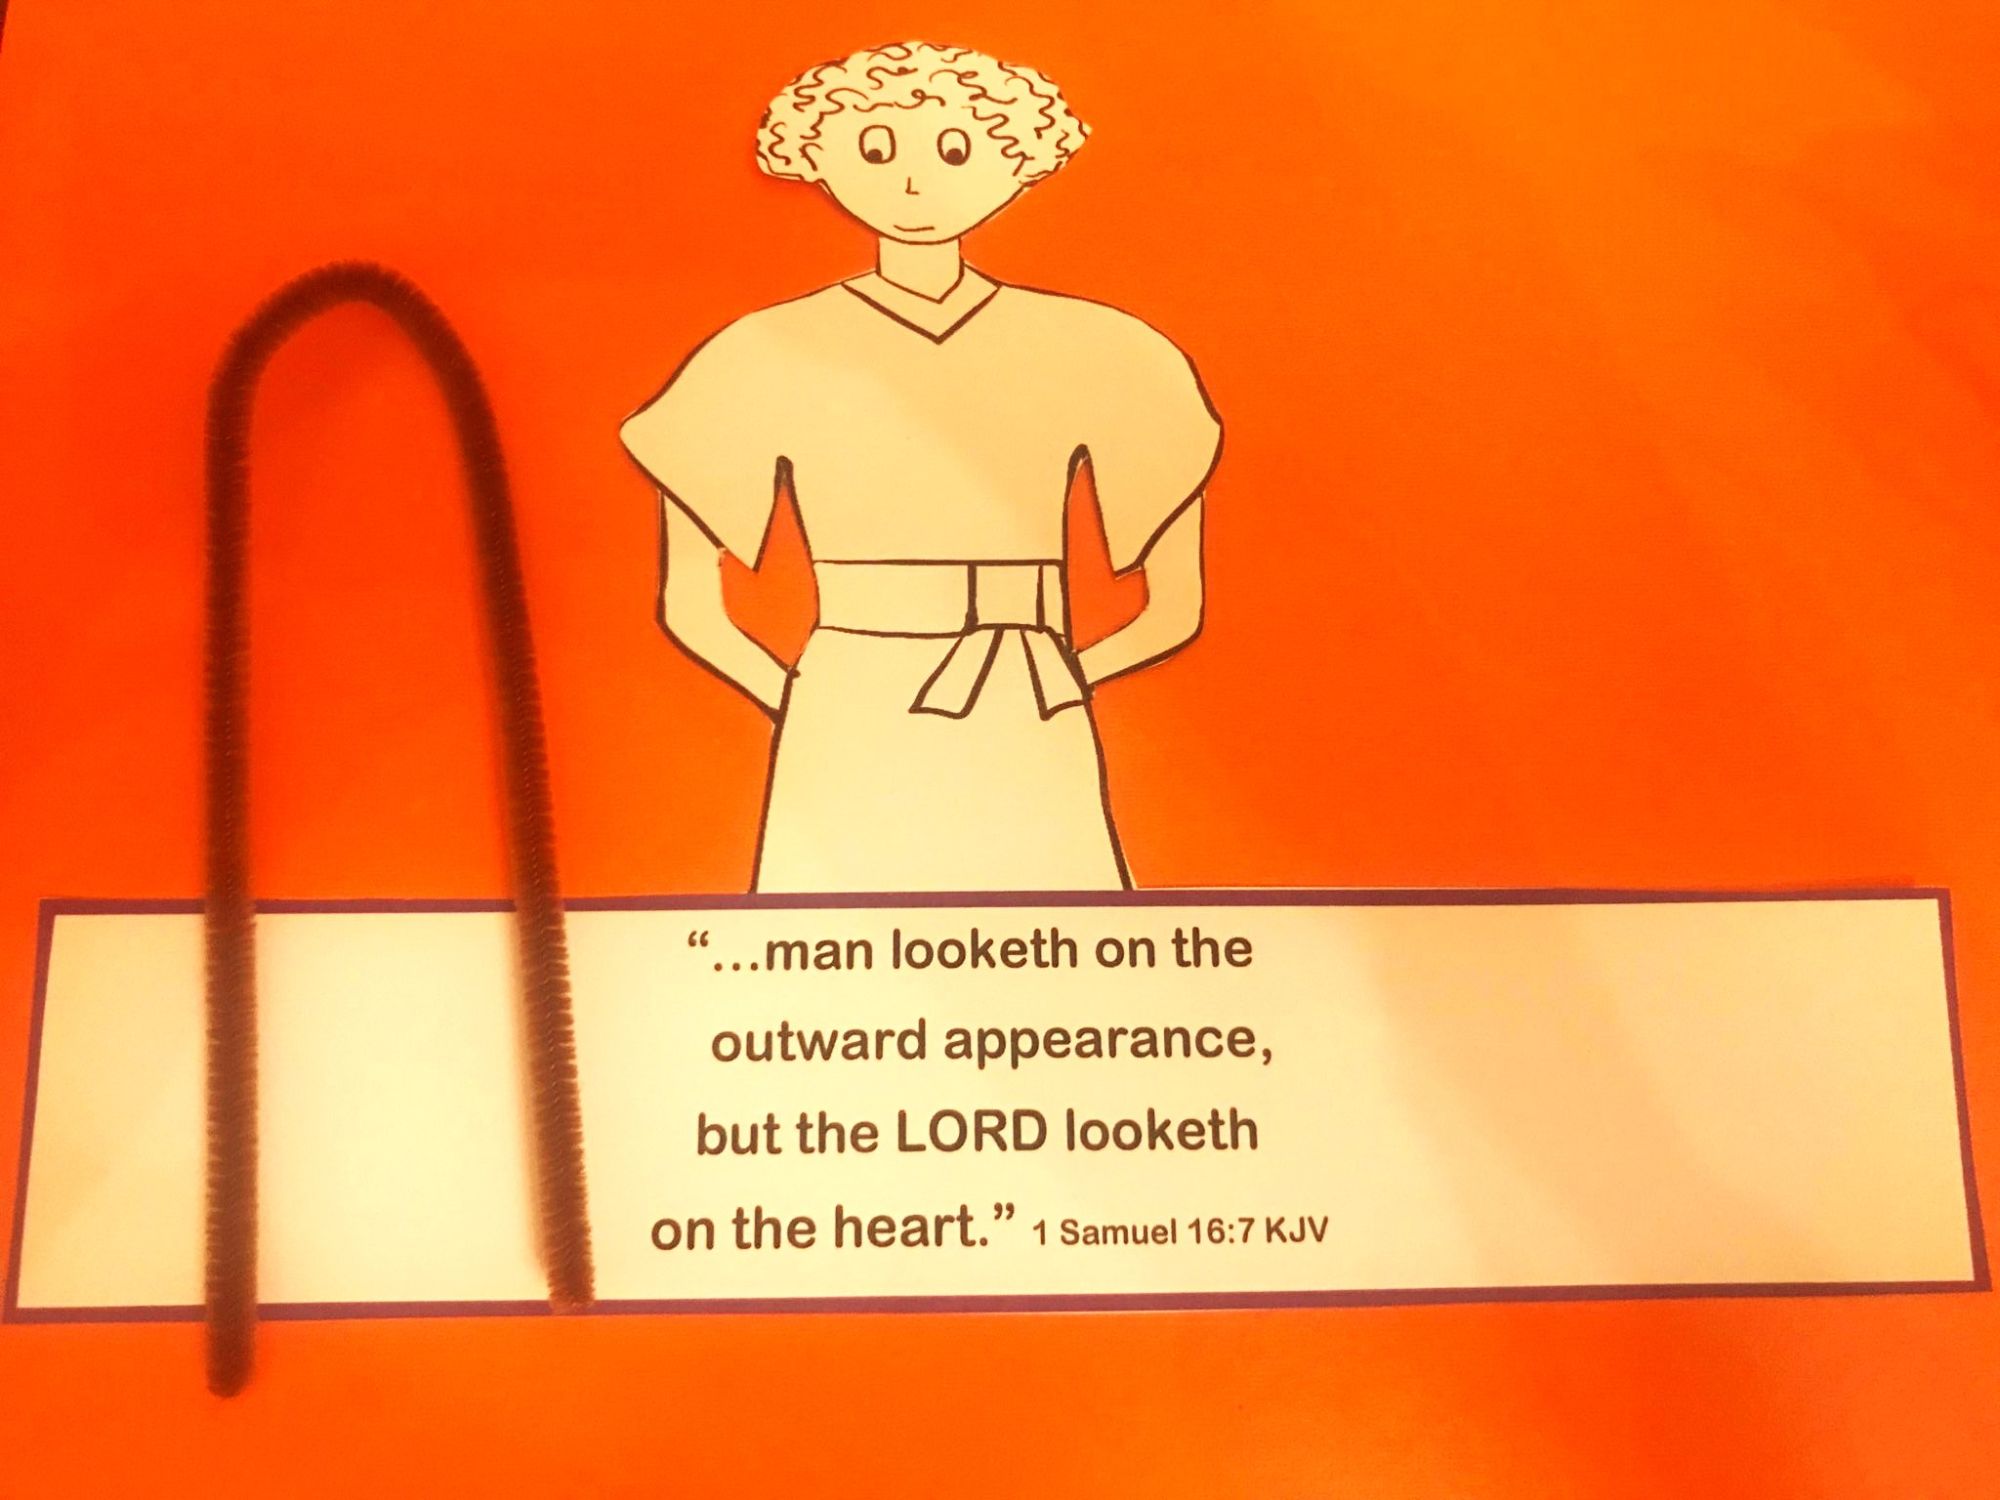
David - The Shepherd Boy Annointed King
1 Samuel 16:1-13
As a young boy, God selects David to be annointed as the future king of Israel.
The youngest of the 8 sons of Jesse is chosen.
"...man looketh on the outward apperance, but the LORD looketh on the heart."
1 Samuel 16:7 KJV
Follow the instructions to make a stand up David shepherd boy.
- You need to cut out the FREE printable template found by clicking HERE. I recommend you use light card, 160gsm fits through most inkjet printers easily.
- You also require a pipe cleaner, a brown one was used to imitate a wooden staff, but a coloured one could be used. Bend the pipe cleaner in two and twist into the shape of a shepherd's staff/crook as shown in image.
- The shepherd boy needs to be coloured in and then the two sides stapled together at the back to create a base that will stand up, see picture.
- Finally the "staff" needs to be inserted through one of the arm hole and taped in place at the back, see picture.
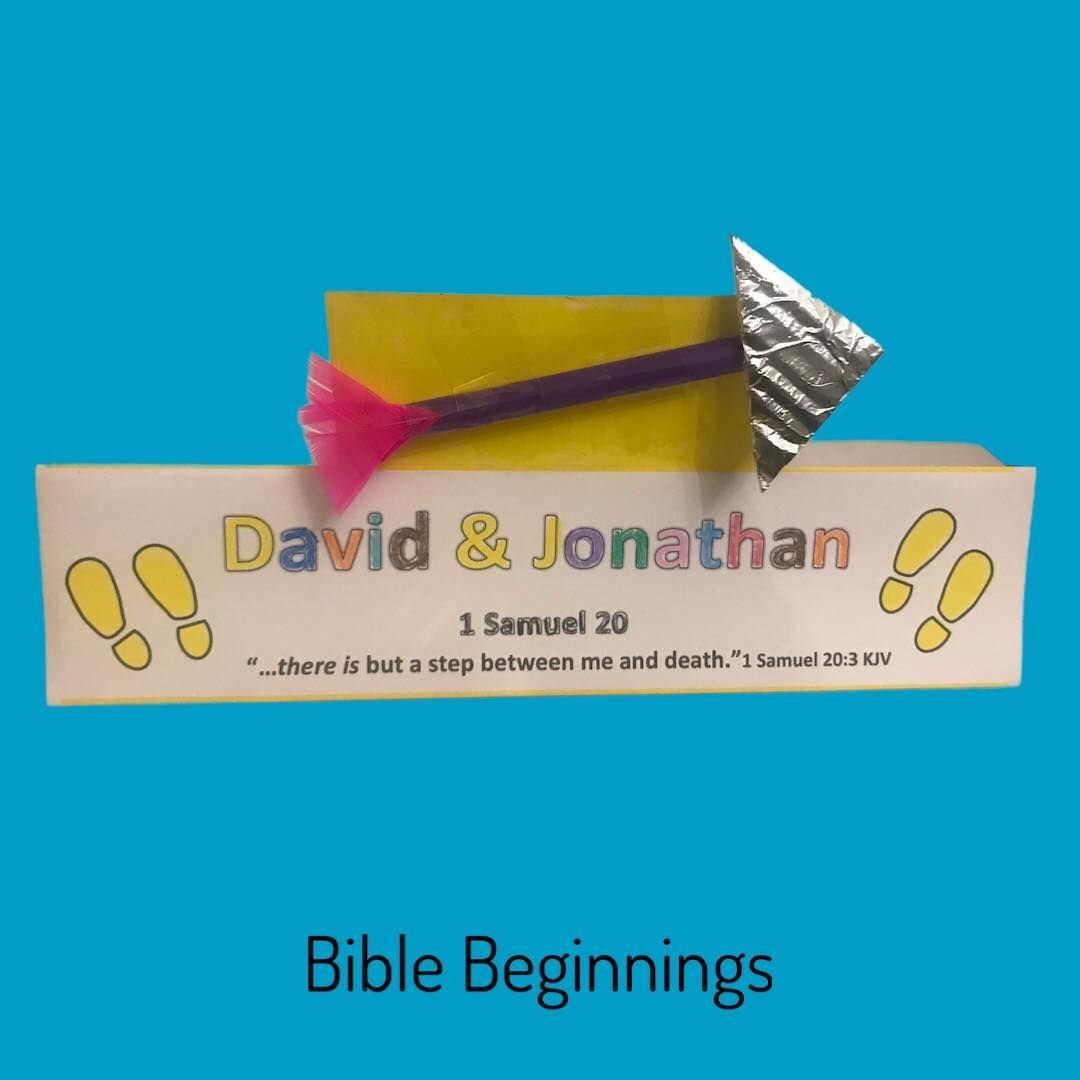
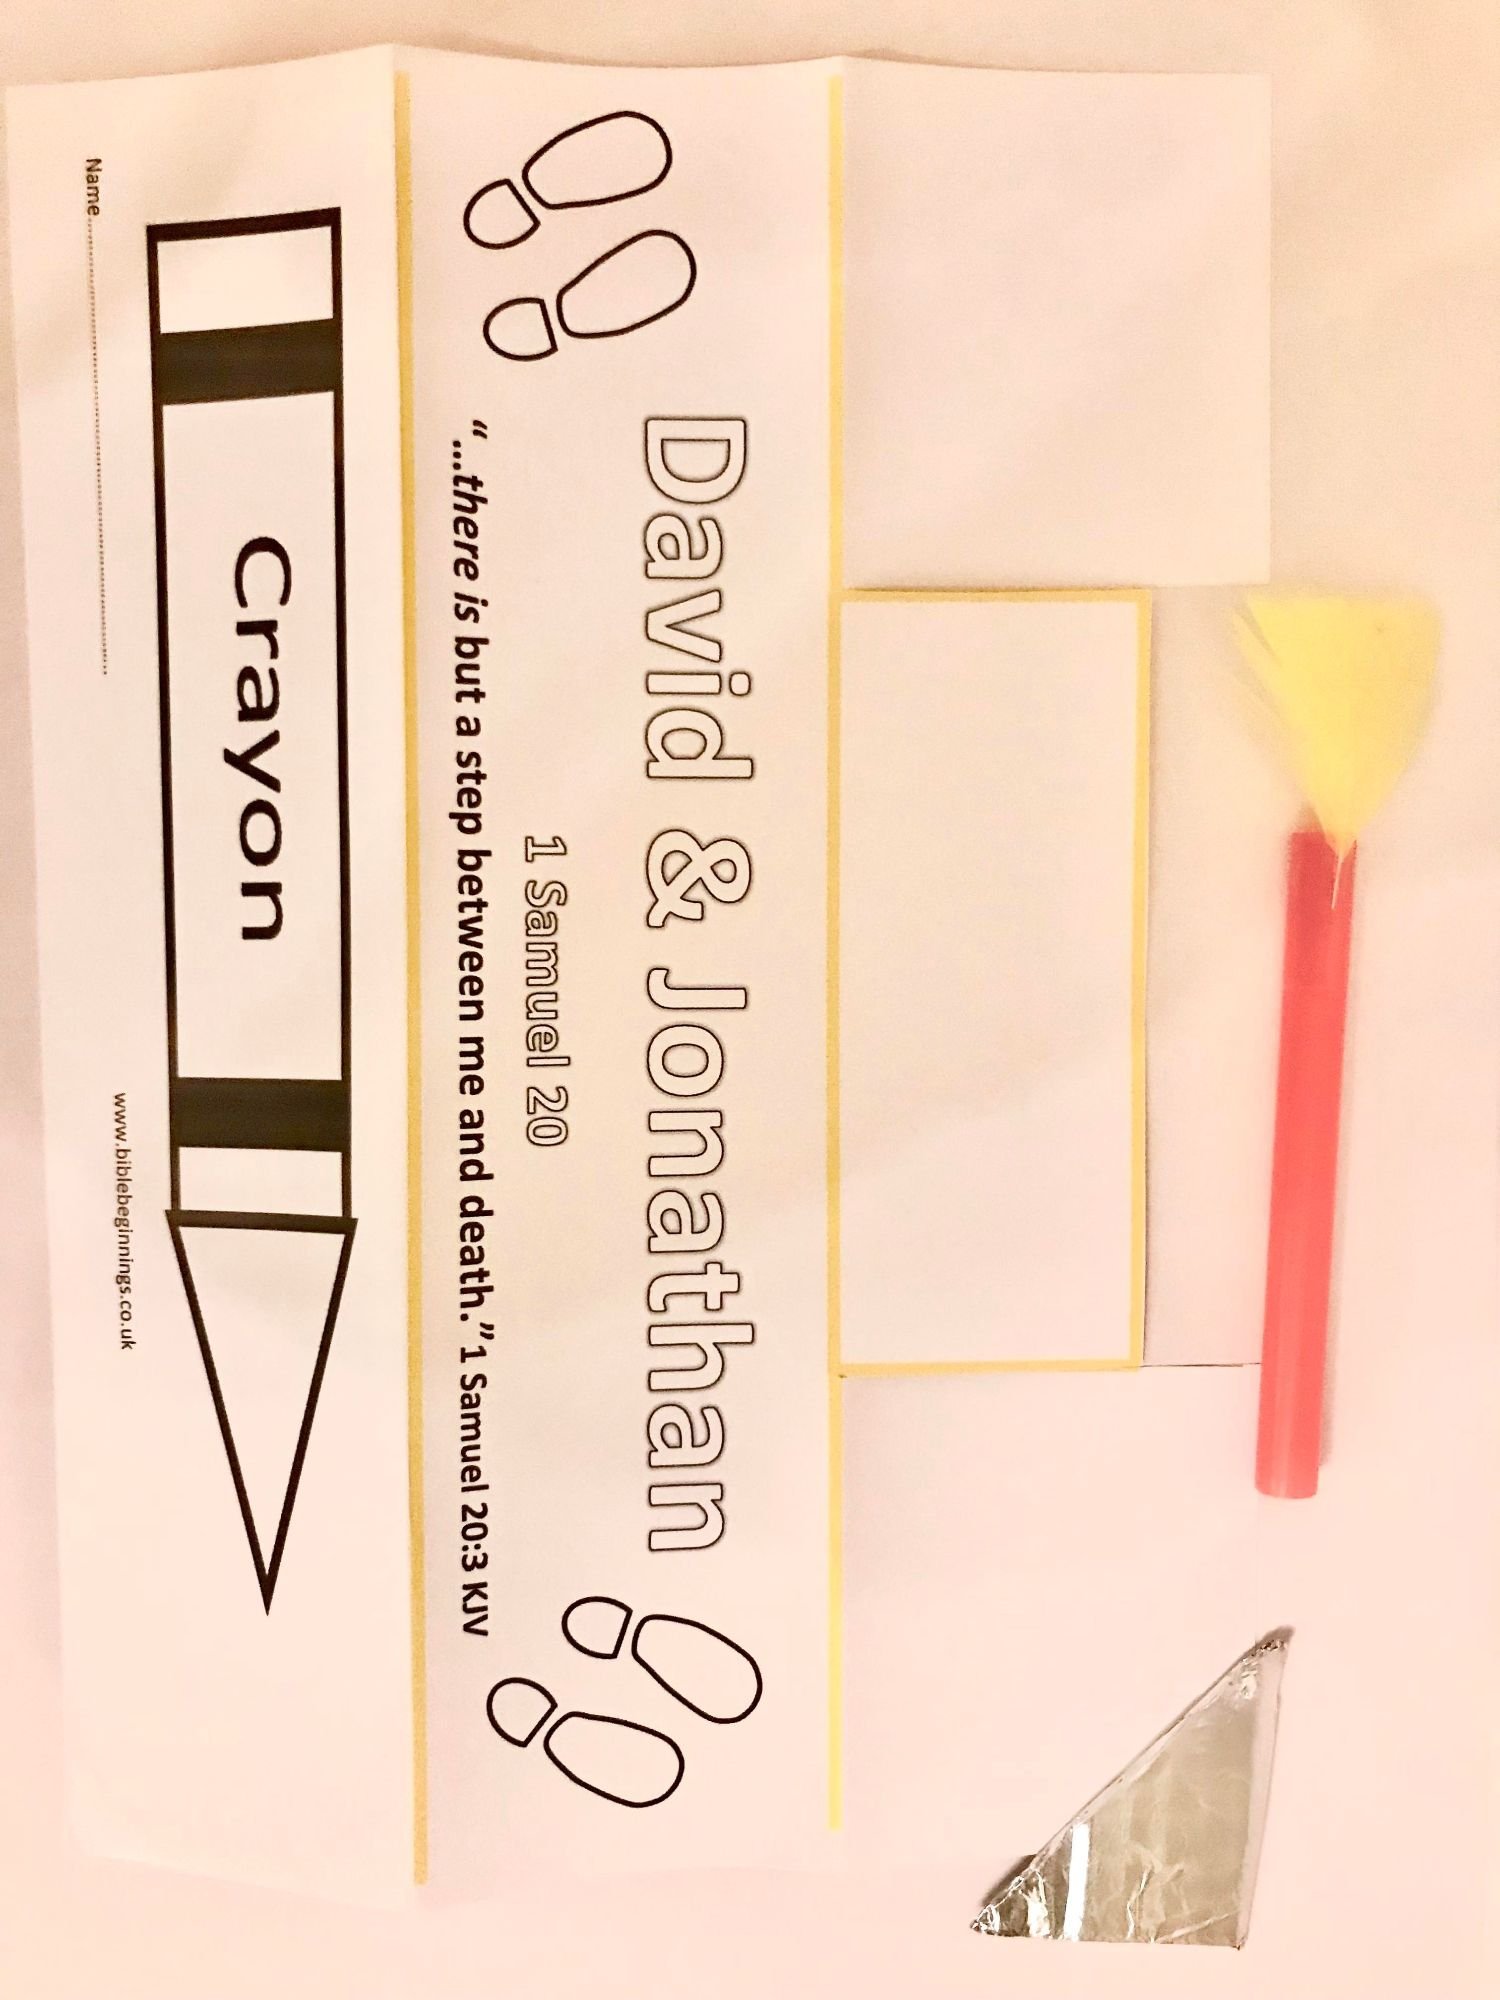
David & Jonathan - A Step From Death
This stand up craft is suitable for the Bible passage in 1 Samuel 20, when David is afraid Saul is going to kill him. Jonathan helps guide David by using a secret signal by shooting arrows. With the Scripture text taken from 1 Samuel 20:3.
Follow the instructions to make this craft:
- Print the Free printable template by clicking HERE. I recommend 160gsm light card, this fits through most inkjet printers easily.
- Cut as directed, remove the small rectangle as instructed and cut down the two sides of the yellow rectangle. This allows the two white sides to be folded back.
- The template is now ready for colouring, after it is coloured, simply fold into a triangular shape, taping the ends together so it can stand up, see image.
- The arrow is made using a straw cut in two, with a piece of feather at one end stuck with tape. At the other end attach an arrow head using double sided sticky foam. I used a traingle of cardboard covered in silver sticky foil. You could use regualr tin foil (aluminium foil). The sticky tape is made for the building industry to seal up insulation sheets.
- The arrow can then be taped onto the top of the front side as shown in the image.
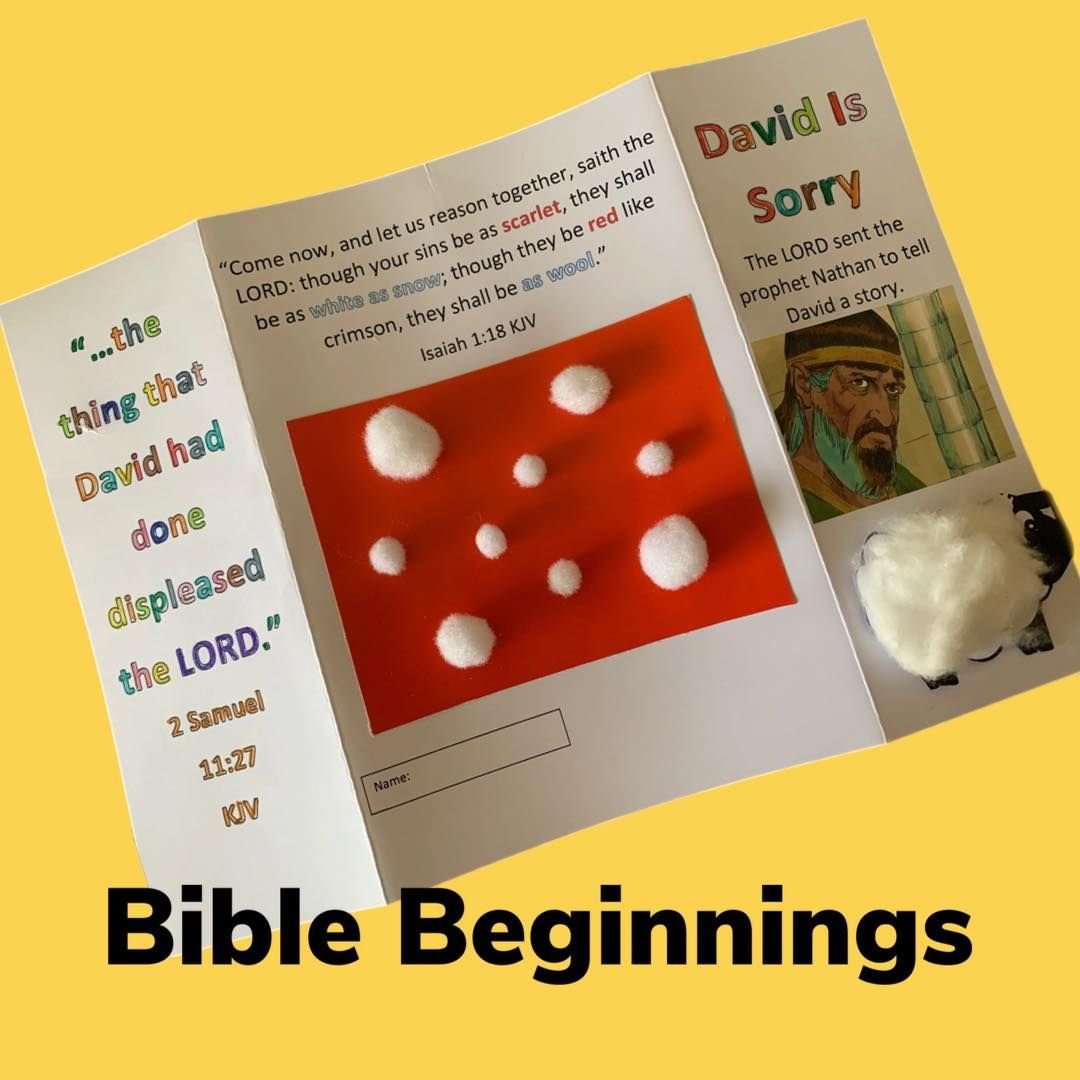
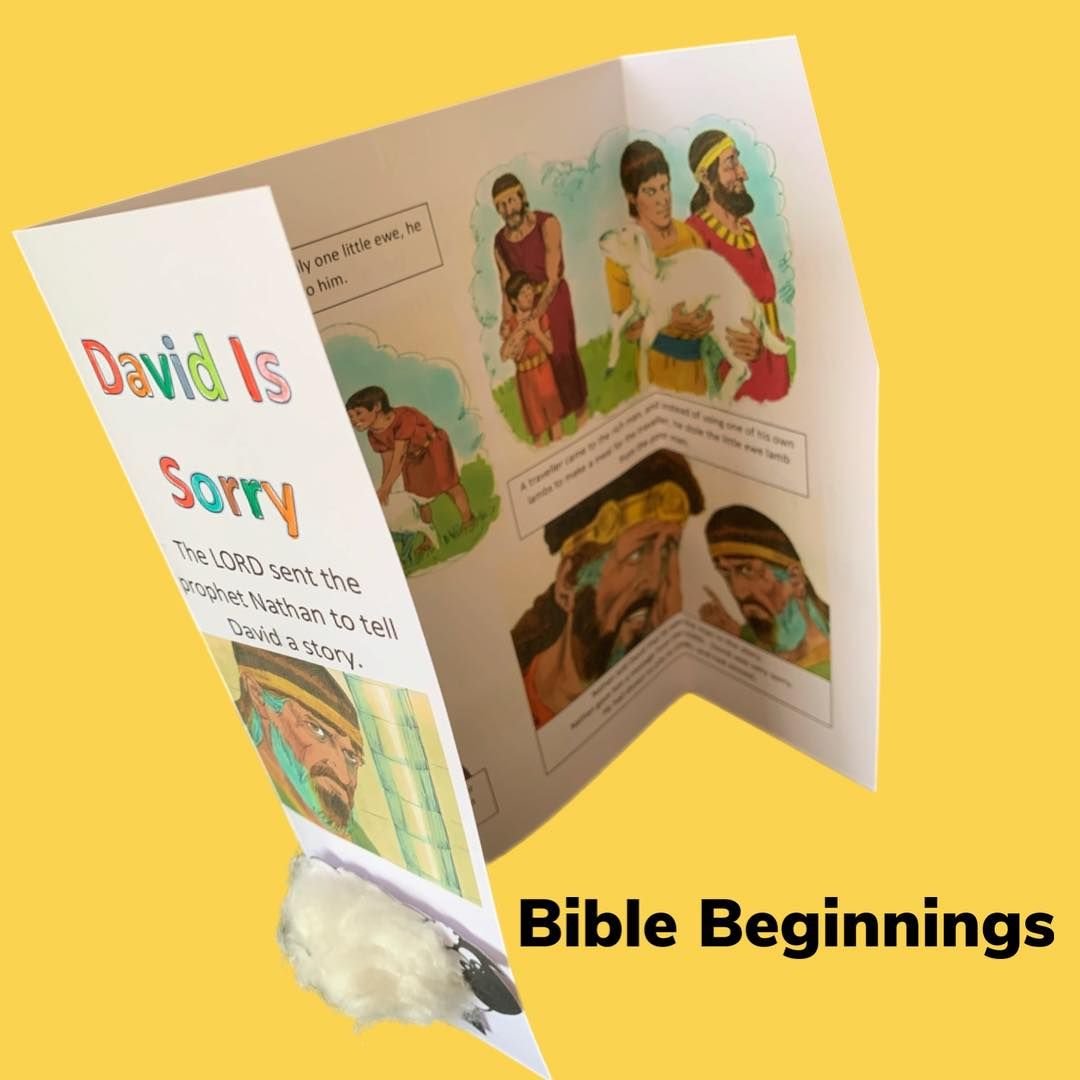
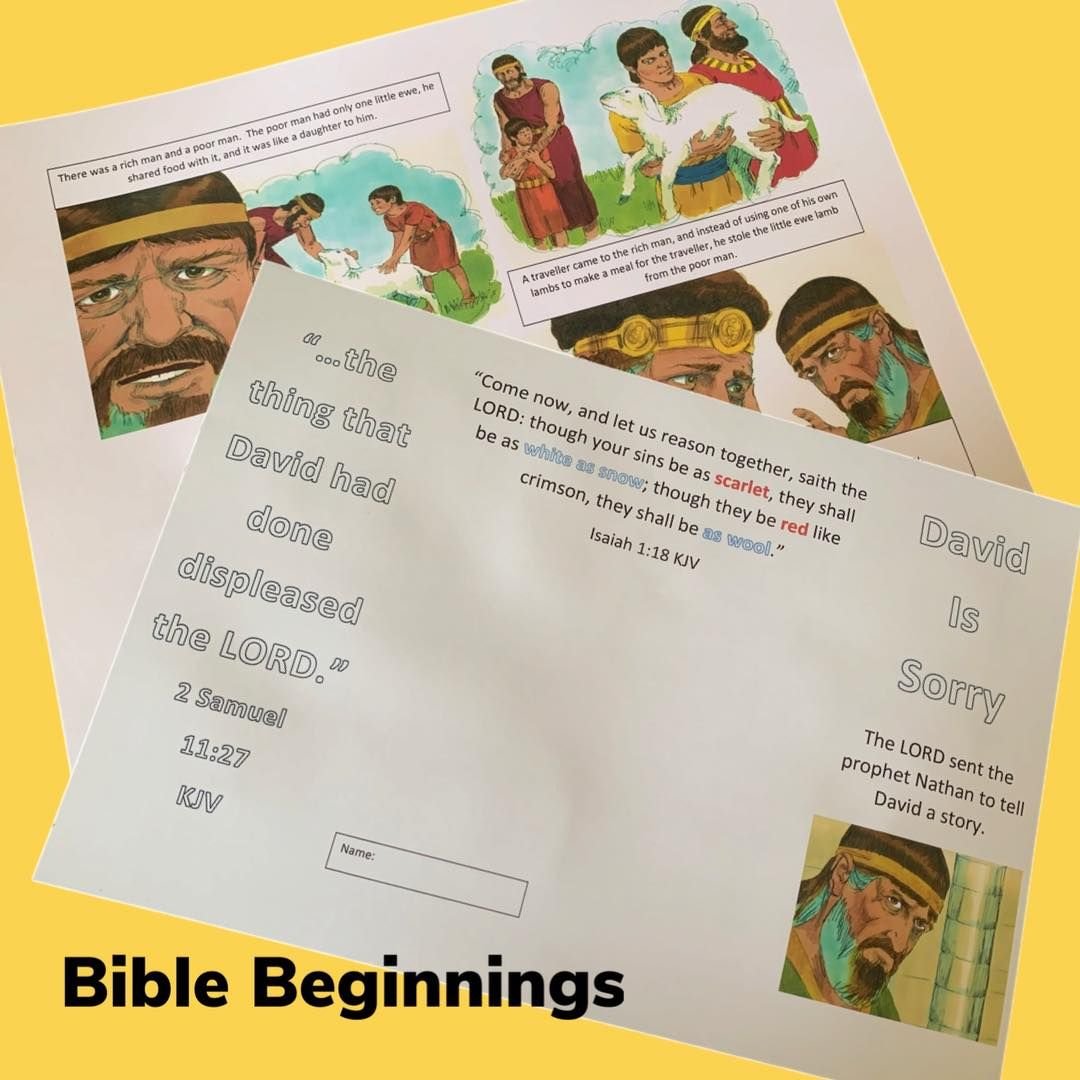
David & Nathan - 2 Samuel 12
This double sided free printable relates the story of Nathan being sent to talk to David after he sinned regarding Uriah, and the story of the pet lamb.
It has a Gospel text on the back, Isaiah 1:18 KJV.
The coloured images are used with permission from Free BIble Images.
To print the free template CLICK HERE.
I recommend you use light card, 160gsm fits eaily through most inkjet printers.
For each child you will requie one A4 sheet of light card. red paper or card, white craft pom poms, glue stick and crayons to colour. If you wish to add a sheep to the front cover (see picture) you can print the free template of multiple sheep by CLICKING HERE. You will also need white pom pom balls for the sheep.
- Fold the A4 story sheet as shown in the images, two side flaps meeting in the centre front. This can be coloured in as shown on picture.
- Cut out a sheep from the above free template. Stick some cotton wool onto the sheep and attach to the front cover as shown.
- Glue a piece of red paper or card to the back cover as shown. Roughly 12 X 9cm works well. Glue on some white "snowballs" using the pom pom balls or some cotton wool, or snowflake stickers. You can use the colours red and white to talk to the children about the Gospel message as you work.
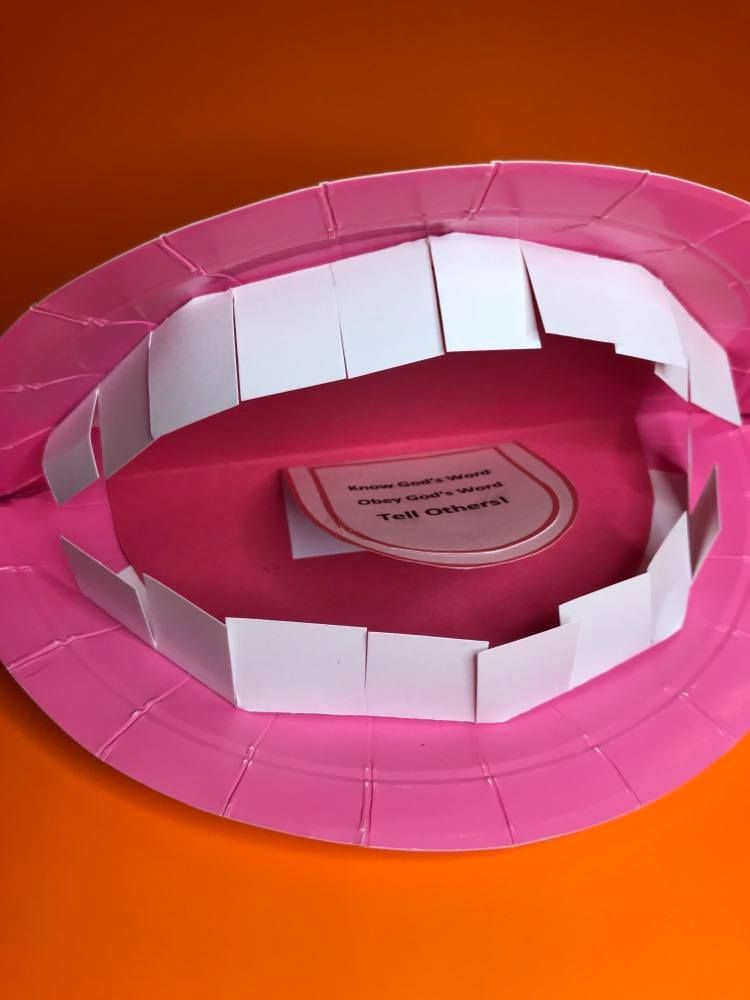
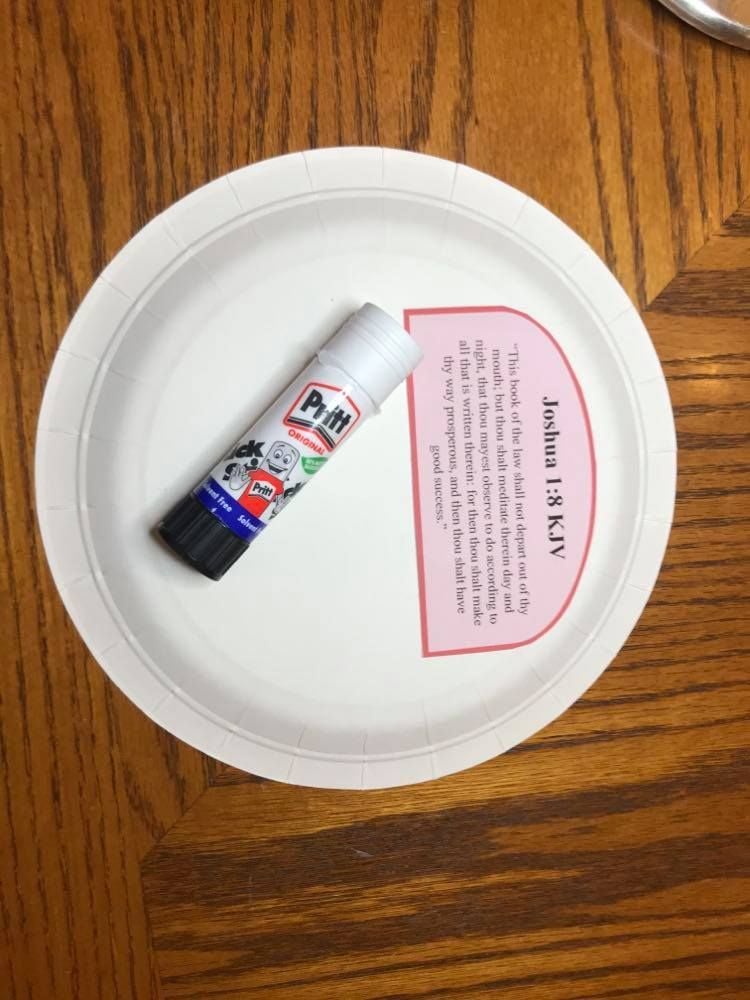
Tell Others About God's Word!
Joshua 1:8 KJV "This book of the law shall not depart out of thy mouth..."
The free PDF printable template can be downloaded by clicking here.
This craft requires you to print one A4 sheet, this will make two crafts. As always I recommend a light card to print on, 160g/M2 fits through most inkjet printers easily, or you could print on paper and glue to a supporting sheet of card after printing.
You can watch a video on how to make this craft on our Instagram or Facebook page.
- You will also require a paper plate. I used a pink one, red would also be good or colour in a white one.
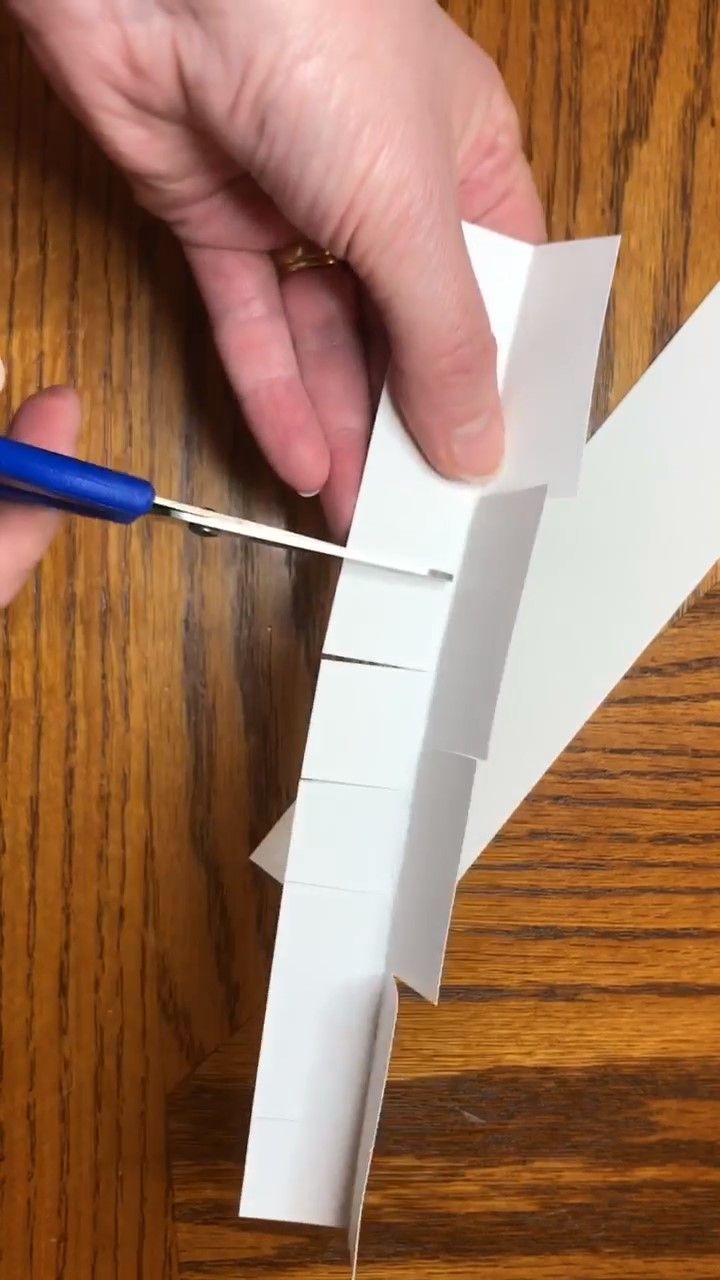
- Cut the three shapes from the PDF free template and glue the largest shape (with the scripture text) to the back of the plate as shown in the second picture, and fold the plate in two.
- Fold the two white strips of card in half lengthwise (see the third picture)and cut one half into four equal sections as shown and the other cut into multiple cut sections to form the teeth.
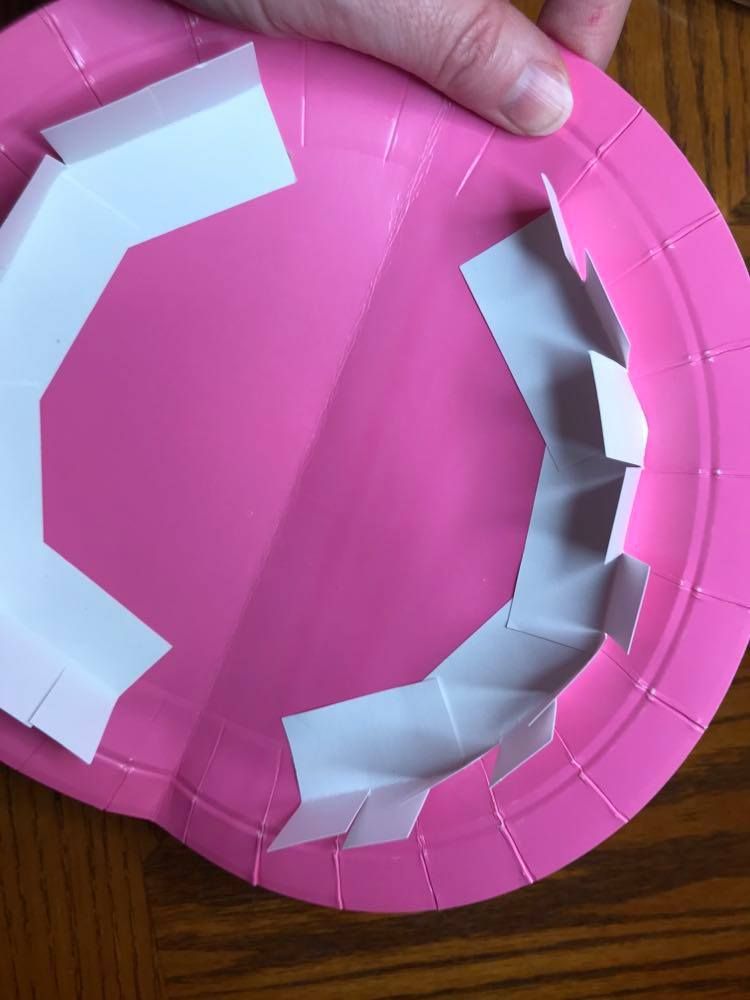
- Now stick the "teeth" down inside the paper plate as shown in the fourth picture, make sure the scripture text on the other side of the plate at the top side.
- Cut out a circle of pink or red paper/card slightly smaller than the inside area of the paper plate. I used a small saucepan lid. Cut the circle out and glue down to the inside central area of the plate.
- Now bend back about 2.5cm of the larger blank cut out from the template sheet and stick it down to form the tongue. You can then glue the smaller cut out shape (with Know, Obey & Tell text) on top of the tongue as shown.
- Lastly, place a staple at either end where the plate folds and smile!
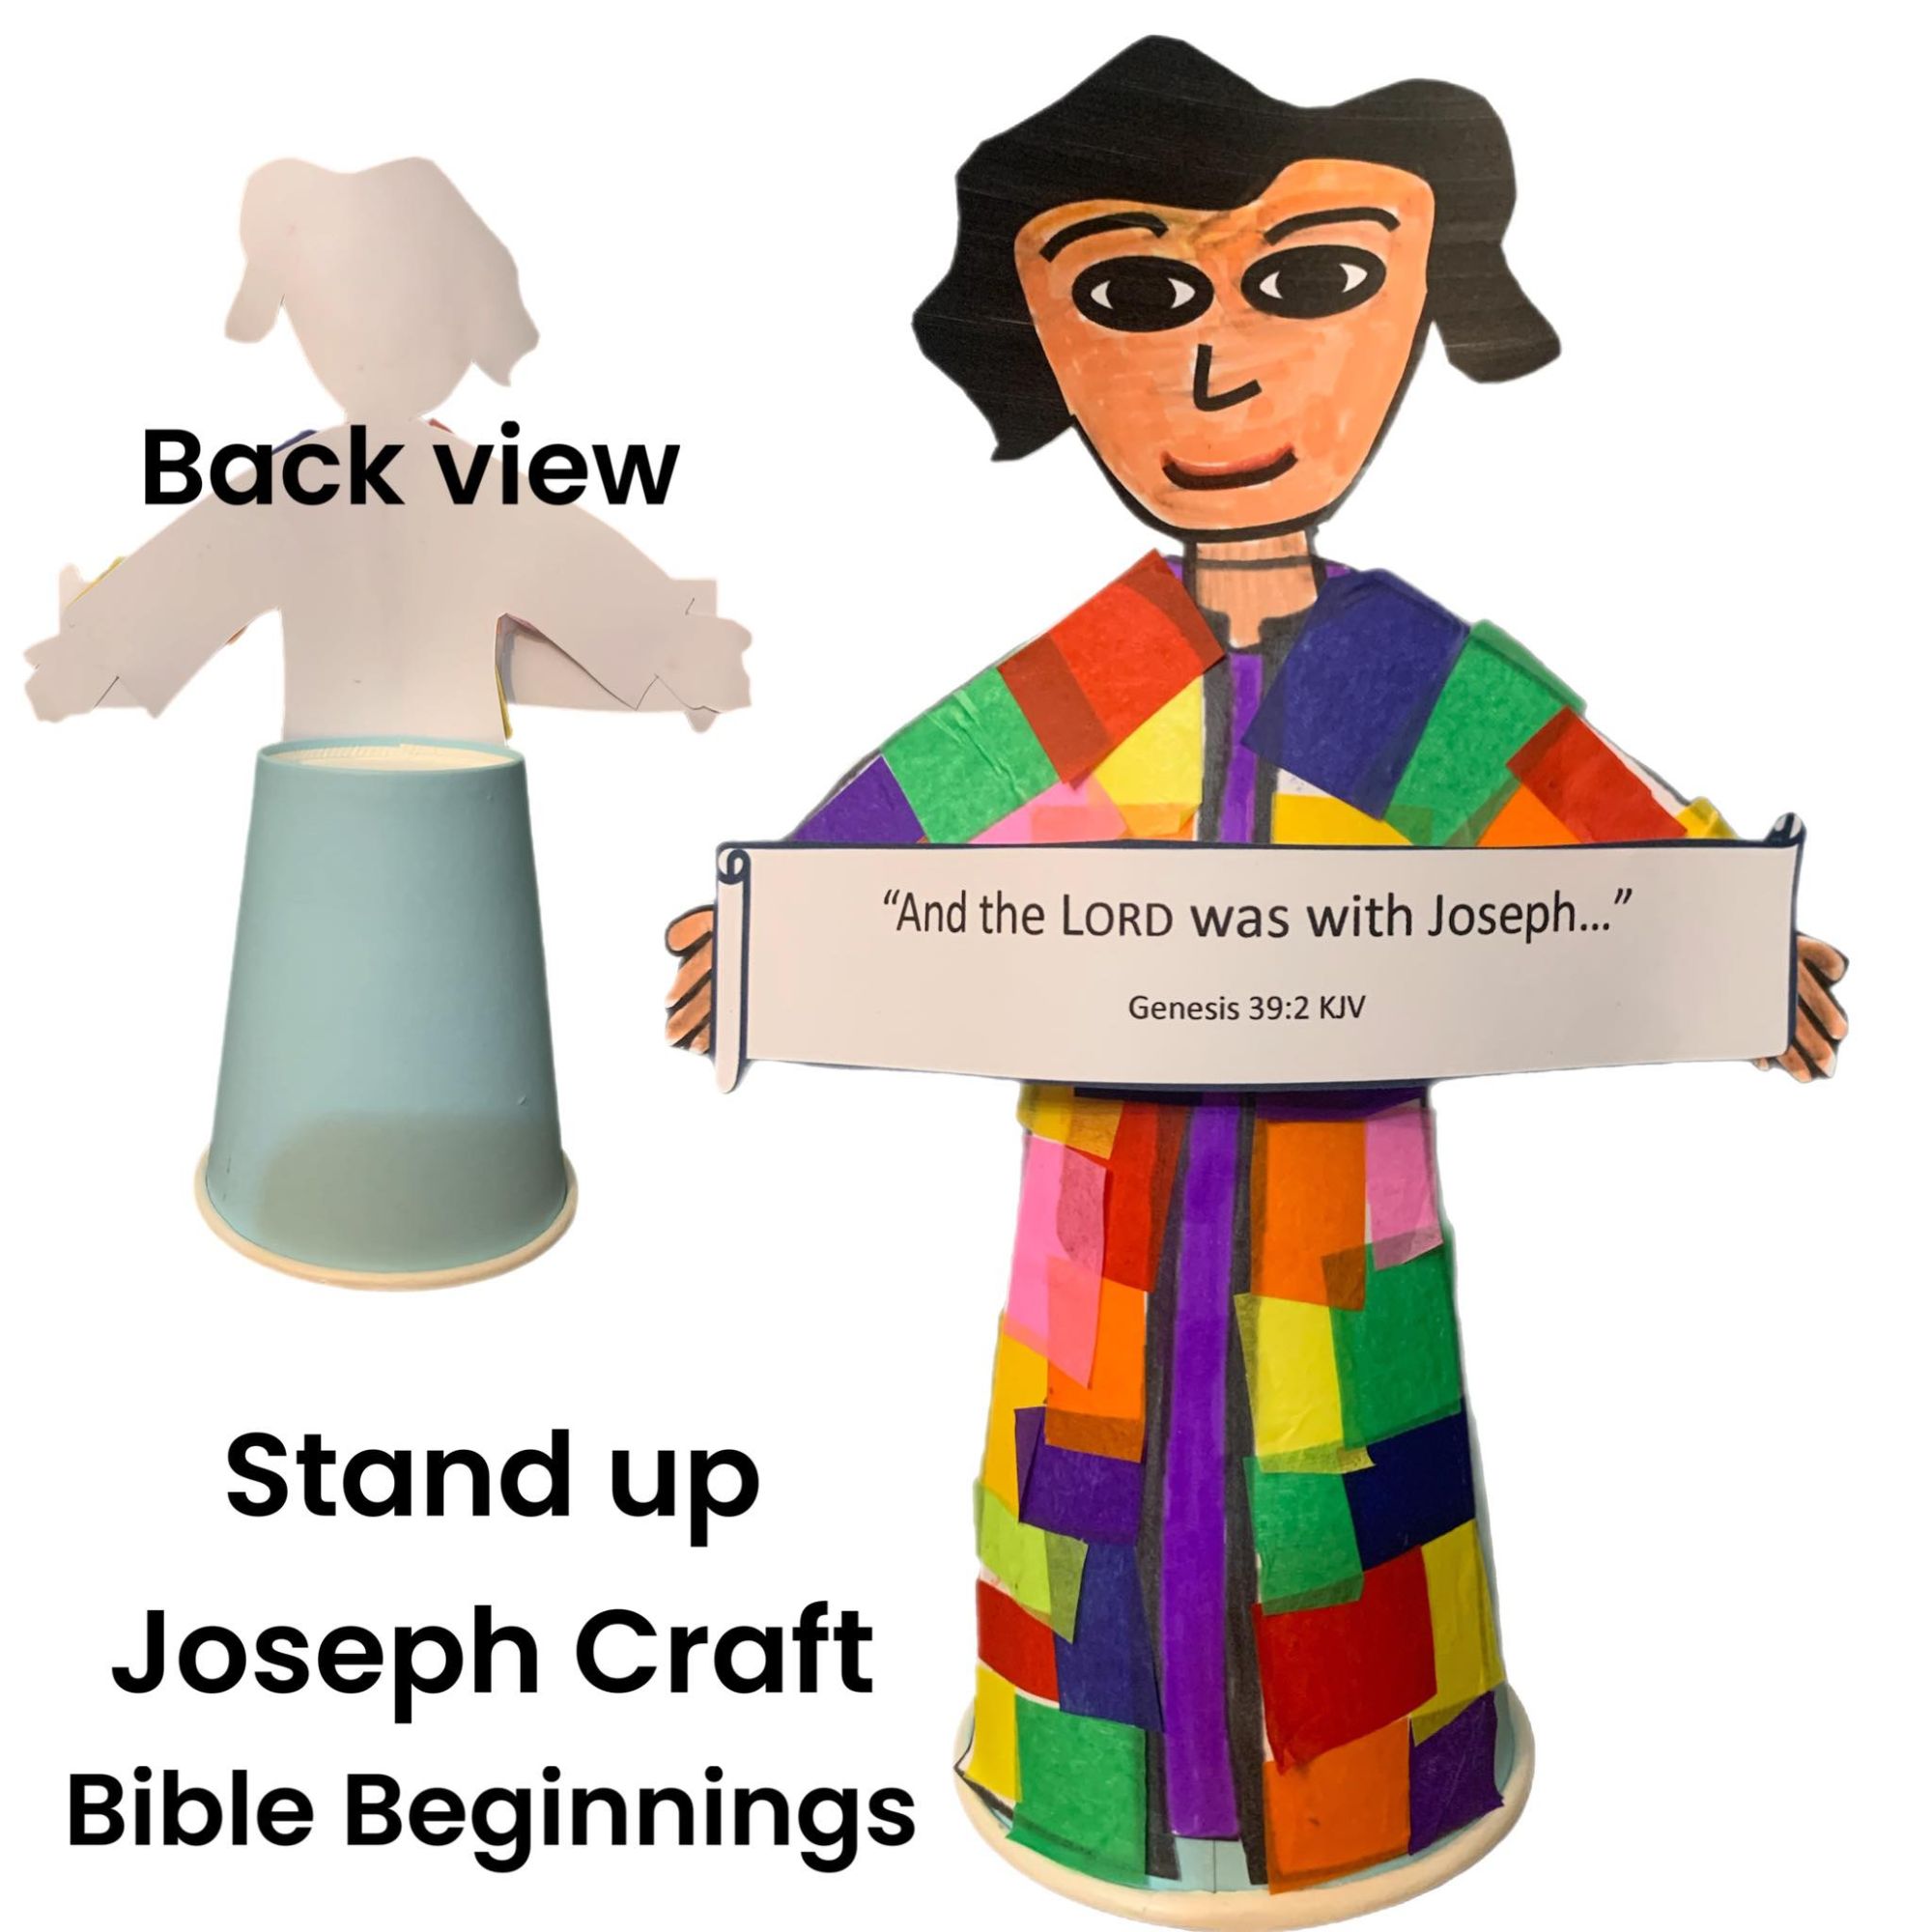
Stand Up Joseph Paper Cup Craft
This cute stand up Joseph craft is suitable for a wide range of ages, it can be made as shown in the picture, with paper mosaic detail or simply coloured in.
Click HERE to print the free template, one A4 sheet per child, 160gsm light card is recommended, this should fit easily through inkjet printers.
You will require the printed template, a paper cup, a glue stick, crayons and an assortment of different coloured paper pieces (tissue paper is good).
- Carefully cut out the template pieces, and colour in.
- Cover the coat area of Joseph with glue and apply paper pieces to create a colourful paychwork effect, see picture.
- Attachone end of the Scripture banner to each of Joseph's hands.
- Stick the Joseph figure to an upside down paper cup as shown in the picture.
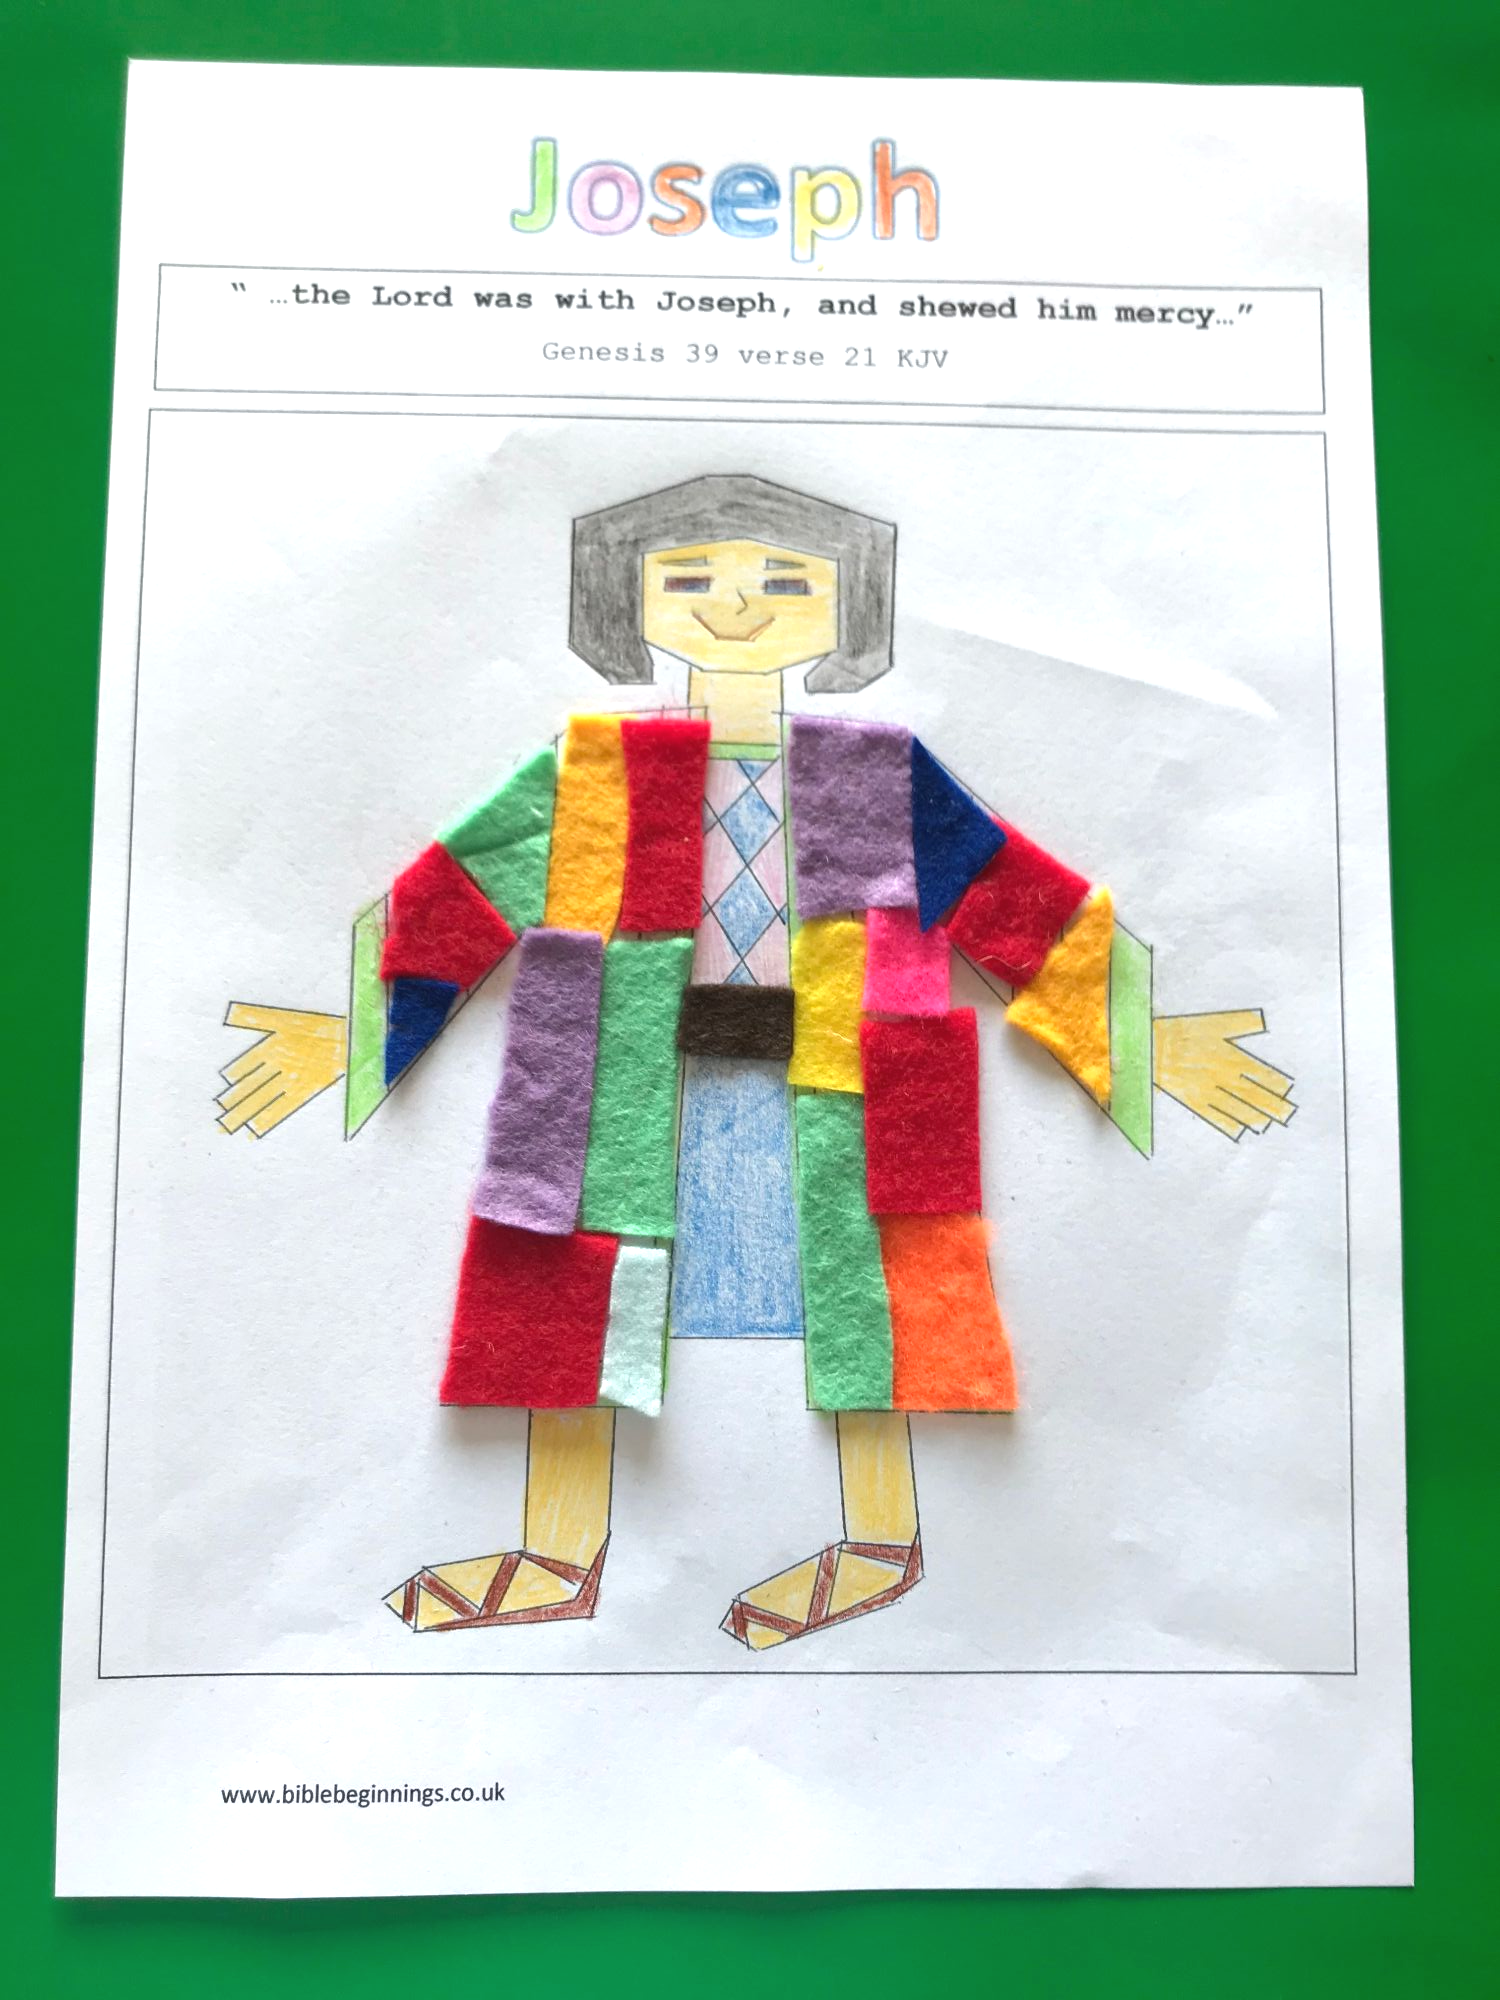
Joseph And The Coat of Many Colours - Genesis 37:3
The PDF template that can be printed free of charge is found here.
Print the free template by clicking on the link above. I recommend printing on light card, 160g/M2 is good and fits through an inkjet printer. Ordinary paper is fine too.
- Colour in the heading and the picture.
You can either colour the coat or you can use cut out pieces of brightly coloured felt or other fabric scraps. Cover the coat area with a suitable glue (Pritt stick is good) and stick the fabric pieces down, they can be cut to shape or just roughly patched on for younger children.
Further ideas:
Use 3D googly eyes, colour the background, use pieces of wool for his hair, just be creative and have fun!
Remember some of the craft items suggested above may not be suitable for children under 3 years of age as they are a potential choking hazzard.
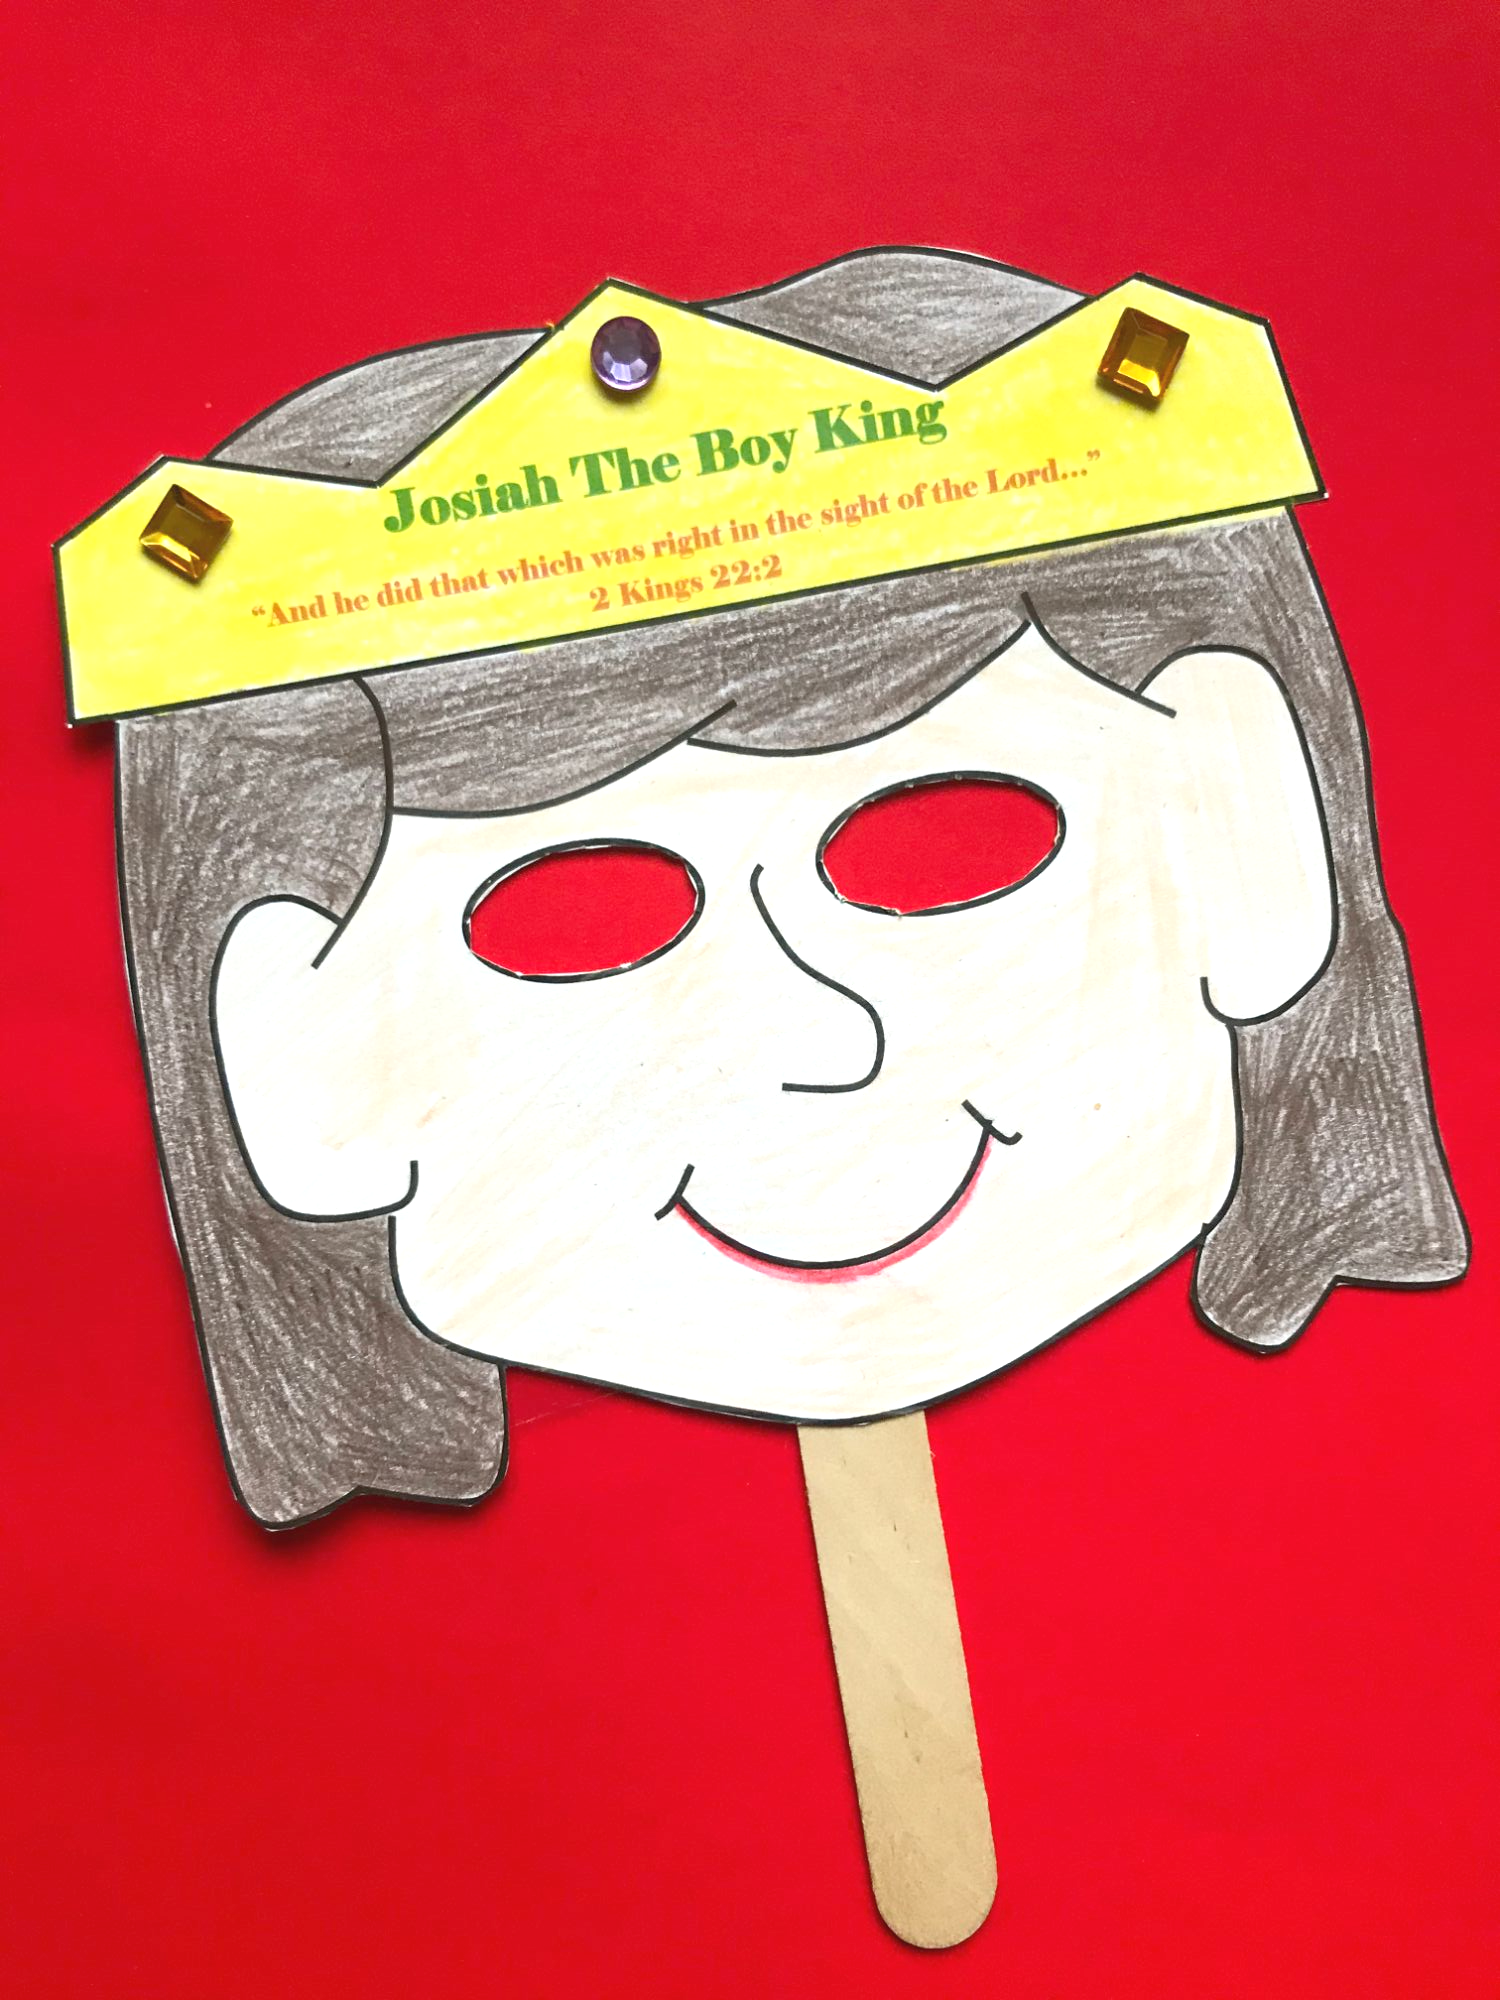
Josiah - The Boy King (2 Kings)
The PDF template can be found here.
Print the template onto light card. I find that the 160 g/M2 weight works well in an injet printer and does not cause paper jams. If you do not have card you could stick two sheets of paper together, ordinary paper will be too flimsy.
Next you will need:
Crayons or colouring pencils, scissors, sticky gem stones, large lolly pop stick, sticky tape.
- Firstly you need cut out the main template. Then cut the eyes out as shown in the picture.
- Next colour in the picture.
- Stick the gem stones onto the crown, this is optional.
- Lastly stick a large lolly pop stick to the back of the craft, roughly half of the stick. Sellotape works well or parcel tape is extra secure.
- Don't forget to write the childs name on the back.
- The children can use this craft as a fun mask, please remember crafts are not suitable for children under 3 years old due to choking hazzards.
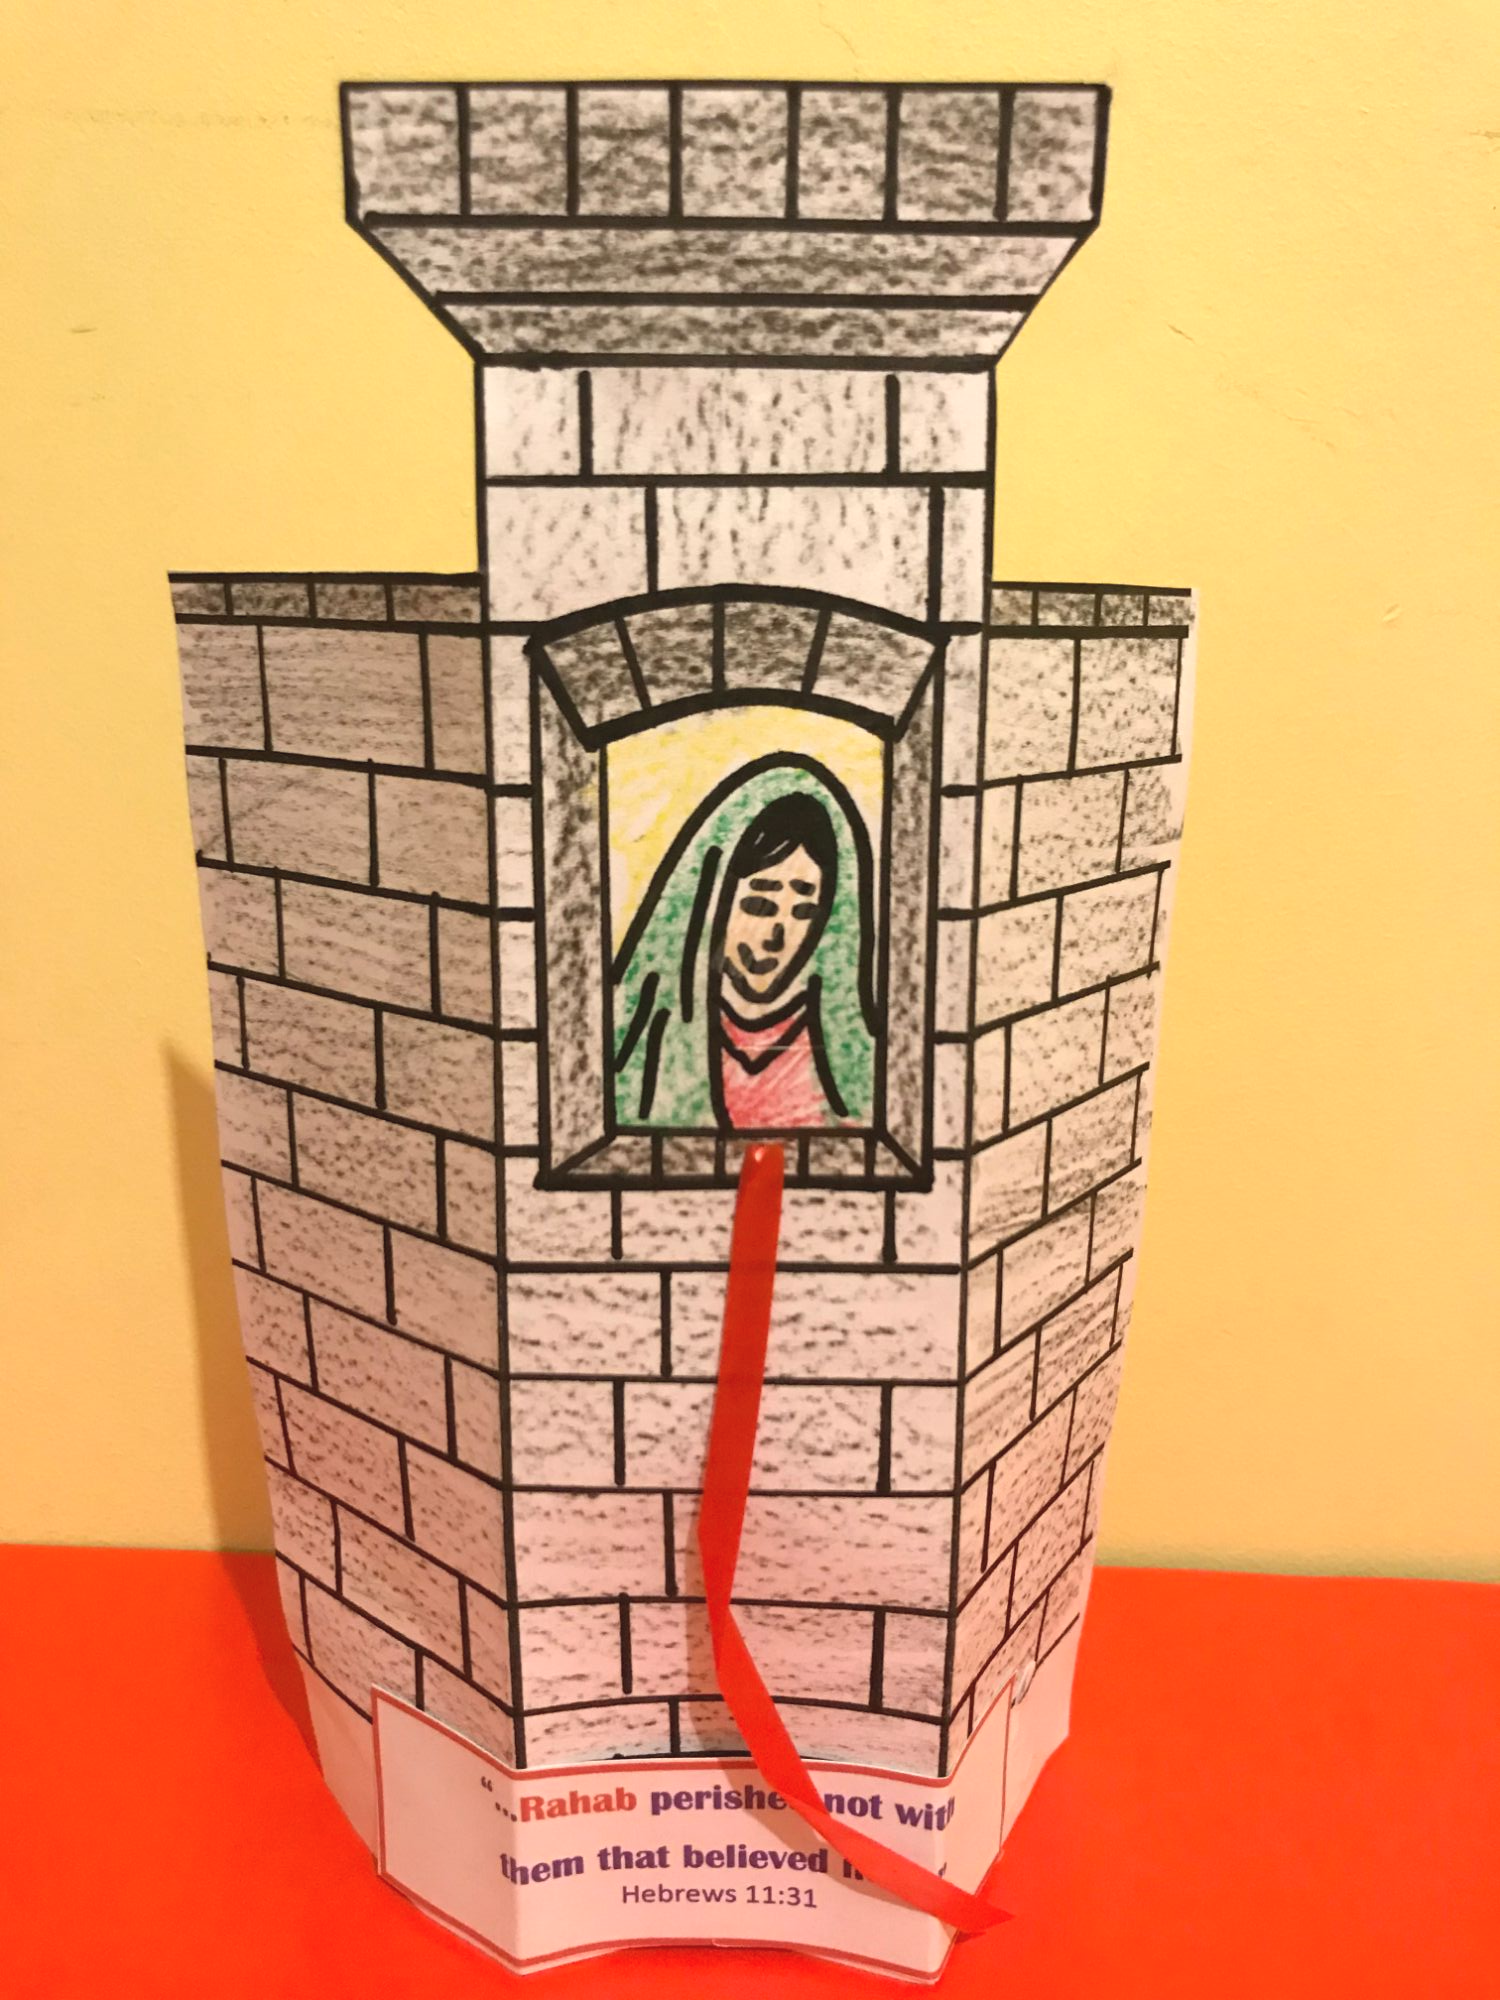
Rahab (Joshua Chapters 2 & 6)
The PDF templates can be found here and here.
Print the PDF above (on light card)which allows you to print two craft templates on one A4 sheet. Cut the two towers out and print others as needed. I recommend 160 g/M2 light card for inkjet printers.
The other link is for the scripture text boxes, twelve boxes can be printed on one A4 sheet. These need to be cut into individual boxes. Paper or card are both suitable.
Next you will need:
Colouring pencils or crayons, red curling ribbon, double sided tape or glue stick.
- It is useful to have a small slit cut in each tower in advance, this should be slightly bigger than the width of the curling ribbon. The slit should be placed at the bottom of the window as shown in the picture.
- The children colour the craft.
- Tie a knot at one end of a lenght of curling ribbon, and slit through the hole made earlier. The knot should be at the back and big enough to stop the curling ribbon from falling out.
- Attach the verse to the bottom of the tower as shown, either with double sided tape which can be attached to the scripture box in advance, or with a glue stick.
- Carefully fold the tower into three walls as shown in the picture, the tower should stand upright.
- Write the childs name on the back.
- Remember this craft will not be suitable for children under 3 years - choking hazzard.
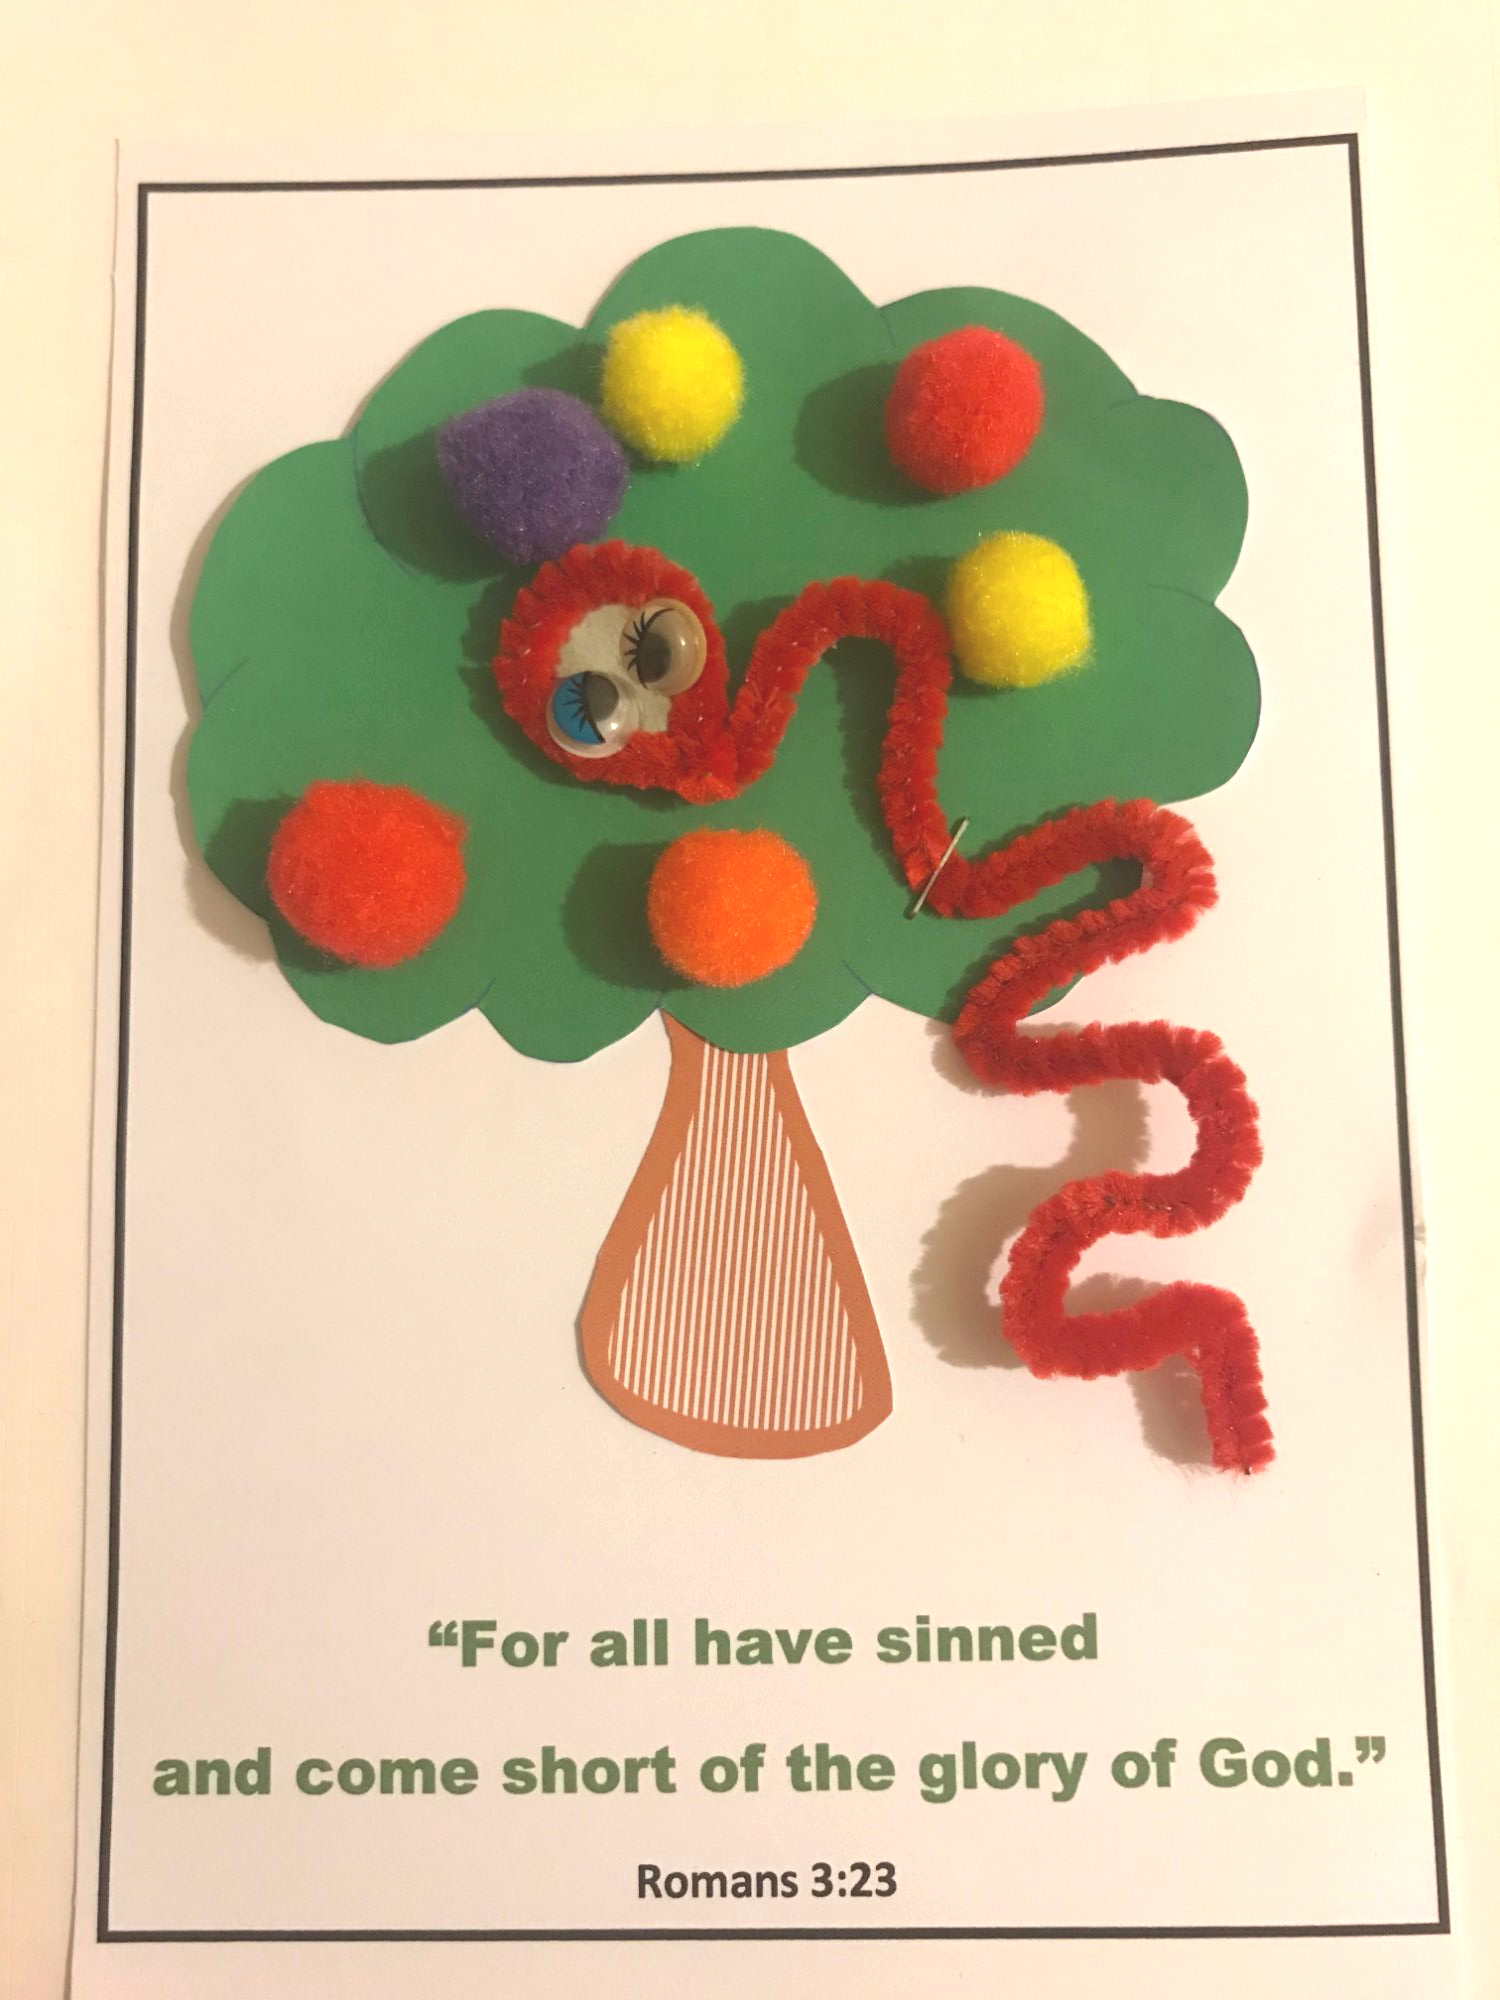
The Garden Of Eden - The Serpent Tempts Eve (Genesis Chapter 3)
The PDF templates can be found here.
You can print off two background sheets (with the memory verse) on one A4 page and four sets of tree trunks and tree tops on another A4 page.
Cut the background sheet into two, then cut out the parts of the tree with scissors.
Next you will need:
1 pipe cleaner, some coloured card, craft wiggly eyes, small coloured balls, stapler, glue dots, glue or double sided tape.
- Cut out a small circle to form a base for the serpents head and then form a circle the same size as the card circle at one end of the pipe cleaner. Shape the remaining lenghth of pipe cleaner as shown in the picture. Stick the circle end of the pipe cleaner to the card circle with glue dots, then stick on two eyes with glue dots as shown.
- The tree trunk needs to be stuck down to the page first and then the tree top is placed on the page, slightly overlapping the tree trunk edges. You can use either double sided tape or glue sticks. Double sided tape is a good option if you are working with very young children and are short on help as the glue sticks can be very messy!
- Use glue dots to stick the "fruits" onto the tree. I like to remind the children that the Bible does not tell us what kind of fruit it was or what colour etc. They can be creative!
- Finally the serpent can be stapled into place as shown or as you prefer.
I have made this craft in the past with a black piece of card stuck behind the tree. This would be helpful for teaching younger children if you have been using colours to teach them the basics about the Gospel, a black background will help them to remember they have been learning about sin.
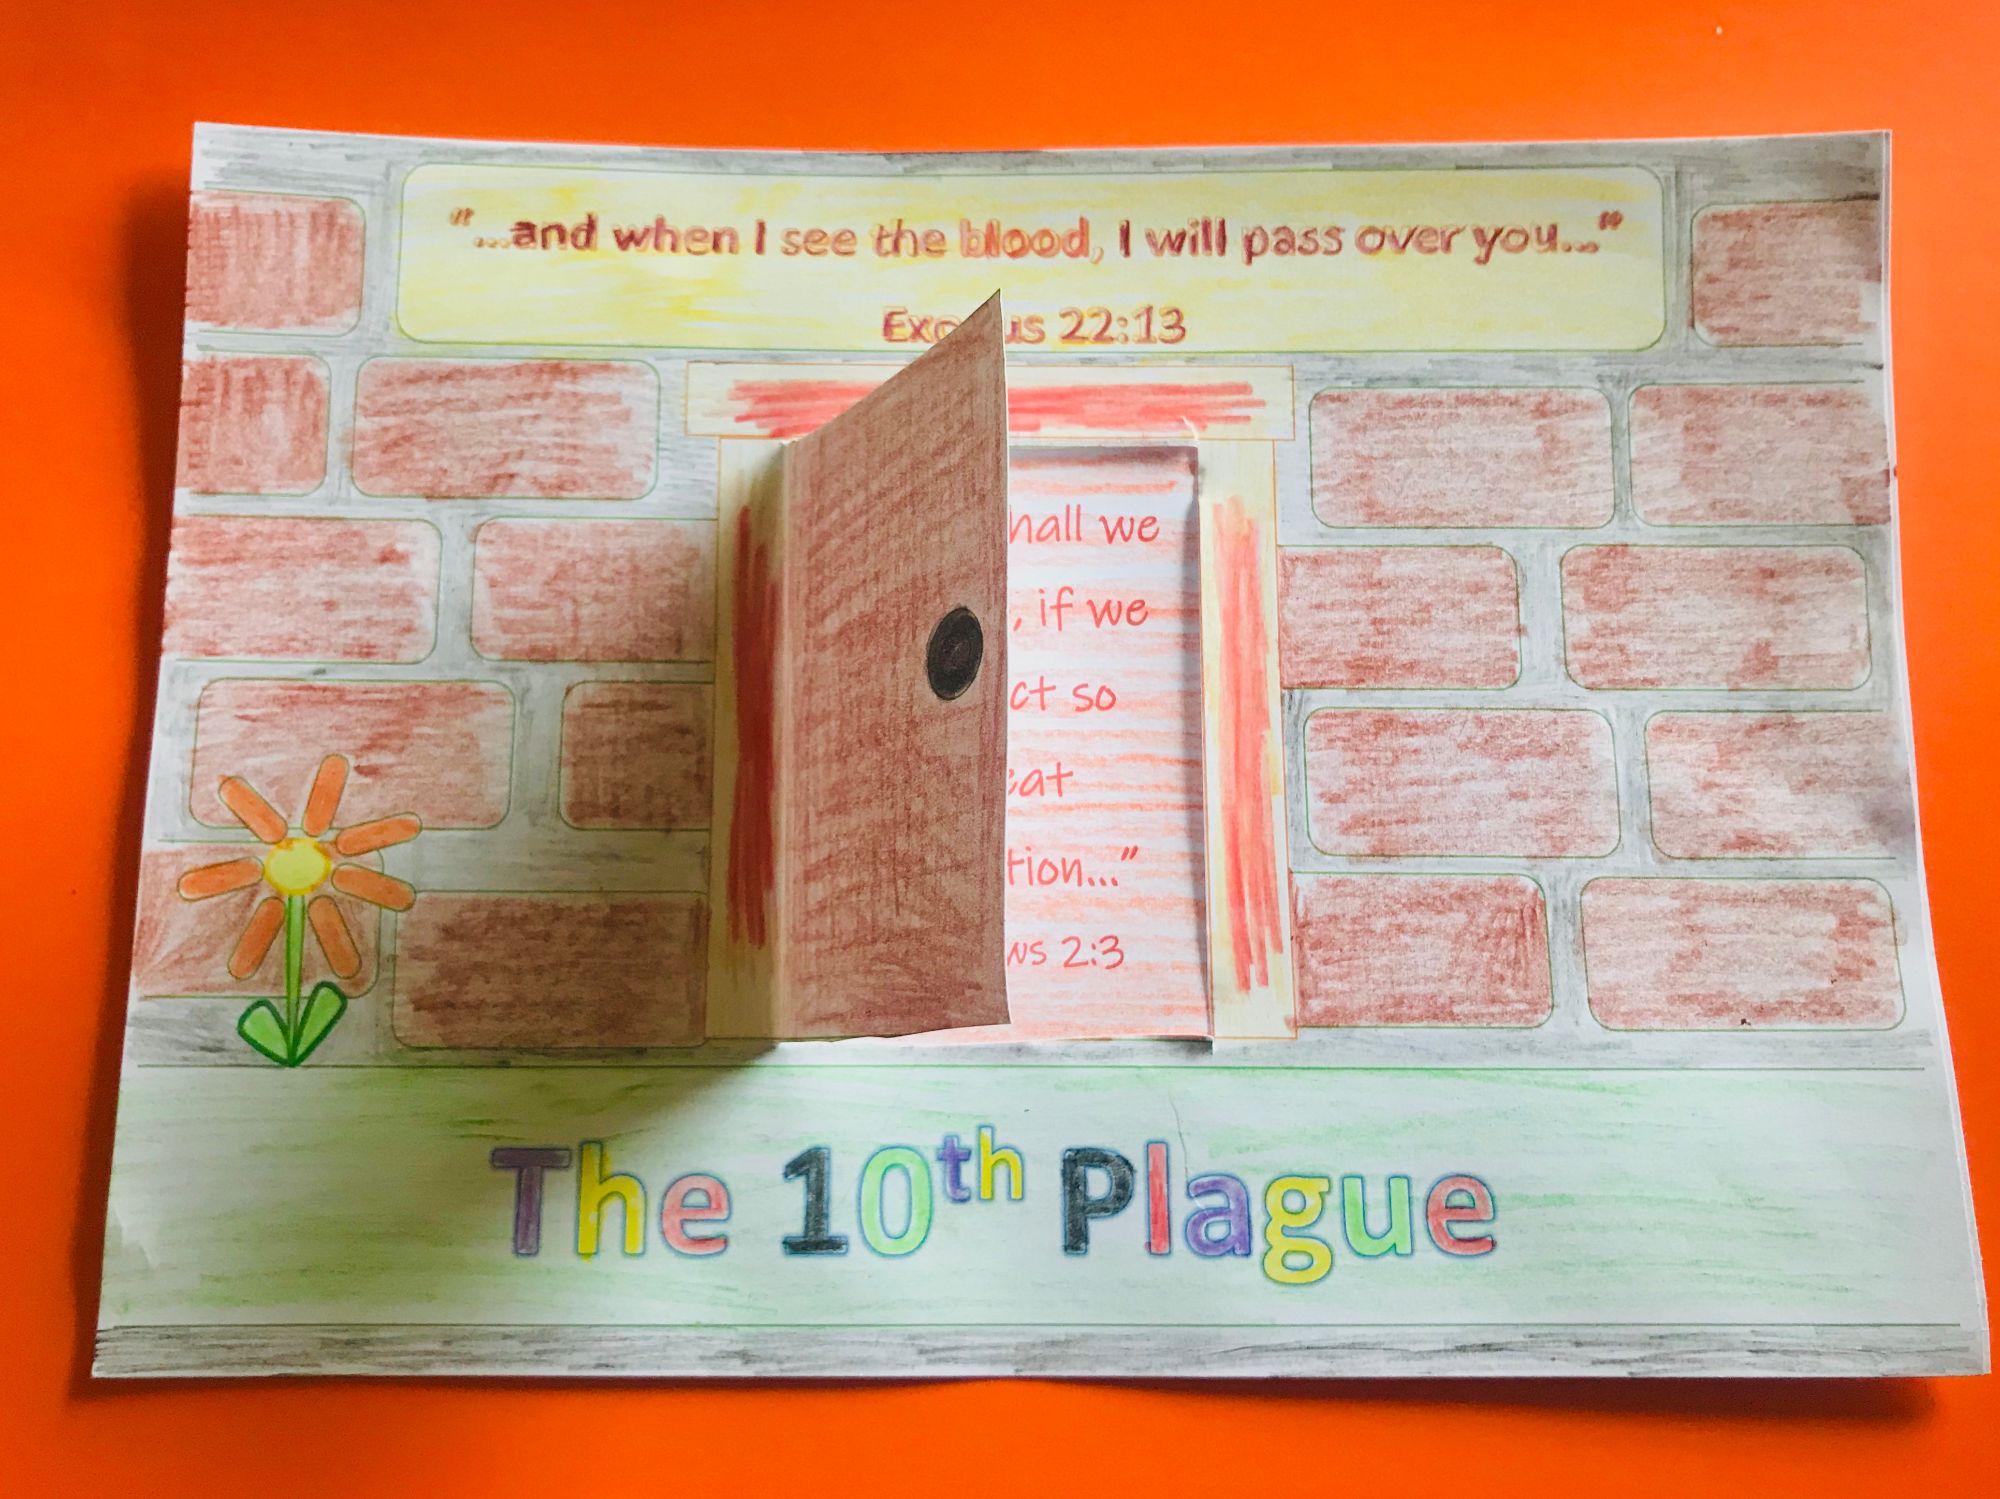
The 10th Plague - The Passover (Exodus Chapter 22:13)
The PDF templates can be printed by clicking here.
This craft requires you to print 2 full A4 sheets per child. As always, I recommend light card (160g/M2 fits smoothly through an inkjet printer) but paper is fine.
Start off by getting the children to colour in, there is a lot of detail to colour on the cover sheet, if you have limited time with the children suggest they finish the details at home later.
The door needs to be cut around on the three sides as shown in the picture opposite, the vertical left hand side of the door does not need cut. This allows the door to open and close, fold over neatly along the uncut side. The best way to slit the door opening neatly is to use a paper trimmer.
The under sheet will have printed instructions on it as to where to apply glue, a Pritt/hard glue stick is good for this. If you want to avoid a mess and be very organised you could cut some strips of double sided tape and apply them to the areas to be glued. The children then simply need to peel the tape off and stick sheets together.
Once the sheets are stuck together (obviously no glue/tape should be applied to the door areas) the door should open and close and reveal the scripture text, this has been included to help the children relate the lesson to their own need of salvation.
Remember to be careful with children under 3 years of age regarding choking hazzards and the use of scissors and glue.
You could add some further embellishments such as small wooden craft sticks as door posts, stickers or a gemstone as a door handle and in the centre of the flower.